2022年3月15日~3月29日に開催された中高生向けのCTF大会、picoCTFの[Forensics]分野のwriteupです。 その他のジャンルについてはこちらを参照。
Enhance!
Download this image file and find the flag.
drawing.flag.svg が配布されます。
テキストファイルで開いたら、後ろの方に飛び飛びにFlagが見えたので、これをつなげれば答え。
File types
This file was found among some files marked confidential but my pdf reader cannot read it, maybe yours can.
Flag.pdf が配布されます。
PDFとして開こうとすると警告が出るので、fileコマンドでファイルタイプを調べます。
$ file Flag.pdf
Flag.pdf: shell archive text
shell archive textは、そのまま /bin/sh で実行すれば良いので
$ ./Flag.pdf
x - created lock directory _sh00046.
x - extracting flag (text)
./Flag.pdf: 119: uudecode: not found
restore of flag failed
flag: MD5 check failed
x - removed lock directory _sh00046.
おや、uudecode というのが必要らしい。
installして再度
$ ./Flag.pdf
x - created lock directory _sh00046.
x - extracting flag (text)
x - removed lock directory _sh00046.
$ ls
flag  Flag.pdf
$ file flag
flag: current ar archive
今度はcurrent ar archiveというのが生成された。こちらを見ながら、memberを抽出してみます。
$ ar -v -x flag
x - flag
$ file flag
flag: cpio archive
ファイル名が変わらなかったから気づかなかったけど、今度は cpio archive というのになっていました。
今度はこちらを参考にして、cipoからtarファイルを取り出してみます。
$ mkdir tmp
$ cpio -iv -D tmp < flag
flag
2 blocks
$ ls tmp
flag
$ file tmp/flag
flag: bzip2 compressed data, block size = 900k
今度はbzip2。こちらまたリネームしてから解凍してみます。
$ cd tmp
$ bzip2 -d flag
bzip2: Can't guess original name for flag -- using flag.out
$ file flag.out
flag.out: gzip compressed data, was "flag", last modified: Tue Mar 15 06:50:41 2022, from Unix, original size modulo 2^32 326
今度はgzip。
$ mv flag flag.gzip
$ gzip -d flag.gzip
gzip: flag.gzip: unknown suffix -- ignored
$ zcat flag.gzip
LZIP
...(omit)...
普通のgzipでは解凍できなかったので中身を詳細に見てみると、LZIPというファイルらしい。
$ cat flag.out
A70bflagF��LZIP
                O�'6��=�n�X�Cܣ5k�gY��;"��i�?�(;Y&��F9%
...(omit)...
$ zcat flag.out
LZIP
        O�'6��=�n�X�Cܣ5k�gY��;"��i�?�(;Y&��F9%
zcatの出力とcatの出力を比べてみると、lzipとして認識されるためにはマジックの前に何やら不要なデータが入ってそう。LZIPの前のデータをバイナリエディタで削除して、lzipとして解凍してみました。
$ lzip -v -d flag.out
lzip: Can't guess original name for 'flag.out' -- using 'flag.out.out'
  flag.out: done
$ file flag.out.out
flag.out.out: LZ4 compressed data (v1.4+)
今度はLZ4 compressed data。
$ lz4 -d flag.lz4 flag.out
flag.lz4             : decoded 263 bytes
$ file flag.out
flag.out: LZMA compressed data, non-streamed, size 25
まだまだ続きます…。解凍ツールがない場合は都度インストールしつつ、最後まで走り抜けました。
$ lzma -d -c flag.lz > output
$ file output
output: lzop compressed data - version 1.040, LZO1X-1, os: Unix
$ lzop -d output -o flag.lzop
$ file flag.lzop
flag.lzop: lzip compressed data, version: 1
$ lzip -d flag.lzop -o flag
$ file flag
flag: XZ compressed data
$ unxz flag.xz
$ ls
flag
$ file flag
flag: ASCII text
$ cat flag
7069636f4354467b66316c656e406d335f6d406e3170756c407431306e5f
6630725f3062326375723137795f39353063346665657d0a
$ echo 7069636f4354467b66316c656e406d335f6d406e3170756c407431306e5f6630725f3062326375723137795f39353063346665657d0a | xxd -r -p
picoCTF{f1len@m3_m@n1pul@t10n_f0r_0b2cur17y_950c4fee}
Lookey here
Attackers have hidden information in a very large mass of data in the past, maybe they are still doing it.
anthem.flag.txtというファイルが配布されます。詩っぽいものがダーッと書いてある長いファイルですが、picoで検索するとすぐflagが出てきました。
これが welcome 問題だったのかな。
Packets Primer
Download the packet capture file and use packet analysis software to find the flag.
pcap解析問題です。network-dump.flag.pcapが配布されます。たったの9通信。
wiresharkで開いて通信ごとに確認しても良いし、strings コマンドで文字列を抽出しても良し。どちらにしても一字飛びですがflagがすぐに見つかります。
Redaction gone wrong
Now you DON’T see me. This report has some critical data in it, some of which have been redacted correctly, while some were not. Can you find an important key that was not redacted properly?
Financial_Report_for_ABC_Labs.pdfが配布されます。かなり黒塗りされています。

黒塗りが外せるかトライしてみます。
strings コマンドで内容を確認してみると、
<</CreationDate (D:20210717194411Z00'00') /Creator (Word) /ModDate (D:20210717214449+02'00') /Producer (macOS Version 11.4 \(Build 20F71\) Quartz PDFContext) /Title (Microsoft Word - Financial Report for ABC Labs.docx) >>
という文言が。wordで作成されたようなので、wordで開き、黒塗り部分の文字を白くしてみると

flagが出ました。
Sleuthkit Intro
Download the disk image and use
mmlson it to find the size of the Linux partition. Connect to the remote checker service to check your answer and get the flag.Note: if you are using the webshell, download and extract the disk image into
/tmpnot your home directory.
- Download disk image
- Access checker program:
nc saturn.picoctf.net 52279
disk imageが配布されます。解凍して、指定の通りmmlsで見てみます。
$ mmls disk.img
DOS Partition Table
Offset Sector: 0
Units are in 512-byte sectors

      Slot      Start        End          Length       Description
000:  Meta      0000000000   0000000000   0000000001   Primary Table (#0)
001:  -------   0000000000   0000002047   0000002048   Unallocated
002:  000:000   0000002048   0000204799   0000202752   Linux (0x83)
あとはcheckerに接続して問題を出してもらいます。
$ nc saturn.picoctf.net 52279
What is the size of the Linux partition in the given disk image?
Length in sectors:
Linux partition の Length in sectors` を聞かれているので、先程のmmlsの結果を見ながら値を入れるとフラグがもらえました。
St3g0
Download this image and find the flag.
タイトルからして、ステガノ系のようです。pico.flag.pngが配布されます。

stego-toolkitで色々試そうとしたところ、一発目のzstegで出てきました。
# zsteg -a pico.flag.png
b1,r,lsb,xy         .. text: "~__B>VG?G@"
b1,rgb,lsb,xy       .. text: "picoCTF{7h3r3_15_n0_5p00n_a9a181eb}$t3g0"
Sleuthkit Apprentice
Download this disk image and find the flag.
Note: if you are using the webshell, download and extract the disk image into
/tmpnot your home directory.
disk image が配布されます。
ファイルを解凍して、mmlsコマンドで確認してみます。
$ mmls disk.flag.img
DOS Partition Table
Offset Sector: 0
Units are in 512-byte sectors

      Slot      Start        End          Length       Description
000:  Meta      0000000000   0000000000   0000000001   Primary Table (#0)
001:  -------   0000000000   0000002047   0000002048   Unallocated
002:  000:000   0000002048   0000206847   0000204800   Linux (0x83)
003:  000:001   0000206848   0000360447   0000153600   Linux Swap / Solaris x86 (0x82)
004:  000:002   0000360448   0000614399   0000253952   Linux (0x83)
flsでoffsetを指定してファイル一覧を取得してみます。
$ fls -o 2048 disk.flag.img
d/d 11: lost+found
r/r 12: ldlinux.sys
r/r 13: ldlinux.c32
r/r 15: config-virt
r/r 16: vmlinuz-virt
r/r 17: initramfs-virt
l/l 18: boot
r/r 20: libutil.c32
r/r 19: extlinux.conf
r/r 21: libcom32.c32
r/r 22: mboot.c32
r/r 23: menu.c32
r/r 14: System.map-virt
r/r 24: vesamenu.c32
V/V 25585:      $OrphanFiles
もう一つのパーティションも同様にチェック。
$ fls -o 360448 disk.flag.img
d/d 451:        home
d/d 11: lost+found
d/d 12: boot
d/d 1985:       etc
d/d 1986:       proc
d/d 1987:       dev
d/d 1988:       tmp
d/d 1989:       lib
d/d 1990:       var
d/d 3969:       usr
d/d 3970:       bin
d/d 1991:       sbin
d/d 1992:       media
d/d 1993:       mnt
d/d 1994:       opt
d/d 1995:       root
d/d 1996:       run
d/d 1997:       srv
d/d 1998:       sys
d/d 2358:       swap
V/V 31745:      $OrphanFiles
うーん、第一階層には怪しいファイルはなさそう。
問題のタイトルから、The Sleuth Kit (TSK) & Autopsy: Open Source Digital Forensics Toolsのページに行き着き、autopsyを使えば楽に解けそうだな、と当たりをつけました。
autopsyは、kali上には初期インストールされていて、
$ autopusy
とコマンドを打つとサービスが立ち上がり、webブラウザからアクセスできるようになります。
問題ファイルをimageとして読み込み、Mounting Point: /3/の3番目のパーティションを選択、FILE SYSTEMをクリックしてファイルシステムビューに移行。
その後、FILE ANALISYS タブをクリックし、ファイル検索に flag と入れると、怪しいファイルが出てきました。

2つ目のファイルに、一字とびでフラグが記載されていました!
Eavesdrop
Download this packet capture and find the flag.
pcapファイル capture.flag.pcap が配布されます。今度はファイルまるごと strings コマンドでは何も出てきませんでした。
wiresharkで開いてみると、全75通信。少ないので全部の通信を丁寧に見ていけそうです。
L12の通信で会話のようなものが見えたので、この通信を右クリック follow > TCP Stream として開いてみると
Hey, how do you decrypt this file again?
You're serious?
Yeah, I'm serious
*sigh* openssl des3 -d -salt -in file.des3 -out file.txt -k supersecretpassword123
Ok, great, thanks.
Let's use Discord next time, it's more secure.
C'mon, no one knows we use this program like this!
Whatever.
Hey.
Yeah?
Could you transfer the file to me again?
Oh great. Ok, over 9002?
Yeah, listening.
Sent it
Got it.
You're unbelievable
こんな内容のやり取りを見ることが出来ました。 file.des3 というのを手に入れればフラグが手に入りそう。9002のポートを使ったっぽいので、9002のポートを使った通信を上記と同様、右クリック > follow > TCP Stream で見てみます。HexDumpに表示を切り替えると、こんなデータが得られたので

これをCyberChefに貼り付けて From HexDump のレシピにして出来たOutputを file.des3 としてダウンロード、上記会話中のdecryptコマンドで復号してあげると file.txt が出てきました。
ここにflagが書いてありました👍
Operation Oni
Download this disk image, find the key and log into the remote machine.
Note: if you are using the webshell, download and extract the disk image into
/tmpnot your home directory.
- Remote machine: ssh -i key_file -p 51989 ctf-player@saturn.picoctf.net
緑のボタンをポチッとしてマシンをローンチすると、マシンのポート番号と接続用のコマンドを教えてもらえました。
配布されたdisk imageを、Sleuthkit Apprentice と同じようにautopsyを使って中身を見てみます。
/2/root/.ssh/ に id_ed25519, id_ed25519.pub を発見。ssh用の秘密鍵と公開鍵だ。これを使って接続したいのだけど、permissionとかを元のイメージに合わせる必要がありそうだったので、まるっとimageをマウントしました。まずは mmls でoffsetを調べます。
$ mmls disk.img
DOS Partition Table
Offset Sector: 0
Units are in 512-byte sectors

      Slot      Start        End          Length       Description
000:  Meta      0000000000   0000000000   0000000001   Primary Table (#0)
001:  -------   0000000000   0000002047   0000002048   Unallocated
002:  000:000   0000002048   0000206847   0000204800   Linux (0x83)
003:  000:001   0000206848   0000471039   0000264192   Linux (0x83)
この003をマウントするときに指定するoffsetは、512 * 206848 = 105906176。
$ sudo mount -o loop,offset=105906176 disk.img /mnt/tmp
これで /mnt/tmp/にimageがマウントできました。ここに入って、先程発見したkeyを使い、ssh接続を試してみます。
$ sudo su
# cd /mnt/tmp/root
# ssh -i .ssh/id_ed25519 -p 52184 ctf-player@saturn.picoctf.net
The authenticity of host '[saturn.picoctf.net]:52184 ([18.217.86.78]:52184)' can't be established.
ED25519 key fingerprint is SHA256:5gIm/EJ9bYnoH4qed83W5HXLfN1DO55849f6Lze0lx8.
This host key is known by the following other names/addresses:
    ~/.ssh/known_hosts:1: [hashed name]
    ~/.ssh/known_hosts:3: [hashed name]

...(omit)...

ctf-player@challenge:~$
接続できました!
ctf-player@challenge:~$ ls
flag.txt
ctf-player@challenge:~$ cat flag.txt
picoCTF{k3y_5l3u7h_75b85d71}
フラグゲット٩(๑❛ᴗ❛๑)尸
以下番外編
partition 2 の方の /etc/shadow に、rootのパスワードハッシュがあったので、これのクラックを試みます。
$ echo "$6$SZjns4Aspg4Zc0m6$SqXv68049cJwFNWFrJGadnoprNagNI2eHHlOVvIf5nSRrUS65do9IM9N204fLZ2ndetcwtg1A.EF86y8XhHKa/" > hash.txt
$ hashcat -m 1800 -a 0 hash.txt /usr/share/wordlists/rockyou.txt                                                       2 ⨯
hashcat (v6.1.1) starting...

OpenCL API (OpenCL 2.0 pocl 1.8  Linux, None+Asserts, RELOC, LLVM 9.0.1, SLEEF, DISTRO, POCL_DEBUG) - Platform #1 [The pocl project]
...(omit)...

$6$SZjns4Aspg4Zc0m6$SqXv68049cJwFNWFrJGadnoprNagNI2eHHlOVvIf5nSRrUS65do9IM9N204fLZ2ndetcwtg1A.EF86y8XhHKa/:password

Session..........: hashcat
Status...........: Cracked
...(omit)...
クラックに成功しました。やったね。※これ使わなかった。
Operation Orchid
Download this disk image and find the flag.
Note: if you are using the webshell, download and extract the disk image into
/tmpnot your home directory.
disk image が配布されます。
$ file disk.flag.img
disk.flag.img: DOS/MBR boot sector; partition 1 : ID=0x83, active, start-CHS (0x0,32,33), end-CHS (0xc,223,19), startsector 2048, 204800 sectors; partition 2 : ID=0x82, start-CHS (0xc,223,20), end-CHS (0x19,159,6), startsector 206848, 204800 sectors; partition 3 : ID=0x83, start-CHS (0x19,159,7), end-CHS (0x32,253,11), startsector 411648, 407552 sectors

$ mmls disk.flag.img
DOS Partition Table
Offset Sector: 0
Units are in 512-byte sectors

      Slot      Start        End          Length       Description
000:  Meta      0000000000   0000000000   0000000001   Primary Table (#0)
001:  -------   0000000000   0000002047   0000002048   Unallocated
002:  000:000   0000002048   0000206847   0000204800   Linux (0x83)
003:  000:001   0000206848   0000411647   0000204800   Linux Swap / Solaris x86 (0x82)
004:  000:002   0000411648   0000819199   0000407552   Linux (0x83)

$ fls -o 411648  disk.flag.img                                                                                         1 ⨯
d/d 460:        home
d/d 11: lost+found
d/d 12: boot
d/d 13: etc
d/d 81: proc
d/d 82: dev
d/d 83: tmp
d/d 84: lib
d/d 87: var
d/d 96: usr
d/d 106:        bin
d/d 120:        sbin
d/d 466:        media
d/d 470:        mnt
d/d 471:        opt
d/d 472:        root
d/d 473:        run
d/d 475:        srv
d/d 476:        sys
d/d 2041:       swap
V/V 51001:      $OrphanFiles
3つ目のpartitionが怪しいので、またautopsyで開いて解析してみます。
今度は /root/ に、 flag.txt(削除済) と flag.txt.enc があります。同じ階層の .ash_historyを見てみると、
touch flag.txt
nano flag.txt
apk get nano
apk --help
apk add nano
nano flag.txt
openssl
openssl aes256 -salt -in flag.txt -out flag.txt.enc -k unbreakablepassword1234567
shred -u flag.txt
ls -al
halt
という履歴が見えます。これで復号できそう。このイメージをマウントしてみます。offsetは、512 * 411648 = 210763776。
$ sudo mount -o loop,offset=210763776 disk.flag.img /mnt/tmp
Eavesdrop で出てきた復号コマンドがそのまま使えそうです。
$ sudo su
# openssl aes256 -d -salt -in flag.txt.enc -out flag.txt -k unbreakablepassword1234567
*** WARNING : deprecated key derivation used.
Using -iter or -pbkdf2 would be better.
bad decrypt
140571440010624:error:06065064:digital envelope routines:EVP_DecryptFinal_ex:bad decrypt:../crypto/evp/evp_enc.c:610:
何やら警告が出たけども、復号できてました。
# cat flag.txt
picoCTF{h4un71ng_p457_1d02081e}
SideChannel
There's something fishy about this PIN-code checker, can you figure out the PIN and get the flag?
Download the PIN checker program here pin_checker
Once you've figured out the PIN (and gotten the checker program to accept it), connect to the master server using
nc saturn.picoctf.net 50364and provide it the PIN to get your flag.
pin_checker という実行ファイルが配布されます。
$ file pin_checker
pin_checker: ELF 32-bit LSB executable, Intel 80386, version 1 (SYSV), dynamically linked, interpreter /lib/ld-linux.so.2, stripped
実行してみると
$ file pin_checker
pin_checker: ELF 32-bit LSB executable, Intel 80386, version 1 (SYSV), dynamically linked, interpreter /lib/ld-linux.so.2, stripped
タイトルからしてサイドチャネル攻撃のようなので、入力によって何かが変化するっぽい。出力と処理時間くらいしか計測できなさそうなので、試してみようか…とおもったけど、まずはバイナリを解析してみます。
$ r2 pin_checker                                                                                                       1 ⨯
[0x0804909c]> aaaa
[x] Analyze all flags starting with sym. and entry0 (aa)
[x] Analyze function calls (aac)
[x] Analyze len bytes of instructions for references (aar)
[x] Check for vtables
[x] Type matching analysis for all functions (aaft)
[x] Propagate noreturn information
[x] Use -AA or aaaa to perform additional experimental analysis.
[x] Finding function preludes
[x] Enable constraint types analysis for variables
[0x0804909c]> afl
0x0804909c    1 262140       entry0
0x08049080    1 6            sym.imp.sigaction
0x08049030    1 6            sym.imp.fgets
0x08049040    1 6            sym.imp.gettimeofday
0x08049060    1 6            sym.imp.strlen
0x08049070    1 6            sym.imp.__isoc99_sscanf
0x08049010    1 6            sym.imp.printf
0x08049050    1 6            sym.imp.exit
0x08049020    1 6            sym.imp.strcspn
[0x08049080]> s entry0
[0x0804909c]> pdf
Do you want to print 11725 lines? (y/N)
ひえー!!!!!そんなにたくさんの行見切れまへん!
ということで、体感としてはあまりわからなかったけど、きっとタイミング系のサイドチャネルが有効だと当たりをつけ、下記のスクリプトを作成。上の桁から正解の数を入力したときに処理時間が長くなることを期待しています。
import subprocess
import time

fix_pin = ""

def chall(p):
    try:
        res = subprocess.check_output('echo \"' + p + '\" | ./pin_checker', shell=True, stderr=subprocess.STDOUT)
    except Exception as e:
        print(e)

for n in range (8):
    t = [0] * 10
    for i in range(10):
        pin = fix_pin + str(i) + "0"*(7-n)
        time_sta = time.perf_counter()
        chall(pin)
        time_end = time.perf_counter()
        t[i] = time_end- time_sta
        print ("elapsed_time[" + str(n+1) + "-" + str(i) + "]: " + str(t[i]))
    fix_pin += str(t.index(max(t)))

print("pin: " + fix_pin)
実行結果
pin: 48353705
pin: 42576074
pin: 48390519
結果にばらつきが。何度か試すようにして精度を上げてみます。
import subprocess
import time

fix_pin = "4839051"

def chall(p):
    try:
        res = subprocess.check_output('echo \"' + p + '\" | ./pin_checker', shell=True, stderr=subprocess.STDOUT)
    except Exception as e:
        print(e)

for n in range(7,8):
    t = [0] * 10
    for m in range (5):
        for i in range(10):
            pin = fix_pin + str(i) + "0"*(7-n)
            time_sta = time.perf_counter()
            chall(pin)
            time_end = time.perf_counter()
            t[i] += time_end- time_sta
            print ("elapsed_time[" + str(n+1) + "-" + str(i) + "]: " + str(t[i]))
    fix_pin += str(t.index(max(t)))

print("pin: " + fix_pin)
実行結果
pin: 48390557
pin: 48390516
pin: 48390518
外れ値を外すようなプログラムをすればもっと精度が上がりそうだけど、最後の方は総当りをしたほうが早そうなので、最後の一桁は手動でpin_checkerを実行してみて当てました。
$ nc saturn.picoctf.net 50364
Verifying that you are a human...
Please enter the master PIN code:
48390513
Password correct. Here's your flag:
picoCTF{t1m1ng_4tt4ck_914c5ec3}
Torrent Analyze
SOS, someone is torrenting on our network. One of your colleagues has been using torrent to download some files on the company’s network. Can you identify the file(s) that were downloaded? The file name will be the flag, like
picoCTF{filename}.
パケットキャプチャファイル、torrent.pcapが配布されます。
今回はなんと58118行。約6万行。全部のパケットを見るのは大変。
タイトルと問題文から、BitTorrentの通信に関する問題っぽいと予測します。
が、WireSharkで開いてみたものの、よくわからない。filterにBitTorrentで使えそうなやつを入れても何も出てこないので、Hintを見てみます。
You may want to enable BitTorrent protocol (BT-DHT, etc.) on Wireshark. Analyze -> Enabled Protocols
お、重要情報。これをやっておくと BitTorrentが解析できるようになるみたい。早速やっておきます。
Try to understand peers, leechers and seeds. Article
BitTorrent, peerについてはこの記事を読んでおくと良さそう。
The file name ends with
.iso
これも重要情報。
BitTorrent のport情報は BitTorrent の情報より、tcpまたはudpの 6881-6889。tcpでfilterするとうまくかからなかったので、udpで下記のようにwireshark上でfilterしてみます。
(udp.dstport >= 6881 and udp.dstport <= 6889)

沢山通信が見えますが、今見えているあたりに何度も通信して大きなファイルをやり取りしてそうな通信が見えます。srcのipが 192.168.73.132 だったので、今度はこのipからの通信に絞ってみてみます。
ip.src == 192.168.73.132

以下、何を血迷ったかパケットの中身を全部見てやる!と思って鍵の抽出に取り組みだします。Crypto問じゃないから違くね?と思って帰ってくるまでの迷走の軌跡…
通信の最初の方を見てみると、鍵交換の形跡が見えます。Client Helloしている相手との通信を見るために、 の通信を右クリック -> Conversation Filter > TCP でフィルタを掛けてみます。さきほどのClient Helloに対するServer Helloの通信も出てきました。 WireSharkでの鍵交換パケットからの鍵抜き出しについては SECCON 2017 online CTF の Very smooth でやったことがあったので、これを見ながら思い出します。 基本的には ここを参照すると良さそう。 今回は2つcertificateのデータが有ったので、1つ目を ちゃんと抽出できてそうです。 良い感じ。でも通信の中身を見るには、秘密鍵が必要。 行き詰まって他の手段を考え始めました。を、ここに折りたたんでおきます。解法には全く関係ないです。
18 3.416210367 192.168.73.132 91.189.95.21 TLSv1.2 571 Client Hello

メモを残しておくと、L20の通信でSecure Socket Layer > TLSv1.2 Record Layer: Handshake Protocol: Certificate > Handshake Protocol: Certificate > Certificatesserver.ca, 2つ目を signing.ca として 右クリック > Export selected packet bytes... で保存しました。
server.caのほうを確認してみると$ openssl x509 -inform der -in server.ca.bin -text
Certificate:
Data:
Version: 3 (0x2)
Serial Number:
03:30:1f:f3:b7:0c:7f:70:b1:2c:d8:93:af:27:0f:39:b0:69
Signature Algorithm: sha256WithRSAEncryption
Issuer: C=US, O=Let's Encrypt, CN=Let's Encrypt Authority X3
Validity
Not Before: Jan 2 18:03:42 2020 GMT
Not After : Apr 1 18:03:42 2020 GMT
Subject: CN=torrent.ubuntu.com
Subject Public Key Info:
Public Key Algorithm: rsaEncryption
Public-Key: (2048 bit)
Modulus:
00:c3:53:e7:4a:47:a2:78:18:26:b7:1d:32:d7:57:
05:87:6e:e0:0d:4f:cc:fa:80:a0:36:4b:85:8e:b9:
f6:66:0b:bc:7b:be:2d:93:b5:cb:4f:7d:58:49:d5:
96:09:21:b5:83:18:f7:12:7d:b1:18:c9:fc:0e:5f:
e3:f4:8f:31:ef:a6:20:7c:c6:df:9d:4c:1f:78:18:
3c:38:cb:26:99:5c:63:64:a1:f6:4f:18:9f:e8:48:
56:39:45:92:53:86:49:b4:c0:10:98:2b:8c:b7:e3:
2d:62:e9:77:fb:dc:c8:d7:66:67:a4:de:31:fb:ba:
2a:25:a4:e9:4c:1a:10:16:c8:c6:1a:c6:1e:e5:6a:
55:d6:ae:98:f5:5a:c8:5a:07:77:5c:36:f1:6b:fc:
44:88:96:4a:2e:3c:78:8d:87:0b:84:24:99:3d:36:
dd:81:5f:51:a7:a8:a5:ef:b0:13:d4:a2:6d:49:c9:
33:fa:41:6a:0a:27:15:e7:a9:9c:bb:7d:4c:81:e0:
ac:9d:f9:b1:df:4c:7c:4f:69:f0:93:d3:b5:4b:de:
10:ab:03:ea:8c:58:42:eb:e1:58:f3:4d:9a:9e:ea:
dd:2f:07:1d:b7:19:e9:ee:67:ae:2e:9b:b5:3c:57:
9d:a7:38:e4:1c:21:45:91:11:69:f0:38:05:6c:7e:
41:8d
Exponent: 65537 (0x10001)
X509v3 extensions:
X509v3 Key Usage: critical
Digital Signature, Key Encipherment
X509v3 Extended Key Usage:
TLS Web Server Authentication, TLS Web Client Authentication
X509v3 Basic Constraints: critical
CA:FALSE
X509v3 Subject Key Identifier:
AF:F9:36:D6:65:4A:97:A9:FB:AD:D3:2F:BC:F4:58:AC:63:24:04:39
X509v3 Authority Key Identifier:
keyid:A8:4A:6A:63:04:7D:DD:BA:E6:D1:39:B7:A6:45:65:EF:F3:A8:EC:A1
Authority Information Access:
OCSP - URI:http://ocsp.int-x3.letsencrypt.org
CA Issuers - URI:http://cert.int-x3.letsencrypt.org/
X509v3 Subject Alternative Name:
DNS:bittorrent.ubuntu.com, DNS:ipv6.bittorrent.ubuntu.com, DNS:ipv6.torrent.ubuntu.com, DNS:torrent.ubuntu.com
X509v3 Certificate Policies:
Policy: 2.23.140.1.2.1
Policy: 1.3.6.1.4.1.44947.1.1.1
CPS: http://cps.letsencrypt.org
1.3.6.1.4.1.11129.2.4.2:
......t....Y....@.-/....K..G....4......s...og.[7.....E0C. _..9#.]...S....)..*6.A.&......Ao....Ye..A.f.....AMQ...u...\..}h.....#....W|W..j..a:.i......og.[\.....F0D. .|..).c.Xr;D.."k,.....c........5. ;'...|6.tr...q!.<.c.,....2.o.#U{
Signature Algorithm: sha256WithRSAEncryption
2b:0b:37:d2:3f:6d:af:bc:f3:a2:99:a4:85:e9:2d:20:5a:39:
fe:cd:aa:63:9f:d1:ce:d8:03:b9:d9:e7:d5:08:55:d0:5a:9e:
82:ef:a2:9a:d9:dc:bb:f9:ff:10:30:ed:4d:d5:ff:49:25:f5:
77:60:20:c2:bd:52:1d:c7:01:ab:35:68:01:a5:a2:1c:83:85:
28:56:f4:fb:95:77:ef:a8:87:29:56:0b:b6:65:53:4a:a2:43:
43:e3:f9:e4:7b:6a:0e:5d:25:87:44:15:40:26:d0:c7:f7:1e:
a7:d6:df:3f:f8:16:21:01:29:8d:e9:48:36:4a:f6:a2:d3:92:
f3:fd:ef:06:36:5d:a6:d3:45:5b:11:94:91:b1:98:34:2e:52:
10:58:c6:6f:29:8f:bc:2c:41:86:82:bb:54:51:f6:b9:c4:da:
f7:8e:60:cf:f2:6e:7a:db:a5:4c:63:35:86:38:a8:4d:b3:2e:
26:37:9f:dd:1d:7a:5d:5b:0f:03:70:72:e5:48:a6:ca:b9:a2:
71:7b:43:78:87:16:67:84:15:07:9c:9f:98:0f:ee:a2:4b:6e:
82:da:8d:05:12:6e:b8:f2:d0:23:81:4b:4b:06:ea:32:30:8e:
73:5d:cc:b1:cf:98:2c:a7:52:92:a3:4b:ea:b0:0c:4e:68:86:
2b:7f:5c:fe
-----BEGIN CERTIFICATE-----
MIIFpTCCBI2gAwIBAgISAzAf87cMf3CxLNiTrycPObBpMA0GCSqGSIb3DQEBCwUA
MEoxCzAJBgNVBAYTAlVTMRYwFAYDVQQKEw1MZXQncyBFbmNyeXB0MSMwIQYDVQQD
ExpMZXQncyBFbmNyeXB0IEF1dGhvcml0eSBYMzAeFw0yMDAxMDIxODAzNDJaFw0y
MDA0MDExODAzNDJaMB0xGzAZBgNVBAMTEnRvcnJlbnQudWJ1bnR1LmNvbTCCASIw
DQYJKoZIhvcNAQEBBQADggEPADCCAQoCggEBAMNT50pHongYJrcdMtdXBYdu4A1P
zPqAoDZLhY659mYLvHu+LZO1y099WEnVlgkhtYMY9xJ9sRjJ/A5f4/SPMe+mIHzG
351MH3gYPDjLJplcY2Sh9k8Yn+hIVjlFklOGSbTAEJgrjLfjLWLpd/vcyNdmZ6Te
Mfu6KiWk6UwaEBbIxhrGHuVqVdaumPVayFoHd1w28Wv8RIiWSi48eI2HC4QkmT02
3YFfUaeope+wE9SibUnJM/pBagonFeepnLt9TIHgrJ35sd9MfE9p8JPTtUveEKsD
6oxYQuvhWPNNmp7q3S8HHbcZ6e5nri6btTxXnac45BwhRZERafA4BWx+QY0CAwEA
AaOCArAwggKsMA4GA1UdDwEB/wQEAwIFoDAdBgNVHSUEFjAUBggrBgEFBQcDAQYI
KwYBBQUHAwIwDAYDVR0TAQH/BAIwADAdBgNVHQ4EFgQUr/k21mVKl6n7rdMvvPRY
rGMkBDkwHwYDVR0jBBgwFoAUqEpqYwR93brm0Tm3pkVl7/Oo7KEwbwYIKwYBBQUH
AQEEYzBhMC4GCCsGAQUFBzABhiJodHRwOi8vb2NzcC5pbnQteDMubGV0c2VuY3J5
cHQub3JnMC8GCCsGAQUFBzAChiNodHRwOi8vY2VydC5pbnQteDMubGV0c2VuY3J5
cHQub3JnLzBpBgNVHREEYjBgghViaXR0b3JyZW50LnVidW50dS5jb22CGmlwdjYu
Yml0dG9ycmVudC51YnVudHUuY29tghdpcHY2LnRvcnJlbnQudWJ1bnR1LmNvbYIS
dG9ycmVudC51YnVudHUuY29tMEwGA1UdIARFMEMwCAYGZ4EMAQIBMDcGCysGAQQB
gt8TAQEBMCgwJgYIKwYBBQUHAgEWGmh0dHA6Ly9jcHMubGV0c2VuY3J5cHQub3Jn
MIIBAQYKKwYBBAHWeQIEAgSB8gSB7wDtAHQA8JWkWfIA0YJAEC0vk4iOrUv+HUfj
meHQNKawqKqOsnMAAAFvZ6RbNwAABAMARTBDAiBfgcI5I8VdBdGdU8Op1ggpx7Yq
NudBhSa7+rrk36FBbwIfH7lZZVPqiNyFOuJDFlA4DYh/QYpmyK7CBbFBTVG7vAB1
AAe3XBvlfWj/8bDGHSMVx7rmV3xXlLdq7rxhOhpp06IcAAABb2ekW1wAAAQDAEYw
RAIgFXyotSkLYxlYcjtE/7Uiayypx66WHGO5w433hgDOkDUCIDsn8/X4fDaadHIZ
ndhxIec8D2OnLNetnvwysW8SI1V7MA0GCSqGSIb3DQEBCwUAA4IBAQArCzfSP22v
vPOimaSF6S0gWjn+zapjn9HO2AO52efVCFXQWp6C76Ka2dy7+f8QMO1N1f9JJfV3
YCDCvVIdxwGrNWgBpaIcg4UoVvT7lXfvqIcpVgu2ZVNKokND4/nke2oOXSWHRBVA
JtDH9x6n1t8/+BYhASmN6Ug2Svai05Lz/e8GNl2m00VbEZSRsZg0LlIQWMZvKY+8
LEGGgrtUUfa5xNr3jmDP8m5626VMYzWGOKhNsy4mN5/dHXpdWw8DcHLlSKbKuaJx
e0N4hxZnhBUHnJ+YD+6iS26C2o0FEm648tAjgUtLBuoyMI5zXcyxz5gsp1KSo0vq
sAxOaIYrf1z+
-----END CERTIFICATE-----
この証明書から公開鍵を抜き出してみます。$ openssl x509 -in server.ca.bin -inform der -pubkey > server.pub
$ cat server.pub
-----BEGIN PUBLIC KEY-----
MIIBIjANBgkqhkiG9w0BAQEFAAOCAQ8AMIIBCgKCAQEAw1PnSkeieBgmtx0y11cF
h27gDU/M+oCgNkuFjrn2Zgu8e74tk7XLT31YSdWWCSG1gxj3En2xGMn8Dl/j9I8x
76YgfMbfnUwfeBg8OMsmmVxjZKH2Txif6EhWOUWSU4ZJtMAQmCuMt+MtYul3+9zI
12ZnpN4x+7oqJaTpTBoQFsjGGsYe5WpV1q6Y9VrIWgd3XDbxa/xEiJZKLjx4jYcL
hCSZPTbdgV9Rp6il77AT1KJtSckz+kFqCicV56mcu31MgeCsnfmx30x8T2nwk9O1
S94QqwPqjFhC6+FY802anurdLwcdtxnp7meuLpu1PFedpzjkHCFFkRFp8DgFbH5B
jQIDAQAB
-----END PUBLIC KEY-----
-----BEGIN CERTIFICATE-----
MIIFpTCCBI2gAwIBAgISAzAf87cMf3CxLNiTrycPObBpMA0GCSqGSIb3DQEBCwUA
MEoxCzAJBgNVBAYTAlVTMRYwFAYDVQQKEw1MZXQncyBFbmNyeXB0MSMwIQYDVQQD
ExpMZXQncyBFbmNyeXB0IEF1dGhvcml0eSBYMzAeFw0yMDAxMDIxODAzNDJaFw0y
MDA0MDExODAzNDJaMB0xGzAZBgNVBAMTEnRvcnJlbnQudWJ1bnR1LmNvbTCCASIw
DQYJKoZIhvcNAQEBBQADggEPADCCAQoCggEBAMNT50pHongYJrcdMtdXBYdu4A1P
zPqAoDZLhY659mYLvHu+LZO1y099WEnVlgkhtYMY9xJ9sRjJ/A5f4/SPMe+mIHzG
351MH3gYPDjLJplcY2Sh9k8Yn+hIVjlFklOGSbTAEJgrjLfjLWLpd/vcyNdmZ6Te
Mfu6KiWk6UwaEBbIxhrGHuVqVdaumPVayFoHd1w28Wv8RIiWSi48eI2HC4QkmT02
3YFfUaeope+wE9SibUnJM/pBagonFeepnLt9TIHgrJ35sd9MfE9p8JPTtUveEKsD
6oxYQuvhWPNNmp7q3S8HHbcZ6e5nri6btTxXnac45BwhRZERafA4BWx+QY0CAwEA
AaOCArAwggKsMA4GA1UdDwEB/wQEAwIFoDAdBgNVHSUEFjAUBggrBgEFBQcDAQYI
KwYBBQUHAwIwDAYDVR0TAQH/BAIwADAdBgNVHQ4EFgQUr/k21mVKl6n7rdMvvPRY
rGMkBDkwHwYDVR0jBBgwFoAUqEpqYwR93brm0Tm3pkVl7/Oo7KEwbwYIKwYBBQUH
AQEEYzBhMC4GCCsGAQUFBzABhiJodHRwOi8vb2NzcC5pbnQteDMubGV0c2VuY3J5
cHQub3JnMC8GCCsGAQUFBzAChiNodHRwOi8vY2VydC5pbnQteDMubGV0c2VuY3J5
cHQub3JnLzBpBgNVHREEYjBgghViaXR0b3JyZW50LnVidW50dS5jb22CGmlwdjYu
Yml0dG9ycmVudC51YnVudHUuY29tghdpcHY2LnRvcnJlbnQudWJ1bnR1LmNvbYIS
dG9ycmVudC51YnVudHUuY29tMEwGA1UdIARFMEMwCAYGZ4EMAQIBMDcGCysGAQQB
gt8TAQEBMCgwJgYIKwYBBQUHAgEWGmh0dHA6Ly9jcHMubGV0c2VuY3J5cHQub3Jn
MIIBAQYKKwYBBAHWeQIEAgSB8gSB7wDtAHQA8JWkWfIA0YJAEC0vk4iOrUv+HUfj
meHQNKawqKqOsnMAAAFvZ6RbNwAABAMARTBDAiBfgcI5I8VdBdGdU8Op1ggpx7Yq
NudBhSa7+rrk36FBbwIfH7lZZVPqiNyFOuJDFlA4DYh/QYpmyK7CBbFBTVG7vAB1
AAe3XBvlfWj/8bDGHSMVx7rmV3xXlLdq7rxhOhpp06IcAAABb2ekW1wAAAQDAEYw
RAIgFXyotSkLYxlYcjtE/7Uiayypx66WHGO5w433hgDOkDUCIDsn8/X4fDaadHIZ
ndhxIec8D2OnLNetnvwysW8SI1V7MA0GCSqGSIb3DQEBCwUAA4IBAQArCzfSP22v
vPOimaSF6S0gWjn+zapjn9HO2AO52efVCFXQWp6C76Ka2dy7+f8QMO1N1f9JJfV3
YCDCvVIdxwGrNWgBpaIcg4UoVvT7lXfvqIcpVgu2ZVNKokND4/nke2oOXSWHRBVA
JtDH9x6n1t8/+BYhASmN6Ug2Svai05Lz/e8GNl2m00VbEZSRsZg0LlIQWMZvKY+8
LEGGgrtUUfa5xNr3jmDP8m5626VMYzWGOKhNsy4mN5/dHXpdWw8DcHLlSKbKuaJx
e0N4hxZnhBUHnJ+YD+6iS26C2o0FEm648tAjgUtLBuoyMI5zXcyxz5gsp1KSo0vq
sAxOaIYrf1z+
-----END CERTIFICATE-----
msieveで因数分解しようにも、桁が大きすぎてできず。
そういえば、DNSクエリのところに torrent.ubuntu.com とか ipv6.torrent.ubuntu.com というのを見かけたので、サイトがないかアクセスしてみます。

お、ubuntu系のimageのリストが置いてあります!imageの拡張子は.isoなので、ここにあるリストのやつを片っ端から入れれば通る?
と思ったけど数が多すぎるので最終手段に残しておくことにします。上の Tracker index のリンクを踏むと

こんなテーブルが。info hash, torrent name, size, ... といった情報が書かれています。この info hashについては、下の方にこんな説明が。
info hash: SHA1 hash of the "info" section of the metainfo (*.torrent)
ふむふむ。info hash というののがあるらしい。
ここで再度wiresharkに戻ってみます。BitTorrent解析の記事やwriteupをいくつか見てみましたが、そもそもwiresharkで bittorrent とフィルタに入れたのに何も出てこないのはどうしたことか。bittorrent.info_hashでハッシュ検索しようにも、bittorrentで何も出てこないのでもちろん何も出てこない。
何か設定が足りていないのか?と思って、ヒントの Analize > Enable Protocols の項目を再度見てみます。
検索窓に bit と入れてみると、こんな感じ。

なーんかこの BT-DHT ってやつとっても怪しい。さっきもUDPしかヒットしなかったし、BT-DHTとその下の bittorrent_dht_udpをポチッと有効にしてみました。
設定画面から戻って、filterに bt-dht と入れてみると、該当する通信が沢山!
後は Edit > Find Packet で検索窓を出し、 スコープを Packet details に設定、種別を String にし、 hash で検索をかけてみると、なんということでしょう。
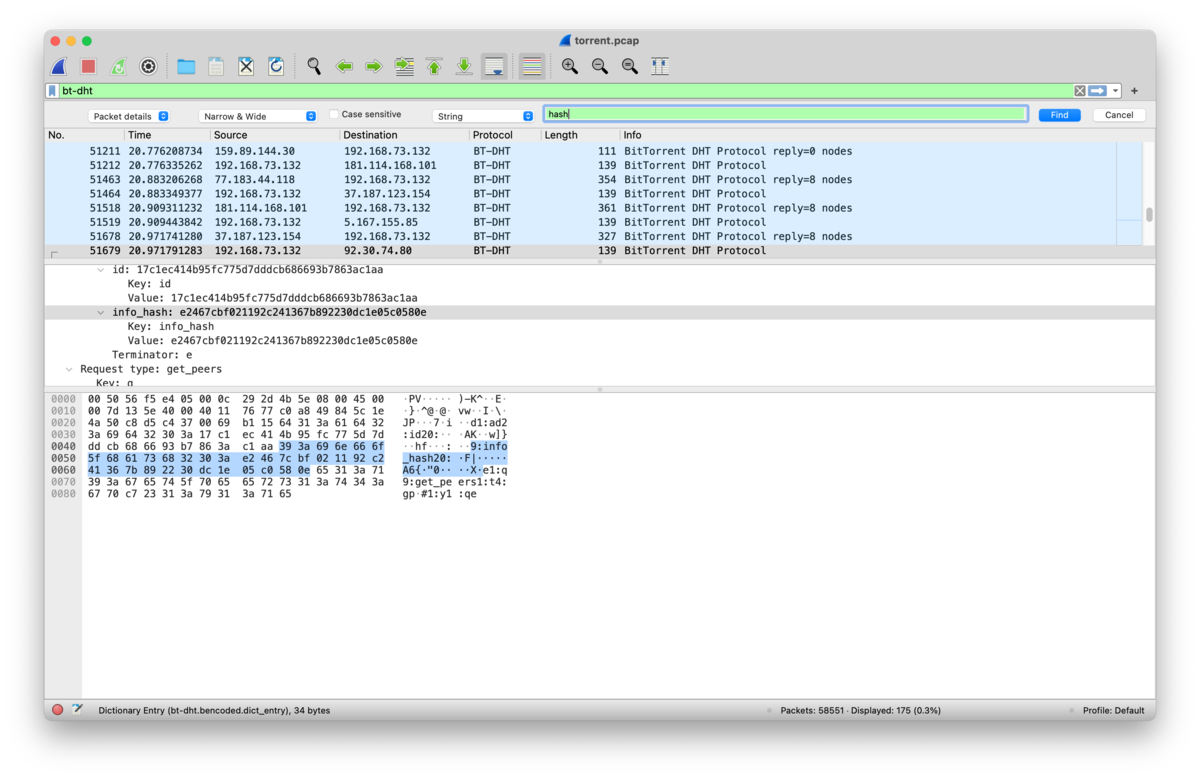
info_hash というキーが設定されたパケットがいくつか出てきます!
先程のubuntu系imageのリストにこのハッシュがあるのかと思いましたが、そうではないようで。
出てきたInfoHashをGoogle検索していくといくつかヒット。No, 51679 に書いてあったHashが ubuntu image っぽい。このimage名がflagでした!